Using trajectory list boxes
Trajectory list box allows you to lay out content along a trajectory and browse the content by clicking and dragging the objects in the trajectory list box.
The size of the trajectory defines the interactive area for click and drag gestures. If the trajectory is too small, users cannot select some of the items in the trajectory list box. To avoid this, make sure the trajectory is large enough. See Using circle trajectories, Using line trajectories, and Using spline trajectories.
Users select objects in a trajectory list box by clicking or tapping the object.
Note that list box items are not children of a list box, even though in Kanzi Studio it seems so when you add items to a list box. Because list box items are not children of a list box, you cannot refer to these items from outside of a list box using paths or aliases. If you need to refer from a list box item to an object outside of a list box, use bindings and aliases. See Binding to properties outside of a list box.
Trajectory list box is an interactive version of a trajectory layout. See Using trajectory layouts.
Creating a trajectory list box
To create a list box:
- In the Project right-click the scene where you want to create a trajectory list box and select Create > Trajectory List Box.
In the Preview enter the Debug mode, if you want to see the trajectory.
- Add objects to the trajectory list box.
As you add objects, Kanzi Studio positions them along the trajectory. To browse the content, click and drag the objects in the trajectory list box.
For example, in the Project right-click the trajectory list box and select Create > Box.
- In the Library create a new trajectory, or select the trajectory of your trajectory list box and set its properties.
You can use either circle, line, or spline trajectories. See Using circle trajectories, Using line trajectories, and Using spline trajectories.
Showing a trajectory list box as a 2D object
To show a trajectory list box as a 2D object:
- Create a trajectory list box and add objects to it. See Showing a trajectory list box as a 2D object.
-
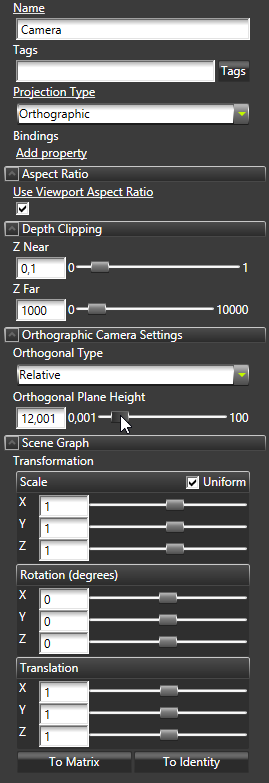
In the Project select the camera you use to view the list box and in the Properties set properties:
- Projection Type to Orthographic
- Transformation property attributes:
- All Scale attributes to 1
- All Rotation attributes to 0
- All Translation attributes to 1
- Adjust the Orthogonal Plane Height property to set the distance between the list box and the camera.
Binding to properties outside of a list box
Use an alias to bind a list box item property to a property of an object outside of the list box.
For example, if you have a Grid List Box or a Trajectory List Box with a Text Block item and want to set the Text property value of the Text Block to a value of an Empty Node property that is not in the list box:
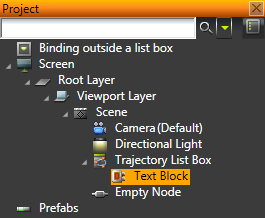
- Create an alias for the Empty Node. See Using aliases.
- In the Text Block create a binding to the Empty Node using the alias you created in the previous step. See Reference for bindings expressions.
For example, use a binding expression {#Empty Node/TextBlock.Text}.
The Text property in the Text Block gets the value of the Text property in the Empty Node.
Trajectory list box example
This example shows the use of a trajectory list box UI component for creating an interactive scrollable collection of objects. The example implements a simple gallery of photos with a selection effect using an animation.
The list box with its circular trajectory and content are created in the Kanzi Studio project, as well as animation data that highlights the centered photo by scaling it up and bringing it to the front. The application logic that launches the animation – forward for highlighting and reverse for returning the object to its original position, relative to the trajectory – is implemented in the program code. The point of time at which a highlight-animation is launched is defined based on the scroll speed and focused item data available from the user input events that the trajectory list box component produces.
The trajectory list box in this example uses the following features:
- Scroll axis. The scroll axis for the trajectory is set to X, but you can set any vector for a list box object. The trajectory defines the scroll path.
- Looping. The objects in the list box can be clamped to the defined trajectory start and end or to transition between the start and end positions as in this example with the Loop Along X property.
- Trajectory. To use a trajectory for the list box, you need to create it in the Library > Trajectories. You can create circle and line trajectories in Kanzi Studio. To use a spline trajectory, create a spline in a third-party tool, import it, and add the spline as a Spline Trajectory. See Using circle trajectories, Using line trajectories, and Using spline trajectories.
You can customize the trajectory by adding and setting trajectory properties such as Proportional Clip Start Offset, Proportional Clip End Offset, Proportional Selector Offset, and Fixed Distance.
- Selection and focus behavior. Selection and focus events are handled separately. The Item focused event is generated at the moment the user releases the pointer. It contains the information on the item that is brought to the center with the current trajectory movement. The selection message is generated when a user selects an item by clicking or tapping it. You can select the Bring to center selection behavior in Kanzi Studio.
You can define more actions for the focus and selection events for any member of the trajectory list box, or even the trajectory list box component itself, by setting invoked actions for List Box: Item Focused or List Box: Item Selected events. The slightly more complex highlighting effect is generated from a combined processing of scroll speed and item focus information in the program code.
You can find the example in <KanziWorkspace>/Examples/Trajectory_list_box.
See also
Using grid list boxes
Using trajectory layouts
Using circle trajectories
Using line trajectories
Using spline trajectories
Using bindings
Open topic with navigation