Best practices
Use these guidelines to find the correct Stereoscopy plugin settings for stereoscopic content in your Kanzi application.
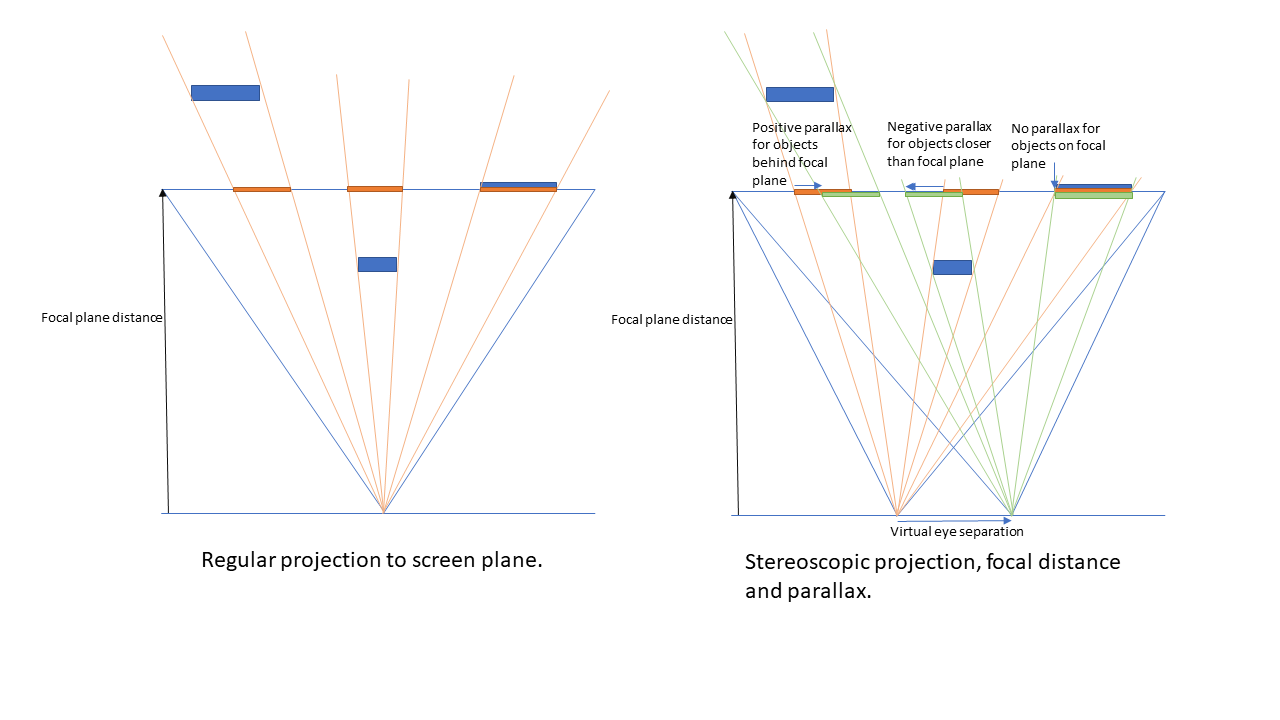
Understanding and setting up the eye separation
The eye separation leads to seeing the same object in different locations on the screen. This separation on the screen is called the parallax. Too large parallax strains the eyes or makes it impossible for the viewer to see the content in focus.
The focal distance defines at which distance the objects seem to be on the plane of the screen. The objects at the focal distance have no parallax. When the distance between objects and the camera is smaller than the focal distance, they have unlimited parallax, which causes focusing problems.
In the Stereoscopy plugin the virtual eye separation is the separation of eyes in 3d space units in Kanzi. You define the virtual eye separation with the Eye Separation property in a Camera node. It causes different parallax on the screen for different fields-of-view, focal distances, and screen sizes. However, you can calculate the maximum acceptable virtual eye separation and adjust it to get the result you need.
Natural eye separation
Natural eye separation results in stereoscopic effect where far away objects really look like they are far away. For example, just as the stars seem to be when looking at the sky. While the objects close to the focal plane look “holographic”. The depth and parallax behave in the same way as with physical objects.
The maximum acceptable parallax for far away objects equals the distance of pupils, which means on average 6 cm separation on the screen. This is because in the physical world the eyes either cross a bit when focusing on close-by objects, or are parallel for really far away objects, but there is no need in physical situations for the focus of the eyes to diverge.
To accommodate the widest range of audiences, limit the maximum physical parallax to 4 cm. If you provide users the control to adjust the amount of stereoscopic separation, you can use a higher value.
Physical parallax depends on the size of the screen. For a larger screen the same parallax on focal plane translates to a larger physical distance. This must not exceed the distance of pupils of the viewer.
If the ratio of the virtual eye separation and the focal distance are the same, the physical parallax for close and far items relative to the focal plane stays the same. The field-of-view has an effect on the physical parallax. Lower field-of-view results in the same parallax being larger on the screen. This is taken into account in the calculation of the desired eye separation.
To calculate the natural virtual eye separation, based on the maximum physical parallax and other variables use this equation:
Use this approach selectively, because you can quickly end up with results that are not good.
When using this equation consider that:
People have heads of different shapes and sizes. This means that the absolute calculation for an average value can return results that are not suitable for some viewers, unless being conservative, which leads to the next option.
For the viewer with a large eye separation, occlusion becomes a problem. You cannot add details to anything that gets occluded, because the brain gets frustrated when seeing the content with only one eye. To avoid the issues with occlusion, keep the parallax relatively low.
Anything larger or close to this maximum value becomes distracting.
This mode is hard to work with as visible objects on the screen take “real” space in depth. Imagine stuffing objects in a box that is in the place of the screen. You run out of space before you include all the content, or different objects start to overlap in depth.
Creating pleasing stereoscopic result
To create pleasing stereoscopic result, multiply the value you calculated with the equation for the natural eye separation by something significantly less than one. For example, 0.2. This way you bring the infinite distance closer to the viewer.
Keep in mind that the far away background on the screen does not have to seem to be as far as the sky is outside of the car.
For example, when creators of stereoscopic 3d movies want to create a pleasing stereoscopic result, they use this approach. Using this approach, the stereoscopic effect looks good on really large and small screens alike, even though on small screens this results in a really low eye separation. If the eye separation was large the movies would be impossible to watch on a large screen, because the physical parallax would get larger than the distance between the eyes.
As the range of eye separations that produces a pleasing stereoscopic result is large, you can use it as a starting point for a ratio based on the focal distance. For example, you can get a pleasing result easily by calculating the eye separation using this equation
You can calculate the eye separation which creates a pleasing using this equation
Natural perspective
Natural perspective is different from the natural eye separation, because natural perspective does not have physical limitations that restrict the use of different values. However, you can calculate the natural field-of-view, which corresponds to the same perspective as there would be through a window in place of the screen. To calculate the natural field-of-view on the x axis use this equation
Increasing this value results in a more visible perspective on objects on the sides.
Position of camera and objects
Face an axis going through origin, set the focal distance to the same distance that the camera has on that axis. This aligns the focal plane with useful coordinates in 3d. Place most of the content behind the focal plane. For example, negative z coordinate corresponds to being behind the focal plane, and positive to the object being closer than the focal plane. This way you know where the virtual surface of the screen is and can place objects based on that. Keep in mind that the width of the virtual screen is defined by the focal distance and the field-of-view.
Objects closer than the camera side of the focal plane appear to stick out from the screen, which is usually distracting. Use this effect carefully, because it causes a change that is larger than it is comfortable for the eye separation.
Tip
In Kanzi you can use bindings to control the relation between the focal distance and the field-of-view.
Tip
If you have multiple sets of objects that you want to composite in one view in a content render pass, you can have the cameras and content in a row side by side. For example, gauges with different perspective than other content, a car with a special camera, background, and foreground. You can also use Tag Filter resources to render only the content you want to render.
Stereoscopic content and blending
When using alpha with stereoscopic content, keep in mind that:
Showing alpha content through a stereoscopic Viewport node is not recommended, because the result on a 3d display is not well defined.
Some display modes allow for alpha blending in some specific cases. These modes are:
Interlace without mask
Side-by-side modes
With these modes blending with the background content using the same mode can produce useful results.
If there is anything other than the content with the same stereoscopy mode, the result is not well defined and is different with different modes.
Avoid blending with 2d content. 2d content is at the same depth with the focal plane, which is why the result does not look correct unless your content is always closer than 2d content, which is not usually the case. For this reason, when you blend with 2d content, the 2d content appears to be closer than the 3d content.
Tip
To have a far away background, use a render pass that renders a far away plane attached to the camera and uses it as a texture. Brushes do not have the required depth.
Tip
For the transparency to work, set all property fields in the Clear Color property in the content render pass to 0. Make sure that the Blend Mode property for the stereoscopic material is set to Automatic.
Orthographic camera
Parallax with an orthographic camera is unlimited. You cannot easily stay within the safe limits using orthographic camera. Use perspective camera instead.
Center of projection
If you want to center the projection to anything other than the center of the screen, use a different Viewport node for that content. Then use for that content a different Viewport node with the Pipeline State Render Pass render pass or a render pass you define.