Creating custom emission and simulation
You can create custom emission and simulation behavior by using Particle Custom Emitter and Particle Custom Affector nodes.
These nodes provide support to run customizable compute shaders and unlock a wide range of functionality that would otherwise be impossible to achieve. For example, you can create custom “Grid Emitter”, “Circle Emitter”, “Vortex Affector”, “Flow Sphere Affector”, different types of colliders, etc.
Setting up a project
Before you can customize emission and simulation, you must set up your Kanzi Studio project to support compute shaders and import the necessary material type templates.
To set up a project for custom emission and simulation:
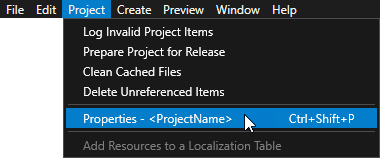
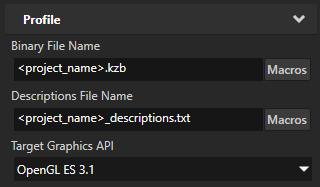
In the Kanzi Studio main menu, select Project > Properties. In the Properties, set the Target Graphics API property to OpenGL ES 3.1.
You must use OpenGL ES 3.1 or higher to enable compute shaders in a Kanzi Studio project.
In the Assets Packages, expand the ParticleSystemSetup section, right-click the Render Pass - Default Particles prefab, and select Import Asset Package.
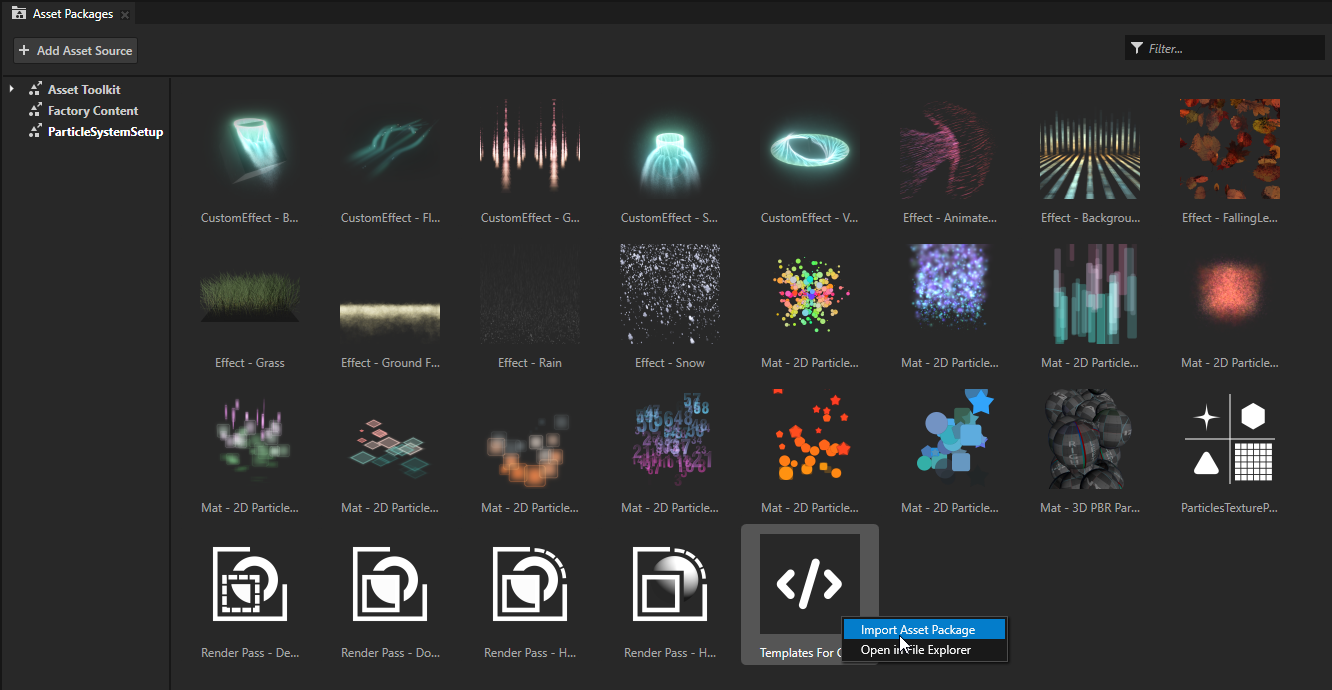
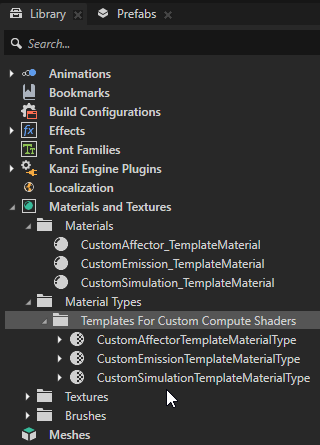
This imports the following material type templates that include compute shaders:
CustomEmissionTemplateMaterialType
CustomSimulationTemplateMaterialType
CustomAffectorTemplateMaterialType
Creating custom emission and simulation behavior with Custom Emitter
You can create custom emission and simulation behavior to enable features and effects that are not available with the built-in emitters.
To create a custom emission and simulation:
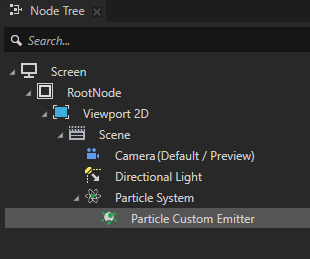
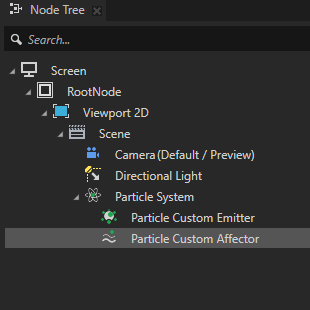
In the Node Tree, in the Scene node create a Particle System node, and in that node create a Particle Custom Emitter node.
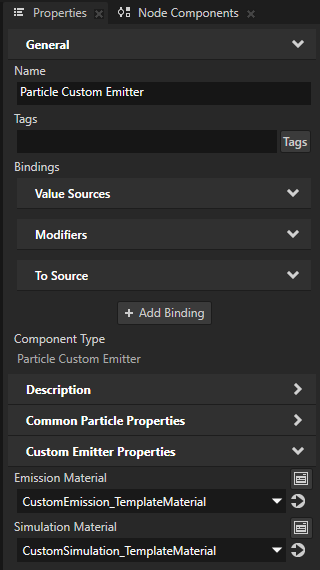
In the Node Tree, select the Particle Custom Emitter node that you created. In the Properties, set:
Emission Material to CustomEmission_TemplateMaterial.
Simulation Material to CustomSimulation_TemplateMaterial.
This applies the materials that you imported when you set up the project.
Tip
To use these materials as a starting point for several custom emitters, make a copy of the CustomEmissionTemplateMaterialType and CustomSimulationTemplateMaterialType material types.
In the Library > Materials and Textures > Material Types > CustomEmissionTemplateMaterialType, double-click the Compute Shader.

In Shader Source Editor, modify the Compute Shader to create the emission behavior that you want.
The emission shader allows you to set specific initial values for emitted particles.
In the template for an emission compute shader you can find sections that are highlighted by comments:
In the
Uniformsbuffer you can add custom uniforms.layout(std140, binding = 5) uniform Uniforms { // Mandatory uniforms: int initialSeed; bool infiniteLifetime; float lifetimeMinimum; float lifetimeMaximum; vec3 scaleMinimum; vec3 scaleMaximum; bool nonUniformScaleFlag; vec3 velocityMinimum; vec3 velocityMaximum; float rotationMinimum; float rotationMaximum; vec3 rotationVelocityMinimum; vec3 rotationVelocityMaximum; float massMinimum; float massMaximum; int emissionMode; uint emissionAmount; mat4x4 systemLocalTransformation; //############################################################################################################### // DEFINE CUSTOM UNIFORMS IN THIS SECTION: //############################################################################################################### vec3 customPosition; //############################################################################################################### };
In the
main()function you can define the logic that writes initial data for a new particle into the particle data buffer.void main() { // Initialize the global random hash seed. gHashSeed = uint(initialSeed) + gl_GlobalInvocationID.x; gHashDimension = 0; int emissionIndex = -1; // Calculate index based on emissionMode. switch(emissionMode) { case EmissionRateMode: { if(gl_GlobalInvocationID.x < emissionAmount) { emissionIndex = int(particleBufferInfo.activeSize + gl_GlobalInvocationID.x); } break; } case MaxAmountMode: { emissionIndex = int(particleBufferInfo.activeSize + gl_GlobalInvocationID.x); break; } case EmissionDisabledMode: { break; } } // If index is valid - generate data for new particle. if (emissionIndex != -1 && uint(emissionIndex) < (particleBufferInfo.pageSize)) { uint frontIndex = particleBufferInfo.frontOffset + uint(emissionIndex); ParticleData newParticle; //############################################################################################################### // TO ACHIEVE CUSTOM EMISSION BEHAVIOR YOU CAN MODIFY CODE BELOW: //############################################################################################################### // Generate position. newParticle.positionAndHash.xyz = vec4(systemLocalTransformation * vec4(customPosition + generatePositionInsideBoxVolume(), 1.0)).xyz; // Generate unique hash. newParticle.positionAndHash.w = hash(); // Generate random initial velocity. newParticle.velocity.xyz = vec3(mix(velocityMinimum.x, velocityMaximum.x, hash()), mix(velocityMinimum.y, velocityMaximum.y, hash()), mix(velocityMinimum.z, velocityMaximum.z, hash())); // Set initial force to zero. newParticle.forceAndMass.xyz = vec3(0); // Generate random mass. newParticle.forceAndMass.w = mix(massMinimum, massMaximum, hash()); // Generate lifetime. float newLifeTime = mix(lifetimeMinimum, lifetimeMaximum, hash()); // If infinite lifetime is enabled, clamp particle life to the smallest positive 32-bit // float value if average life is set to zero, so that particles are not spawned as dead. newLifeTime = infiniteLifetime ? max(1.1754944e-38, newLifeTime) : newLifeTime; // Used as the current lifetime value, decremented each frame. newParticle.lifetime.x = newLifeTime; // Ths is the initial maximum lifetime value. // We can use the reciprocal to derive a normalized [0,1] particle lifetime value. newParticle.lifetime.y = 1.0 / newLifeTime; // Generate random initial rotation. newParticle.rotation.x = radians(mix(rotationMinimum, rotationMaximum, hash())); newParticle.rotation.y = radians(mix(rotationMinimum, rotationMaximum, hash())); newParticle.rotation.z = radians(mix(rotationMinimum, rotationMaximum, hash())); // Generate random rotation velocity. newParticle.rotationVelocity.xyz = mix(rotationVelocityMinimum, rotationVelocityMaximum, vec3(hash(), hash(), hash())); // Generate random scale. if (nonUniformScaleFlag) { newParticle.scale.xyz = mix(scaleMinimum, scaleMaximum, vec3(hash(), hash(), hash())); } else { float min = min(min(scaleMinimum.x, scaleMinimum.y), scaleMinimum.z); float max = max(max(scaleMaximum.x, scaleMaximum.y), scaleMaximum.z); newParticle.scale.xyz = mix(vec3(min), vec3(max), vec3(hash())); } //############################################################################################################### // Set new particle data. particleData[frontIndex] = newParticle; } }
You can create custom emission behavior by using your own logic to write specific data to the particle buffer.
This is the data that you can set for a new particle:
Data type
Description
newParticle.positionAndHash.xyzSets the world space position for a new particle.
To apply the correct transformation to particles, multiply this value by the
systemLocalTransformationuniform.newParticle.positionAndHash.wSets a unique hash value for a new particle that must remain the same for the entire simulation frame.
Set the result of the
hash()function to this data field. Incorrect values can break the behavior of some particle rendering materials.newParticle.velocity.xyzSets the initial world space velocity for a new particle.
newParticle.forceAndMass.xyzSets the initial force for a new particle that is used for the first frame.
The force value is cleared at the end of the frame. If you want to define the force that modifies velocity every frame, use a Particle Custom Affector node.
newParticle.forceAndMass.wSets the particle mass.
newParticle.lifetime.xSets the current lifetime value for a new particle. The value counts down towards zero. The particle dies when the value becomes negative, and the related particle data is cleared from the buffer.
newParticle.lifetime.ySets the reciprocal of the initial total lifetime value for a new particle.
Set the
1.0 / newParticle.lifetime.xas the initial value to not break related logic and rendering materials.newParticle.rotation.xyzSets the rotation in radians for each axis for a new particle.
newParticle.rotationVelocity.xyzSets the rotation velocity for each axis for a new particle.
newParticle.scale.xyzSets the particle scale in each direction for a new particle.
Tip
To generate random values in the range 0.0 to 1.0, use the
hash()function.For example, to emit particles in the form of a 3D grid:
Add a
gridSizeuniform to the highlighted section of code inside the definition for theUniformsbuffer.vec3 gridSize;
Inside the highlighted section in the
main()function, add the logic that writes a random 3D grid position to the emitted particle. Make sure you remove the previous logic that writes a value tonewParticle.positionAndHash.xyz.vec3 step3D = vec3(1) / gridSize; newParticle.positionAndHash.xyz = clamp(round(vec3(hash(), hash(), hash()) / step3D) * step3D, vec3(0.0), vec3(1.0)) - vec3(0.5); newParticle.positionAndHash.xyz = vec4(systemLocalTransformation * vec4(newParticle.positionAndHash.xyz, 1.0)).xyz;
In the Library, select the CustomEmissionTemplateMaterialType material type. In the Properties, click Sync with Uniforms, and create the gridSize property for the
gridSizeuniform.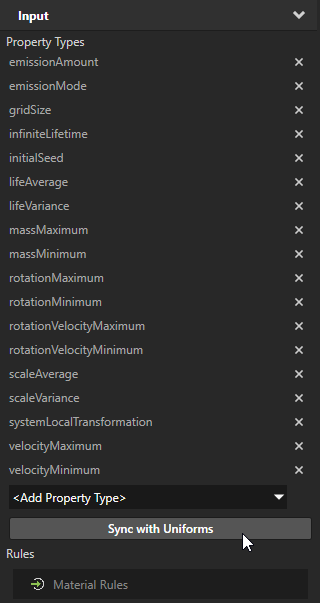
In the Library, select the CustomEmission_TemplateMaterial material. In the Properties, set the gridSize property to 5 for each dimension.
In the Node Tree, select the Particle Custom Emitter node that you created in the previous steps. Modify the emission properties to see the 3D grid of particles clearly.
Render Transformation, Scale attribute to 3.
Emission Rate to 1000.
Maximum Amount to 5000.
Scale Minimum to 2, 2, 2.
Scale Maximum to 2, 2, 2.
Infinite Lifetime to true.
To create a custom simulation behavior, you can modify the compute shader for CustomSimulationMaterialType material type.
For example:
In the Library > Materials and Textures > Material Types > CustomSimulationTemplateMaterialType, double-click the Compute Shader.
In the template for a simulation compute shader you can find sections that are highlighted by comments:
In the
Uniformsbuffer you can add custom uniforms.layout(std140, binding = 4) uniform Uniforms { float frameInterval; //############################################################################################################### // DEFINE CUSTOM UNIFORMS IN THIS SECTION: //############################################################################################################### //... //############################################################################################################### };
In the
main()function you can define the logic that defines the simulation behavior.void main() { uint index = gl_GlobalInvocationID.x; if (index >= particleBufferInfo.activeSize) { return; } uint indexFront = index + particleBufferInfo.frontOffset; if (particleData[indexFront].lifetime.x < 0.0) { return; } //############################################################################################################### // TO ACHIEVE CUSTOM SIMULATION BEHAVIOR YOU CAN MODIFY CODE BELOW: //############################################################################################################### vec4 forceAndMass = particleData[indexFront].forceAndMass; float mass = forceAndMass.w; vec3 newVelocity = particleData[indexFront].velocity.xyz + forceAndMass.xyz * (frameInterval / mass); particleData[indexFront].forceAndMass.xyz = vec3(0); particleData[indexFront].velocity.xyz = newVelocity; particleData[indexFront].positionAndHash.xyz += newVelocity * frameInterval; particleData[indexFront].rotation.xyz += particleData[indexFront].rotationVelocity.xyz * frameInterval; //############################################################################################################### }
By default, the simulation shader applies values from the force and mass buffer to the result velocity buffer and updates the result position buffer based on the result velocity. It updates the particles rotation buffer based on the rotation velocity value.
The simulation shader clears the force buffer at the end of the frame to prepare it for the next frame.
This logic usually remains the same for most types of effects, because changes can break the simulation behavior. However, you can intentionally disable simulation by removing the logic that applies velocity to the position buffer.
You can add logic to make specific modifications to particle data every frame. The simulation shader uses the same particle buffer as the emission shader, so you can modify the same set of data.
To apply velocity to particles in a specific area and kill them based on specific conditions:
Inside the highlighted section in the
main()function, add the code that will apply force on particles that are located in the central area, and will kill particles that reach a specific position.vec4 forceAndMass = particleData[indexFront].forceAndMass; float mass = forceAndMass.w; // Move down particles that are located in the central area. vec3 currentPosition = particleData[indexFront].positionAndHash.xyz; if (all(greaterThan(currentPosition, vec3(-1.25))) && all(lessThan(currentPosition, vec3(1.25)))) { forceAndMass.y = -1.0; } // Kill particles when they reach a specific area: if (currentPosition.y < -5.0) { particleData[indexFront].lifetime.x = -1.0; } vec3 newVelocity = particleData[indexFront].velocity.xyz + forceAndMass.xyz * (frameInterval / mass); particleData[indexFront].forceAndMass.xyz = vec3(0); particleData[indexFront].velocity.xyz = newVelocity; particleData[indexFront].positionAndHash.xyz += newVelocity * frameInterval; particleData[indexFront].rotation.xyz += particleData[indexFront].rotationVelocity.xyz * frameInterval;
As a result, you should see similar behavior on the screen:
Creating custom simulation behavior with Custom Affector
You can create custom affector behavior to enable features and effects that are not available with the built-in affectors.
Tip
When using the custom implementation in the compute shader for the Particle Custom Affector node, you can control which group of particles is affected by the affector. For example, you can apply custom force or modify velocity for several emitters at once by placing the affector at the same level in the Node Tree. If needed, you can control only a specific emitter by placing the affector node inside it.
On the contrary, the custom implementation in the simulation shader for the Particle Custom Emitter node affects only particles that are emitted by that specific emitter.
To create custom affector:
In the Node Tree, in the Particle System node that has an emitter node, create a Particle Custom Affector node.
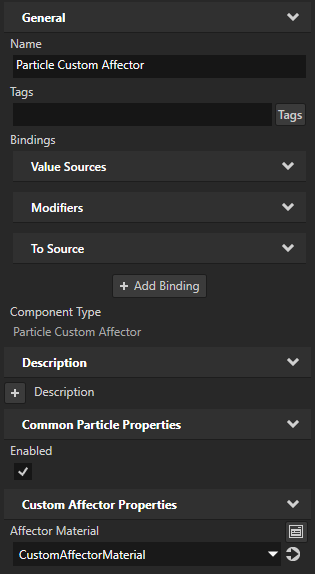
In the Node Tree, select the Particle Custom Affector node that you created. In the Properties, set the Affector Material property to CustomAffector_TemplateMaterial.
In the Library > Materials and Textures > Material Types > CustomAffectorTemplateMaterialType, double-click the Compute Shader.
In the affector shader you can modify the force and velocity that are applied on particles every frame in the simulation shader.
In the template for an affector compute shader, you can find sections that are highlighted by comments:
In the
Uniformsbuffer you can add custom uniforms.layout(std140, binding = 2) uniform Uniforms { mat4 systemLocalTransformation; float frameInterval; //############################################################################################################### // DEFINE CUSTOM UNIFORMS IN THIS SECTION: //############################################################################################################### vec3 force3D; //############################################################################################################### };
In the
main()function you can define the logic that defines the affector.void main() { uint index = uint(gl_GlobalInvocationID.x); if(index >= particleBufferInfo.activeSize) { return; } //############################################################################################################### // TO ACHIEVE CUSTOM BEHAVIOR YOU CAN MODIFY CODE BELOW: //############################################################################################################### particleData[index + particleBufferInfo.frontOffset].forceAndMass.xyz += rotateForce(force3D, systemLocalTransformation); // You can also modify velocity directly in this shader. //particleData[index + particleBufferInfo.frontOffset].velocity.xyz *= 0.5; //############################################################################################################### }
Customize the affector behavior with your own logic that modifies the force, velocity, and mass buffer in the
main()function.For example, modify the compute shader to create a sphere collider using the Particle Custom Affector node.
In the highlighted section in the
main()function, use this code that collides particles inside a sphere and reduces the scale of particles after collisions:uint indexFront = index + particleBufferInfo.frontOffset; // Sphere collision parameters. vec3 sphereCenter = vec3(0.0, 0.0, 0.0); float sphereRadius = 5.0; float bounce = 0.8; float unscaleMultiplier = 0.5; // Collision logic. vec3 currentPosition = particleData[indexFront].positionAndHash.xyz; vec3 currentVelocity = particleData[indexFront].velocity.xyz; vec3 localPos = currentPosition - sphereCenter; bool collision = length(localPos) > sphereRadius; if (collision) { vec3 normal = normalize(localPos); float velocityDotNormal = dot(currentVelocity, normal); if (velocityDotNormal > 0.0) { currentVelocity = currentVelocity - (1.0 + bounce) * velocityDotNormal * normal * particleData[indexFront].forceAndMass.w; currentPosition = sphereCenter + normal * sphereRadius; } particleData[indexFront].velocity.xyz = currentVelocity; particleData[indexFront].positionAndHash.xyz = currentPosition; particleData[indexFront].scale.xyz *= unscaleMultiplier; }
As a result, you should see similar behavior on the screen: