Deploying Kanzi applications to Android
When you are developing Kanzi applications for Android you can use Android Studio, the Clang toolchain, and the Gradle build system. This development approach is tested on:
Ubuntu/Linux 16.04.5
Ubuntu/Linux 18.04.1
Windows 10
Kanzi supports Android API level 21 (Android version 5.0) and newer.
Note
You can use JavaScript only on Windows operating system and only for prototyping.
Requirements
To build and deploy Kanzi applications to Android devices using the Kanzi Android platform package, you need:
Android Studio 4.1.0
You can download and install Android Studio at https://developer.android.com/studio/archive.
Java Development Environment Kit 1.8 or newer (64-bit version)
We recommend using the JDK that is bundled with the Android Studio installation.
USB device drivers for your Android device
See Installing the USB device drivers for your Android device.
This diagram shows the process that Kanzi uses to build an Android package.

Setting up the Android build environment
Before you can deploy Kanzi applications to Android, set up your build environment. You need to have a working Internet connection to set up the build environment in Android Studio.
To set up the build environment:
Open Android Studio, in the welcome screen select Configure, and in the dropdown menu select SDK Manager.
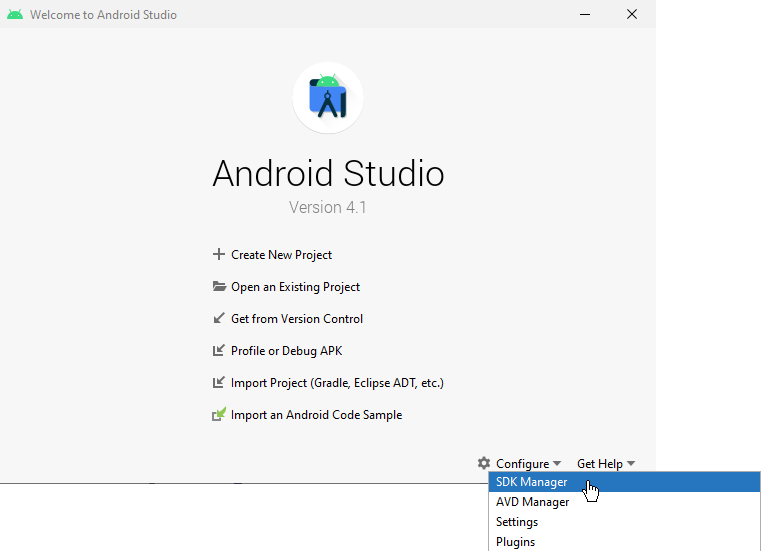
In the SDK Manager window in the SDK Tools tab select CMake and NDK (Side by side), and click OK.
Android Studio installs the Android NDK and CMake you need for building and deploying Kanzi applications for Android.

Open Kanzi Studio and in the main menu select Edit > User Preferences and in the Advanced tab click Open Build Environment Configuration.
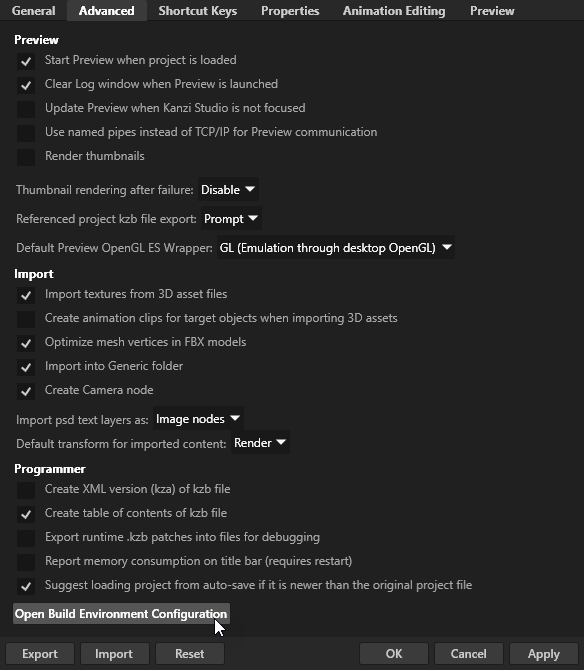
In the Build Environment Configuration window set these environment variables:
ANDROID_HOME to the Android SDK path.
For example, set it to
C:\Users\<user>\AppData\Local\Android\Sdk.JAVA_HOME to the JDK path.
For example, set it to
C:\Program Files\Android\Android Studio\jre.It is recommended to use the JDK tools which are bundled with Android Studio.
Click OK.
Building and deploying Kanzi applications from Kanzi Studio
In Kanzi Studio you can build and deploy your Kanzi application to an Android device using a single command. This approach is useful when you want to see how your application works and looks on an Android device while you are still prototyping or developing your application.
Note
The first time you build and deploy an Android package, you need to have a working Internet connection because the build process downloads and installs the Android Gradle build system.
Note
When you build and deploy a Kanzi application created with the Kanzi Studio project template, Kanzi exports the Android package to the <KanziWorkspace>/Temp directory. See Creating a project.
To build and deploy Kanzi applications from Kanzi Studio:
Connect your Android device to your computer.
In Kanzi Studio create or open the project for your Kanzi application and select File > Export > Build Android Package.
Kanzi Studio builds the application source code, creates the .apk package, and installs the package to your Android device.

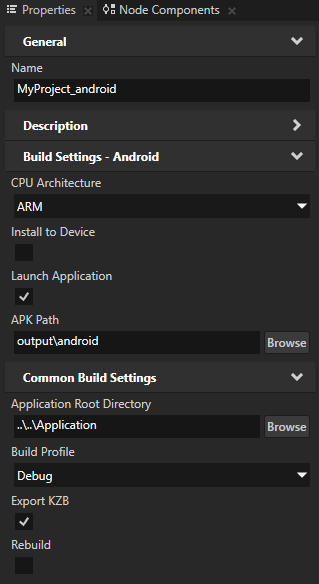
Configuring Android builds
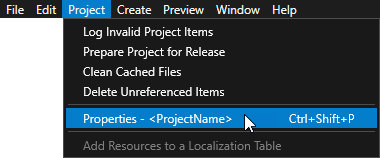
You can configure the building of your Kanzi applications for Android using the application configurations in Kanzi Studio. For example, you can set the target architecture, and whether Kanzi should deploy the built package to the attached target device. You can set which application configuration you want to use when you select File > Export > Build Android Package in Project > Properties in the Default Build Configuration property.

In Kanzi Studio in the Library press Alt and right-click Build Configurations and select Android Build Configuration.
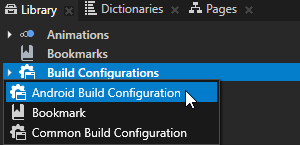
In the Properties set the configuration for the Android build.
For example:
Set the Build Profile property to Debug to build using the debug build type, instead of the default Release build.
Disable the Install to Device property if you want to manually install the .apk package to your Android device.
Building and deploying Kanzi applications from Android Studio
If you want to use the Android platform package with Kanzi 3.6.4 or 3.6.5 applications, you can migrate the applications. See Migrating Kanzi 3.6.4 and 3.6.5 applications to use the Android platform package.
To build and deploy Kanzi applications from Android Studio:
Open Android Studio and in the Welcome screen select Open an existing Android Studio project.
The Open File or Project window opens.

In the Open File or Project window go to
<ProjectName>/Application/configs/platformsand select theandroid_gradleproject.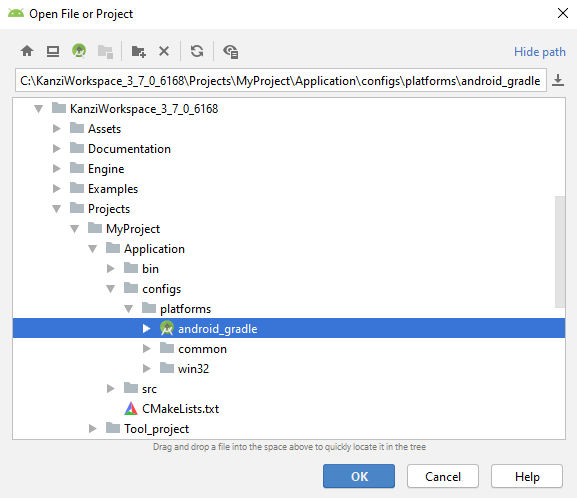
In Android Studio in the main menu select Build > Make Project to build the application package.
By default Android Studio uses the debug build configuration. When you build the Kanzi project, you can find the Android package at
<ProjectName>/Application/configs/platforms/android_gradle/app/build/outputs/apk/debug.To build using the release build configuration, open the Build Variants window and set the Build Variant to release.

Tip
If you do not specify the target architecture, Gradle builds the package for all supported platforms. You can set the architectures for which you want to build your package in
build.gradle.android { defaultConfig { ndk { abiFilters 'arm64-v8a', 'x86' } } }
Deploy your Kanzi application to an Android device or an Android Virtual Device:
Connect your Android device to your computer. To deploy to an Android Virtual Device, you must create one. See https://developer.android.com/studio/run/emulator.
In the Android Studio main menu select Run > Run ‘app’ and select the device to which you want to deploy your application.

Building and deploying Kanzi applications from the command line
You can build and deploy your Kanzi application to an Android device using the command line. In the <ProjectName>/Application/configs/platforms/android_gradle directory of your project:
To build an Android package, run one of these commands depending on whether you want to use the release, profiling, or debug build type:
gradlew assembleRelease
gradlew assembleProfiling
gradlew assembleDebug
If you do not specify the target architecture, Gradle builds the package for all supported architectures. However, you can build the package only for a specific architecture.
For example,
To build for ARM, run:
gradlew assembleRelease -Parch=arm
To build for multiple specific architectures, separate the architecture names with a comma:
gradlew assembleRelease -Parch=arm,aarch64,x86
To install an Android package on a device, run:
gradlew assembleRelease installRelease
To deploy an Android package on a device, run:
gradlew startPackage
To clean old Android package builds, run:
gradlew clean cleanNative
Troubleshooting
When you receive this error while building an Android package:
FAILURE: Build failed with an exception.

* What went wrong:
Execution failed for task ':app.packageDebug'.
> Failed to obtain compression information for entry
Make sure that you are using Android Studio version 4.1.0 or newer. This error occurs on Android Studio version 3.1.
When you receive this error while building an Android package:
FAILURE: Build failed with an exception.

* What went wrong:
Execution failed for task ':app.packageDebug'.
> Java heap space
Increase the available heap amount in the Gradle build system. For example, in Android Studio open the
<ProjectName>/Application/configs/platforms/android_gradleproject, in that project open thegradle.propertiesfile and set:org.gradle.jvmargs=-Xmx4608m
When you receive this error while building an Android package:
FAILURE: Build failed with an exception.

* Where:
Build file 'Engine\configs\platforms\android_gradle\kanziruntime\build.gradle' line: 103

* What went wrong:
A problem occurred evaluating project ':kanziruntime'.
> <PathToKanziWorkspace>\Engine\version.txt not found
In the
<ProjectName>/Application/configs/platforms/android_gradledirectory of your project create a file calledlocal.propertiesand in that file set the correct location of your workspace. For example, set:kanzi.home=C\:\\KanziWorkspace_3_7_0_000
When you receive this error while building an Android package:
> Task :kanziruntime:cmakeInstallNativeLibsRelease FAILED
'cmake' is not recognized as an internal or external command, operable program or batch file.
Execution failed for task ':kanziruntime:cmakeInstallNativeLibsRelease'.
> Process 'command 'cmd finished with non-zero exit value 1
Add the path to the CMake bin folder to your system path. You can find the bin folder in the Android SDK, for example in android-sdkcmake3.10.2.4988404bin.
When your Kanzi application fails to run on Android because of this error:
E AndroidRuntime: java.lang.Exception: The KZB file '<filename>' uses undefined metaclass 'Kanzi.ExecuteScriptAction'
Do not use JavaScript in a Kanzi Studio project that you want to deploy to Android.
You can use JavaScript only on Windows operating system and only for prototyping.
When you receive this warning while building an application that uses the Data_source_plugin_template:
More than one file was found with OS independent path 'lib/arm64-v8a/libkzcoreui.so'. This version of the Android Gradle
Plugin chooses the file from the app or dynamic-feature module,but this can cause unexpected behavior or errors at runtime.
Future versions of the Android Gradle Plugin will throw an error in this case
Update the Kanzi Gradle plugin to version 0.6.1. Whenever you update the Gradle version, update the Kanzi Gradle plugin to the same version.
Migrating Kanzi 3.6.4 and 3.6.5 applications to use the Android platform package
The Android platform package does not support the V8 library. Before you migrate your Kanzi application, disable or remove JavaScript from the Kanzi application that you want to migrate.
To migrate Kanzi 3.6.4 and 3.6.5 applications to use the Android platform package:
Extract the Kanzi Android platform package zip file to the
<KanziWorkspace>directory. When you extract the zip file, skip duplicate files instead of overwriting those files.Copy the
<KanziWorkspace>/Engine/applications/kzb_player/configs/platforms/android_gradledirectory to the<ProjectName>/Application/configs/platformsdirectory of the Kanzi application that you want to migrate to the new Android platform package.In your Kanzi application, edit the Java resources:
In the
android_gradle/app/src/main/java/com/rightware/kanzi/kzbplayerdirectory rename theKZBPlayer.javafile to the name of your application.For example, if your project is called
MyProject, rename theKZBPlayer.javafile toMyProject.java.In the
android_gradle/app/src/main/java/com/rightware/kanzidirectory rename thekzbplayerdirectory to the lowercase name of your application.For example, if your application is called
MyProject, rename thekzbplayerdirectory tomyproject.In a text editor open the
<project_name>.javafile and edit the file to include the references to your application.For example, if your application is called
MyProject:Change
com.rightware.kanzi.kzbplayerto
com.rightware.kanzi.myprojectChange the class
KZBPlayerto
MyProjectChange the
TAG"KZBPlayer"to
"MyProject"Change
Debug.startMethodTracing("kzbplayer")to
Debug.startMethodTracing("myproject")
In a text editor open the
android_gradle/app/src/main/AndroidManifest.xmlfile and edit the file to include the references to your application.For example, if your application is called
MyProject:Change
com.rightware.kanzi.kzbplayerto
com.rightware.kanzi.myprojectChange
activity android:name=".KZBPlayer"to
activity android:name=".MyProject"
In a text editor open the
android_gradle/app/src/main/res/values/strings.xmlfile and edit the file to include the name of your application.For example, if your application is called
MyProject, change<string name="app_name">KZB Player</string>to
<string name="app_name">MyProject</string>
In your project, edit the build scripts:
In a text editor open the
android_gradle/app/CMakeLists.txtfile and edit the file to include the name of your application and the path to the C++ application source file.For example, if your application is called
MyProject:Change
project(kzb_player)to
project(myproject)Change
add_executable(${PROJECT_NAME} src/main/cpp/kzb_player.cpp)to
add_executable(${PROJECT_NAME} ../../../../src/myproject.cpp)
In a text editor open the
android_gradle/settings.gradlefile and edit the file to include the name of your application.For example, if your application is called
MyProject, set the value of therootProject.nameto"myproject".In a text editor open the
android_gradle/app/build.gradlefile and edit the file so thatapplicationIdpoints to you application.For example, if your application is called
MyProject, set theapplicationIdto"com.rightware.kanzi.myproject".In a text editor open the
android_gradle/gradle.propertiesfile and replace:org.gradle.jvmargs=-Xmx<size>m
with
org.gradle.jvmargs=-Xmx4608m
In your application, edit the C++ source files:
In the
Application/src/<project_name>.cppfile change:class <ProjectName>: public ExampleApplication
to
class <ProjectName>: public Application
In the
<project_name>.cppfile add aregisterMetadataOverridecallback that does not contain V8Module registration:class <ProjectName>: public Application { public: ... virtual void registerMetadataOverride(ObjectFactory& /*factory*/) KZ_OVERRIDE { Domain* domain = getDomain(); KanziComponentsModule::registerModule(domain); } };In the
<project_name>.cppfile in theonConfigurecallback function remove references to theExampleApplicationclass:virtual void onConfigure(ApplicationProperties& configuration) KZ_OVERRIDE { Application::onConfigure(configuration); configuration.binaryName = "<project_name>.kzb.cfg"; configuration.extensionOutputEnabled = true; configuration.defaultSurfaceProperties.antiAliasing = 0; configuration.defaultSurfaceProperties.bitsDepthBuffer = 0; configuration.defaultSurfaceProperties.bitsStencil = 0; }
Build and deploy your Kanzi application using either Android Studio or the command line interface. See Building and deploying Kanzi applications from Android Studio and Building and deploying Kanzi applications from the command line.
Installing the USB device drivers for your Android device
To install the USB device drivers for your Android device:
Find the Android USB driver on Android developer website page Android OEM USB Drivers or install the drivers provided by the manufacturer of your device.
Follow the installation instructions provided on the Android developer website or the manufacturer of your device.
On your Android device:
In Settings enable Development options.
In Settings > Security enable Unknown sources.
If you are using a Samsung device in USB computer connection enable the Camera (PTP) setting.
After connecting your Android device to your computer, on your Android device allow USB debugging when prompted.
(Optional) To check that the device drivers are installed correctly, connect your Android device to your computer, run
adb devicescommand in the Windows command prompt.If the Android USB driver is installed correctly, your device is listed in the command output.