Using aliases
Use an Alias to get consistent access to a Kanzi node. You can use aliases to access nodes both in Kanzi Studio and using the Kanzi Engine API.
Because you move nodes in the node tree of your project while creating your application in Kanzi Studio, the easiest way to keep track of them is to use aliases. You can retrieve alias target nodes with bindings or the Kanzi Engine API using the hash sign (#) followed by the name of the alias, regardless of the node location in the project.
Note that you must always add aliases to the resource dictionary of the node from which you want to retrieve them.
Creating an alias from a node
When you create an alias from a node, Kanzi Studio adds that alias to the resource dictionary of the nearest ancestor of that node that contains a resource dictionary. For example, if a Scene has a resource dictionary and it contains a Camera, when you create an alias directly from the Camera node, Kanzi Studio automatically adds the alias pointing to the Camera node to the resource dictionary of the Scene node.
To create an alias:
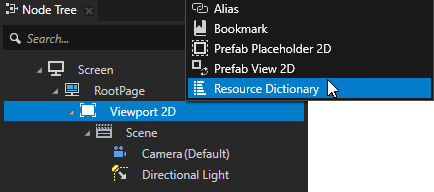
In the Node Tree press Alt and right-click the node to which you want Kanzi Studio to automatically add the alias from the descendants of that node, and select Resource Dictionary.
For example, if you want to use aliases to access the nodes inside the Viewport 2D node, add the Resource Dictionary to that Viewport 2D.
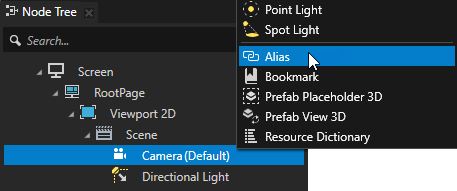
In the Node Tree press Alt and right-click a descendant node of the node that contains a resource dictionary, and select Alias.
For example, in a Viewport 2D that contains a Camera, press Alt and right-click the Camera, and select Alias.
Kanzi Studio creates an alias pointing to the node from which you created the alias and adds it to the resource dictionary of its nearest ancestor node that contains a resource dictionary.
Creating an alias and manually setting its target
To create an alias and manually set its target:
In the Node Tree press Alt and right-click the node to the resource dictionary of which you want to add an alias, and select Resource Dictionary.
For example, if you want to use aliases to access the nodes inside the Viewport 2D node, add the Resource Dictionary to that Viewport 2D.
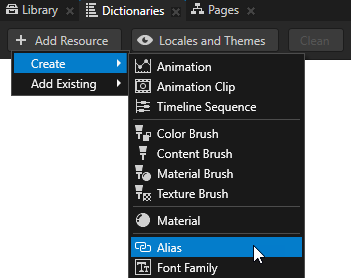
In the Dictionaries select the resource dictionary to which you want to add an alias, click + Add Resource, select Create > Alias, and name the alias.
Kanzi Studio adds an alias to the resource dictionary you selected in the Dictionaries.
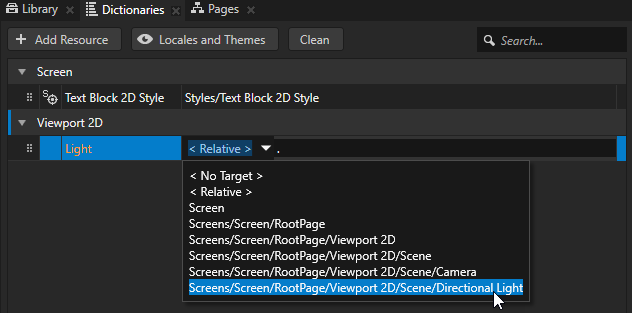
Dictionaries shows the resource IDs of the resources that are local to the node you select in the Node Tree.
In the Dictionaries click the cell next to the alias name and in the dropdown menu select the node that you want to access using this alias.
Use <Relative> to enter a path that is relative to the node to the resource dictionary of which you added the alias.
Use absolute path when the target node is reachable from the node that owns the resource dictionary where the alias is.
Using aliases in bindings
Use bindings to set the value of a property or property field with the value from another property, property field, or a data source.
To use aliases in bindings, enter in curly braces the # sign followed by the alias name, followed by a forward slash and property name of the item to which the alias points.
For example, to bind a property to the Layout Width property of the target node of the alias named Sphere in the Expression of the Binding Editor enter
{#Sphere/LayoutWidth}
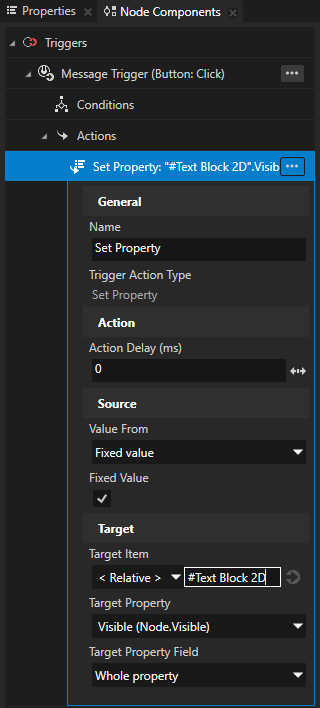
Using an alias to set a target for an action
To use an alias to define a target item for an action:
Create an alias. See Creating an alias from a node.
Add a trigger to a node. See Using triggers.
In the Node Components > Triggers press Alt and right-click the trigger that you added in the previous step and select an action.
For example, select the Set Property action.
In the action that you created set the Target Item property to the alias that you created in the first step.
Using Aliases in the API
To use aliases to access nodes using the API
// Get the reference to the Grid List Box 3D node using the alias #Grid List Box that is
// in the resource dictionary of the Scene node.
GridListBox3DSharedPtr gridListBox = scene->lookupNode<GridListBox3D>("#Grid List Box");