Preventing overdraw with the Sorting Filter
In Kanzi nodes are presented for rendering from top to bottom of the project tree as shown in the Kanzi Studio Node Tree window. You can change the rendering of 3D nodes by using filters.
Overdraw issues occur when one node is first drawn to an area of pixels in the back buffer, after which another node is presented that occludes the first node, and the same pixels are filled again. Excessive overdraw can decrease performance on the GPU in the form of increased fill-rate. If you order nodes so that the occluding node is drawn first, the occluded pixels do not have to be rendered again because of the depth buffering.
You can prevent overdraw by sorting 3D nodes with a Sorting Filter into front-to-back order before rendering, and by hiding known invisible items. This adds some overhead to the CPU, because nodes are ordered before drawing and updated when transformations in the scene are changed (for example, through animations).
Viewing the overdraw of nodes
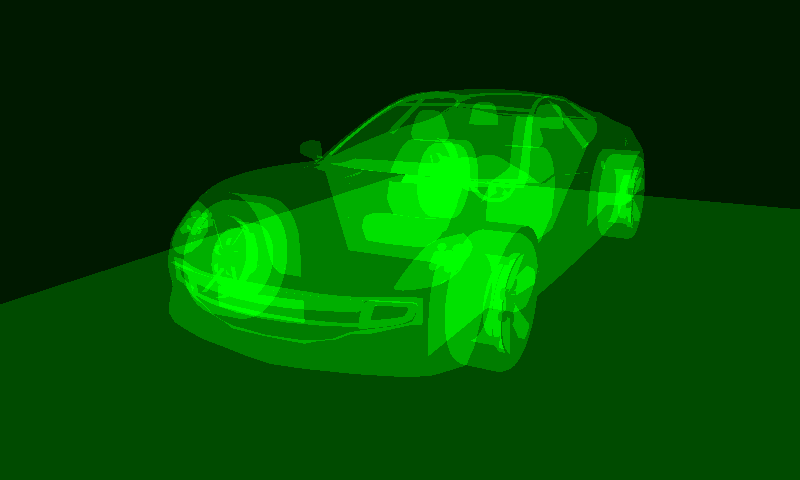
Overdraw visualization indicates areas where Kanzi renders multiple times to the same pixel. Lighter green color indicates higher amount of overdraw.
Kanzi uses the stencil buffer to calculate how many times it draws to the same pixel. If you are using the stencil buffer to render your content, the Overdraw visualization can return unexpected results.
The overdraw visualization does not show:
Overdraw for 3D nodes that you render to a composition, which you then render to a texture. In that case, the Overdraw visualization shows the content from a composition that you render to a texture, as a single quad.
Parts of the nodes that are clipped when you set in their ancestor node the Clip Children property to enabled.
Nodes that are completely translucent or nodes that are not visible, including their descendant nodes.
To view overdraw in your application, in the Kanzi Studio Preview click  to enter the Analyze mode, right-click
  , and select Overdraw.
Using a Sorting Filter to render from front to back
To use a Sorting Filter to render from front to back:
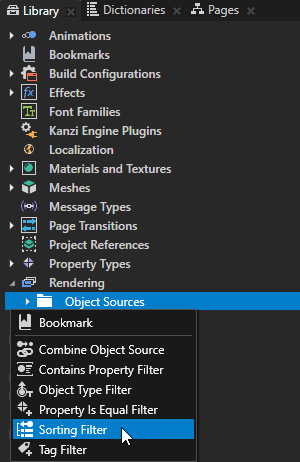
In the Library press Alt and right-click Rendering > Object Sources and select Sorting Filter.
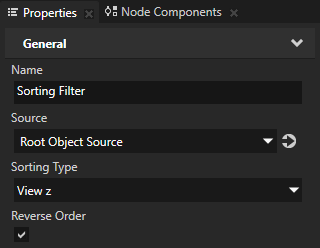
In the Properties set:
Sorting Type to View z
Enable the Reverse Order property
In the Library > Rendering > Render Pass Prefabs select the Draw Objects Render Pass you use to render your scene.
In the Properties set the Object Source property to the sorting filter you created in the first step of this procedure.
The default Sorting Filter rearranges the scene in the front-to-back order. However, you can select only a part of the scene in your project. This is useful if the GPU fill-rate, lighting, texturing or fragment shaders are known bottlenecks for performance in your application. See Using the Tag Filter.
Test the effect of ordering on the overall performance by measuring the frame rate in both cases. See Troubleshooting the performance of your application.