Installing Kanzi
System requirements
Minimum system requirements for using Kanzi Studio:
On a PC: 64-bit Windows 7 SP1, 8.1, and 10 Anniversary Update (version 1607) or newer
On a Mac: Any of the above Windows versions in Boot Camp, or OS X with VMware Fusion or Parallels Desktop
12 GB of free disk space
1 GB of RAM (2 GB recommended)
Graphics card compatible with OpenGL 3.3 or later and graphics card drivers no more than 12 months old
Kanzi Studio depends on these Microsoft libraries and frameworks:
Microsoft .NET Framework 4.7.1
Microsoft Visual C++ 2015-2019 Redistributable, both x86 and x64 versions
During Kanzi installation the installer prompts you to install these.
Platform requirements
Windows
To run Kanzi applications on Windows, you need:
Microsoft Visual C++ 2015-2019 Redistributable (x86)
To develop Kanzi applications and Kanzi Engine plugins, you need:
Visual Studio 2017 with the latest updates
CMake 3.15 or newer
To develop Kanzi Studio plugins, you need:
Visual Studio 2017 with the latest updates
.NET framework 4.7.1
Android
Kanzi Android framework requires Android API level 26 (Android version 8.0.0) or newer.
Kanzi application framework requires Android API level 21 (Android version 5.0) or newer.
To build and deploy Kanzi applications for Android, you need:
Android Studio 4.1.3 or newer
You can download and install Android Studio from here.
64-bit JDK 8 (1.8.0) or newer
We recommend using the JDK that is bundled with the Android Studio installation.
CMake 3.5.1 or newer
To use Java Kanzi Engine plugins from Kanzi Studio, you also need:
64-bit JDK 8 (1.8.0) or newer
We recommend using the JDK that is bundled with the Android Studio installation.
Alternatively, you can install a standalone OpenJDK. For example, from https://github.com/AdoptOpenJDK/openjdk8-binaries/releases/download/jdk8u292-b10/OpenJDK8U-jdk_x64_windows_hotspot_8u292b10.zip.
Note that you can only use Java plugins with Kanzi Android framework applications.
Other platforms
To build and deploy Kanzi applications for other platforms, you need:
Python 2.7.x
Python 3.x
Scons 2.5.1
Installing and activating Kanzi
To upgrade Kanzi, see Upgrading Kanzi.
To install and activate Kanzi:
Copy the Kanzi installer file to a local disk.
You need administrator's rights on the computer where you are installing Kanzi.
Run the Kanzi installer and follow the onscreen instructions.
Set the
<KanziWorkspace>to the root of a hard disk partition, because the Windows operating systems have a limit of 255 characters for paths.Activate your Kanzi license:
If you have a Kanzi product key, see Using a product key to activate Kanzi Studio.
If you have a Kanzi license file, see Using a license file to activate Kanzi Studio.
If you have a Kanzi dongle license, see Using a dongle license to activate Kanzi Studio.
If you are using Kanzi floating licenses, see Using a floating license.
To purchase Kanzi, go to www.rightware.com/buy-kanzi or contact Rightware sales team at sales@rightware.com.
To find out what Kanzi installs on your computer, see What is installed with Kanzi?
For technical support use the Kanzi Support Portal at http://support.rightware.com. See Technical support.
Installing Kanzi unattended
Use unattended installation when you want to avoid user interaction during the installation of Kanzi. This is useful when you want to automate the installation.
When you install Kanzi unattended, the installer shows the installation progress window, but does not require user interaction.
To install Kanzi unattended:
Start the Windows Command Prompt with administrator's rights.
Go to the directory where you have the Kanzi installer.
Run this command:
.\KanziStudio_<KanziVersion>.exe /silent
What's next?
Now that you installed Kanzi you can:
Using Kanzi documentation offline
When you are connected to the Internet, and in Kanzi Studio you press or select Help > Documentation, Kanzi Studio points your default web browser to the Kanzi documentation at https://docs.kanzi.com.
To use Kanzi documentation offline:
Download the https://docs.kanzi.com/3.9.0/Documentation/Documentation-390.zip file, that contains the Kanzi documentation.
Extract the Kanzi documentation zip file to the
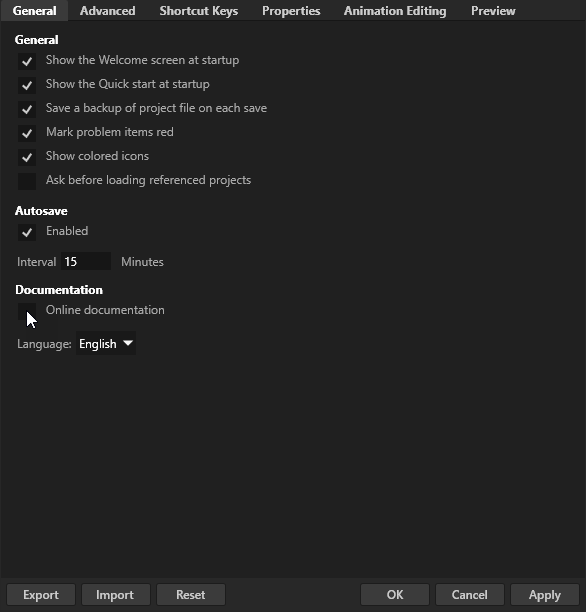
<KanziWorkspace>directory.To view the Kanzi documentation when you are not connected to the Internet, in Kanzi Studio select Edit > User Preferences and disable the Online documentation setting.
When this option is disabled, Kanzi Studio uses the documentation in the
<KanziWorkspace>/Documentationdirectory.
Error reports
To help us improve the quality of Kanzi, Kanzi sends anonymized error reports. We are not able to link this information directly to any individual user. You can opt-out from sending this information during the installation.