Target Preview
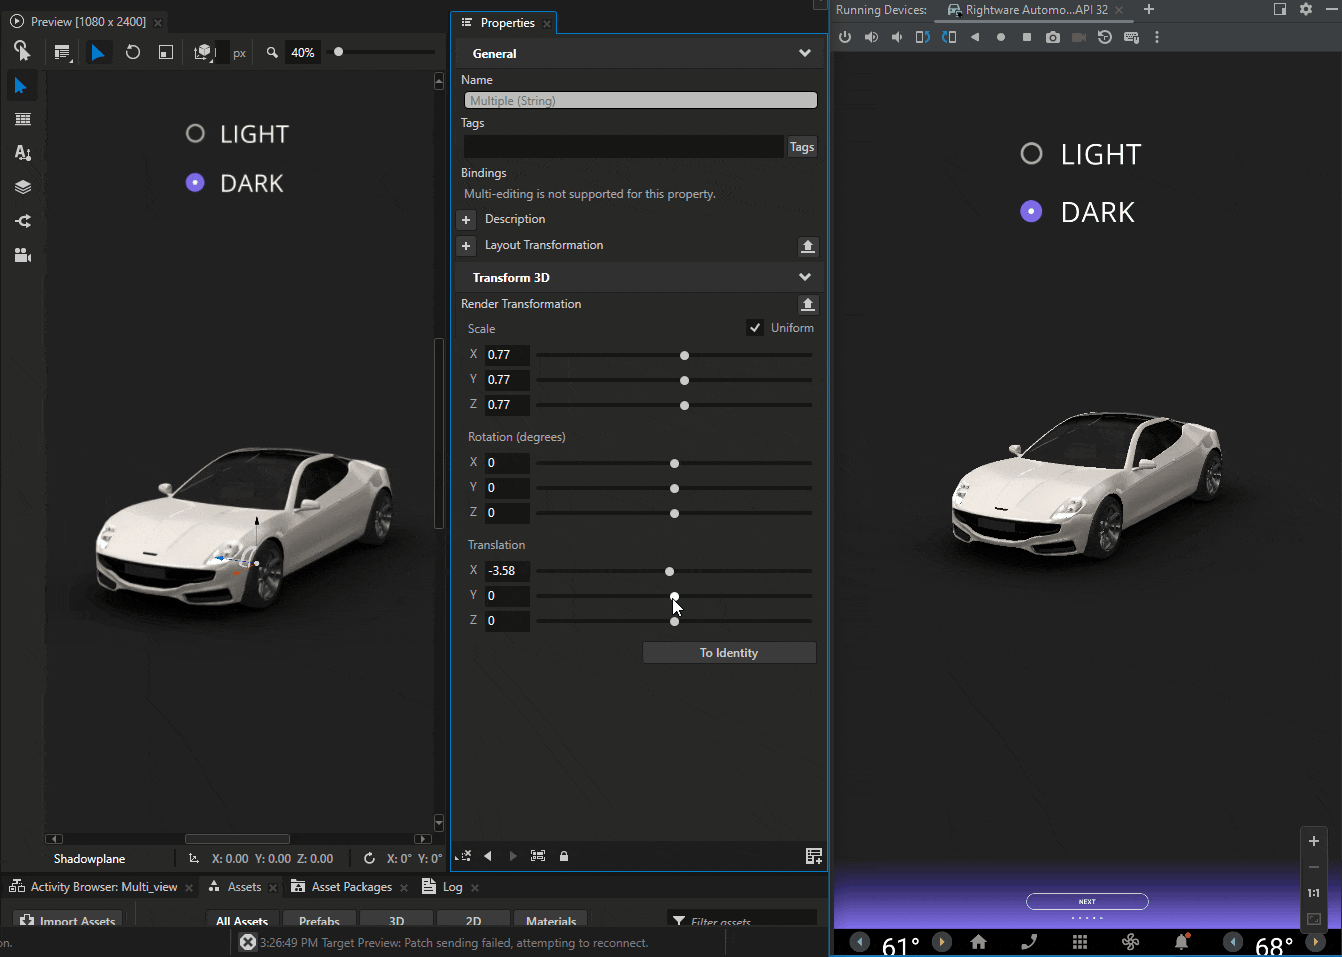
The Target Preview enables you to see on a target device the changes that you make in a Kanzi Studio project without exporting and redeploying the application.
These are the impacts of Target Preview on development workflow:
It shows your application as it is, including the rendering and latency, and any behavior that you define in platform-specific code. The content that the Target Preview shows is not a video stream.
The Target Preview enables you to revise your design even in late stages of the development. You can instantly test designs and see how your changes look in a real environment, such as on a display inside a vehicle.
When you develop an Android application using the Kanzi Android framework (droidfw), you can see full composited application that consists of both Kanzi and Android UI.
The Target Preview plugin creates a TCP/IP communication channel so that Kanzi Studio can make changes to an application on a connected device. It does not replace the deployment process, but it improves the workflow by allowing you to see the changes on a target device without redeploying an application.
Keep in mind that:
If your Kanzi Studio project uses a Kanzi Engine plugin, you must add the same plugin to the Kanzi application and redeploy the application to your target device.
The changes that you make in the Target Preview are not saved on the target device. To make the changes permanent, follow the regular application deployment process. See Deploying Kanzi applications.
Using the Target Preview
The Target Preview is a Kanzi Engine plugin that is delivered with the Kanzi platform packages.
It is meant to be used only as a tool to help you develop your Kanzi application. To get your application ready for production, remove the link to the Target Preview plugin. This way you remove possible security issues that the plugin can introduce.
To use the Target Preview:
Load the plugin:
For dynamically linked plugin, load the plugin by adding it to the
application.cfg. See ModuleNames.ModuleNames="kztargetpreview"
For statically linked plugin, register the plugin in your application code:
#include <kanzi/plugins/targetpreview/targetpreview_plugin.hpp>

void MyApplication::registerMetadataOverride(ObjectFactory& factory) override
{
      TargetPreviewPlugin::registerModule(getDomain());
}
For statically linked plugin, and dynamically linked plugin on Android or QNX with the LLVM C++ compiler, link the plugin in the application
CMakeLists.txt:target_link_libraries(MyApplication Kanzi::kztargetpreview)
See Kanzi Engine plugins.
(Optional) By default, the Target Preview plugin uses network port
50000. To set a different port, in thetarget_preview_configuration.jsonfile, set theportattribute.{ "port": 60000 }
If you use the Target Preview with an application on Android:
Add these network permissions to the
AndroidManifest.xmlfile of your application:<uses-permission android:name="android.permission.INTERNET" /> <uses-permission android:name="android.permission.ACCESS_NETWORK_STATE" />
For an Android emulator, or device connected through ADB:
Use the 127.0.0.1 address. This address on your computer corresponds to the ADB loopback interface.
Set up port forwarding to the default port or the port that you defined.
adb forward tcp:<port> tcp:<port>
Before you start using the Target Preview, export the kzb and make sure that on the target device you use the same kzb and set of Kanzi Engine plugins.
In Kanzi Studio, connect to the application on your device:
In the Kanzi Studio Preview, click
 .
.
In the Target Preview window, set:
Target IP to the IP address of your device
Port to the port that you set earlier
The Target Preview uses TCP/IP to communicate with Kanzi Studio. If you use a firewall, allow your Kanzi application to accept incoming network connection at specified port.
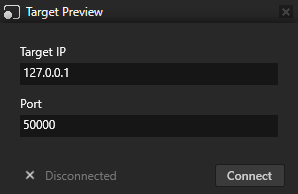
Click Connect.
Kanzi Studio prints the connection status in the Log window.
