Data-Driven Exclusive Activity Host
You can use a list data source and a Data-Driven Exclusive Activity Host to create parts of UI with Activities from content of data objects. For example, you can define the content of menus in a data source and use a Data-Driven Exclusive Activity Host to create the menus in your application.
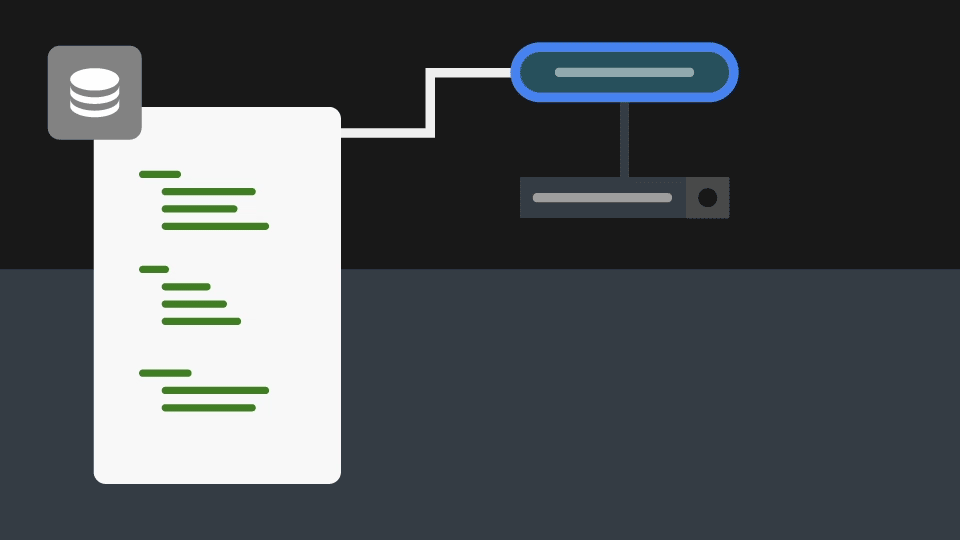
Data-Driven Exclusive Activity Host can have only one of its child Activities active at a time. When one child Activity of a Data-Driven Exclusive Activity Host is active, all other Activities of that Activity Host are inactive. For example, you can use a Data-Driven Exclusive Activity Host to toggle between views in your application.
Learn how to use a Data-Driven Exclusive Activity Host by completing a tutorial. See Tutorial: Generate UI from a data source.
Creating Activities using a data source
To create Activities using a data source:
Add a data source with a list data object.
To learn how to use a data source, see Using a data source and Tutorial: Get application data from a data source.
For example:
In the Library, right-click Kanzi Engine Plugins, select Import Kanzi Engine Plugin and import the
<KanziWorkspace>/Tutorials/Data sources/Completed/Application/lib/Win64/GL_vs2019_Release_DLL/XML_data_source.dll.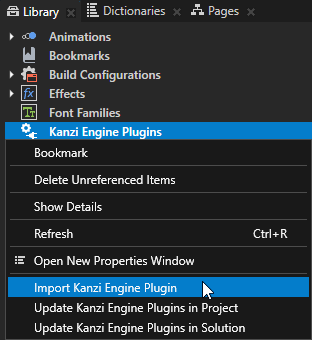
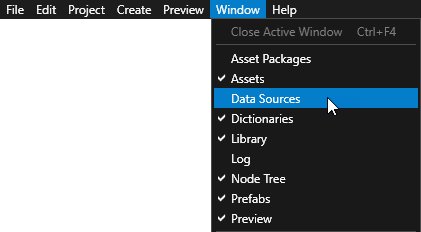
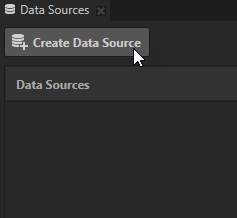
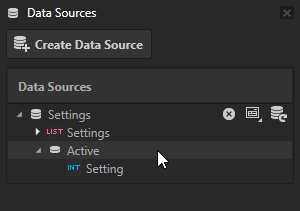
In the Window main menu, select Data Sources to open the Data Sources window.
Use the Data Sources window to create, set, and delete the data sources in your project, and to connect data objects from a data source to nodes and resources in your project.
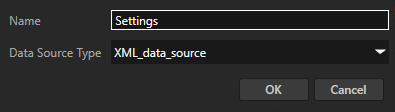
In the Data Sources window, click Create Data Source, enter a name for this data source, and click OK to create a data source.
In the Data Sources window next to the data source that you just created, click
 and set the XML Data Source File property to use an XML file as a data source.
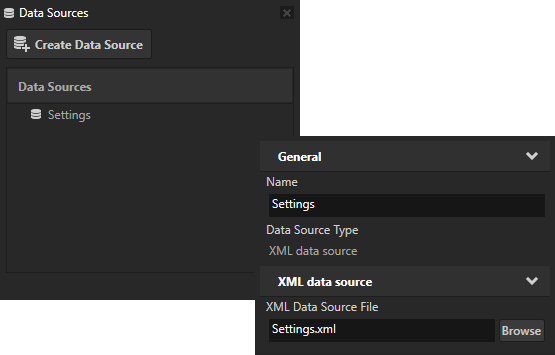
For example, save this data as an XML file and set the data source to use that file.
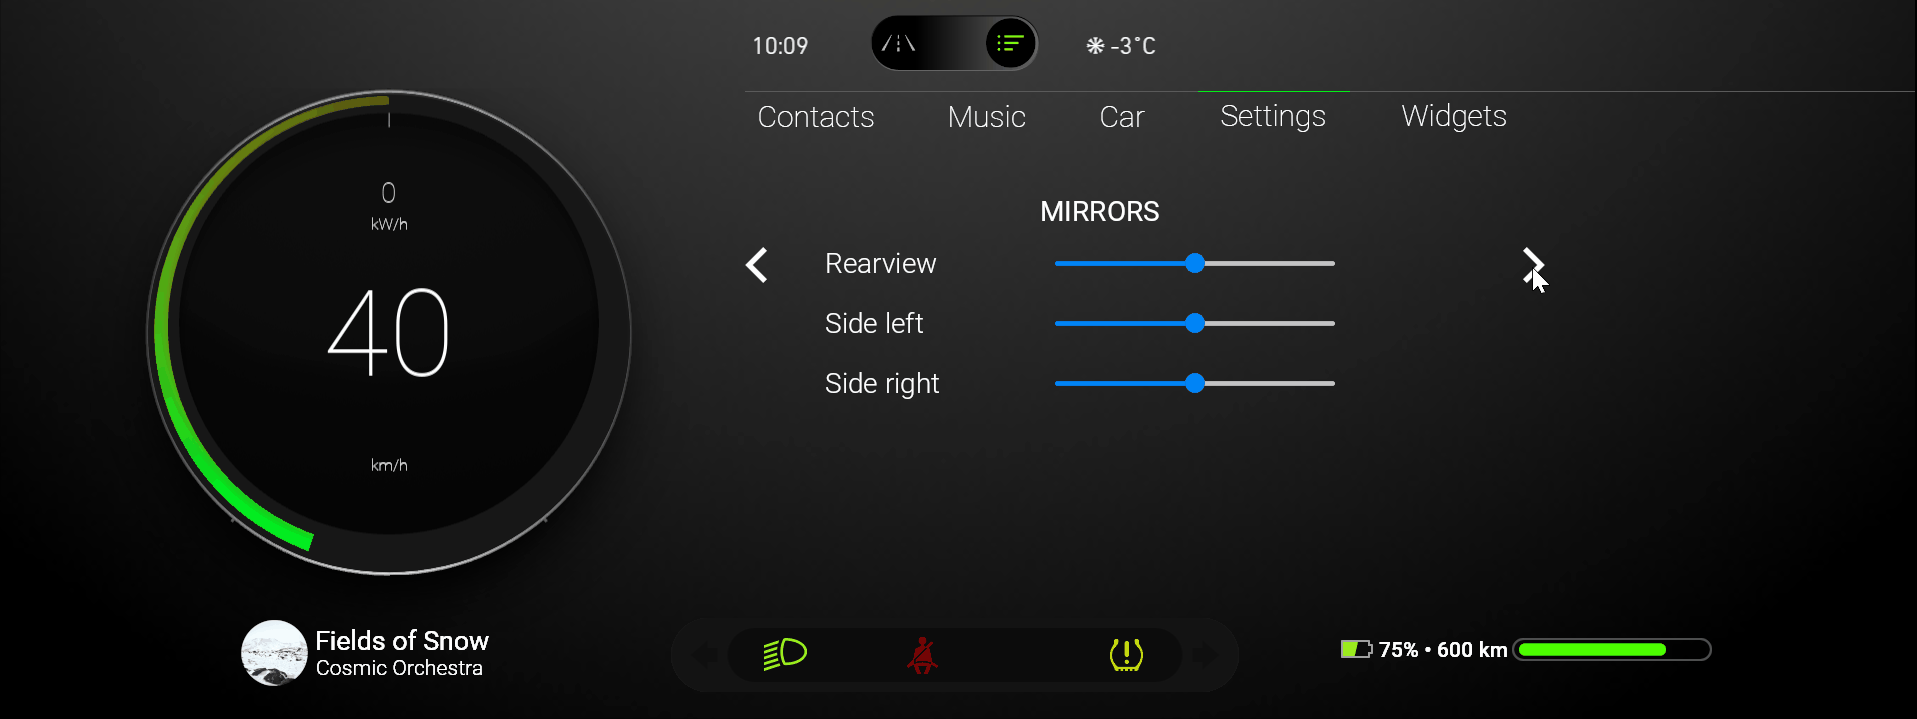
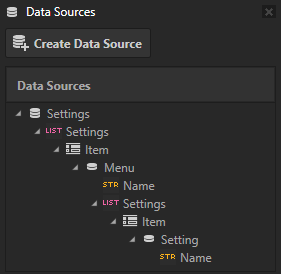
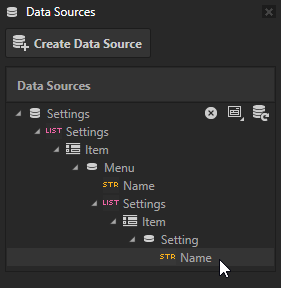
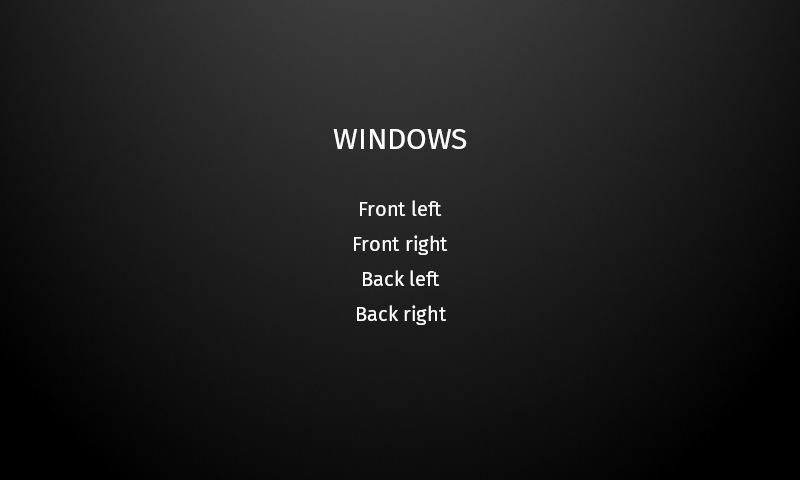
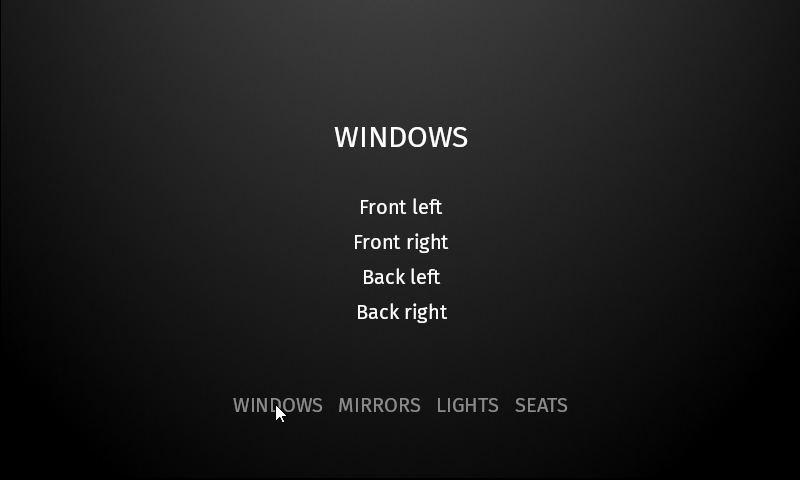
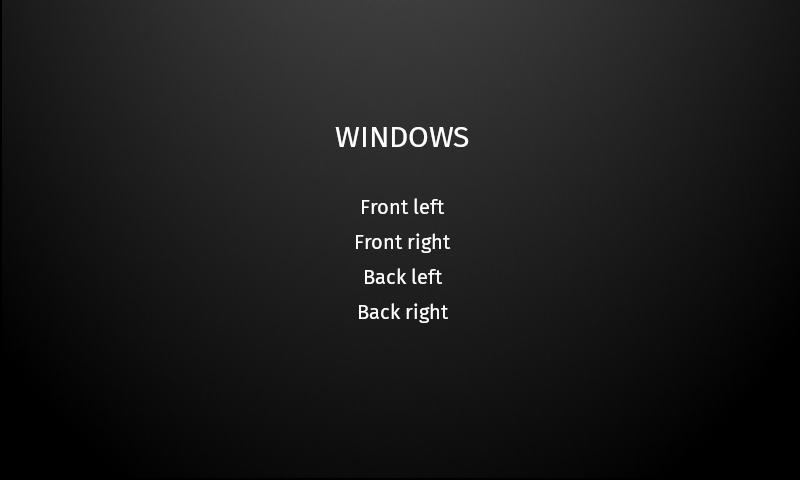
<Settings type="list">
    <items>
        <Menu>
            <Name type="string">WINDOWS</Name>
            <Settings type="list">
                <items>
                    <Setting>
                        <Name type="string">Front left</Name>
                    </Setting>
                    <Setting>
                        <Name type="string">Front right</Name>
                    </Setting>
                    <Setting>
                        <Name type="string">Back left</Name>
                    </Setting>
                    <Setting>
                        <Name type="string">Back right</Name>
                    </Setting>
                </items>
            </Settings>
        </Menu>
        <Menu>
            <Name type="string">MIRRORS</Name>
            <Settings type="list">
                <items>
                    <Setting>
                        <Name type="string">Rearview</Name>
                    </Setting>
                    <Setting>
                        <Name type="string">Side left</Name>
                    </Setting>
                    <Setting>
                        <Name type="string">Side right</Name>
                    </Setting>
                </items>
            </Settings>
        </Menu>
        <Menu>
            <Name type="string">LIGHTS</Name>
            <Settings type="list">
                <items>
                    <Setting>
                        <Name type="string">Ceiling</Name>
                    </Setting>
                    <Setting>
                        <Name type="string">Back left</Name>
                    </Setting>
                    <Setting>
                        <Name type="string">Back right</Name>
                    </Setting>
                </items>
            </Settings>
        </Menu>
        <Menu>
            <Name type="string">SEATS</Name>
            <Settings type="list">
                <items>
                    <Setting>
                        <Name type="string">Heating left</Name>
                    </Setting>
                    <Setting>
                        <Name type="string">Heating right</Name>
                    </Setting>
                    <Setting>
                        <Name type="string">Back left</Name>
                    </Setting>
                    <Setting>
                        <Name type="string">Back right</Name>
                    </Setting>
                </items>
            </Settings>
        </Menu>
    </items>
</Settings>
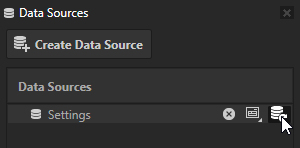
In the Data Sources next to the data source, click
 .
.This way you load the data from your data source and create data objects. A Data-Driven Exclusive Activity Host uses these data objects to generate Activities.
Create a template that a Data-Driven Exclusive Activity Host uses to generate Activities from a list data source.
For example:
In the Prefabs, click
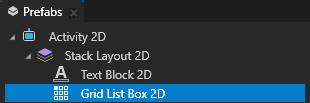
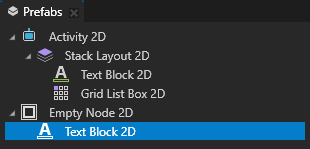
 and select Activity 2D. In the Activity 2D prefab create a Stack Layout 2D node with a Text Block 2D node and a Grid List Box 2D node.
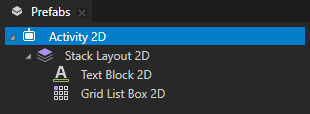
In the Prefabs, click
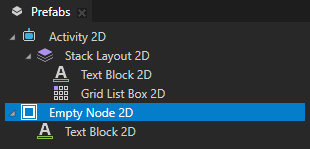
, select Empty Node 2D. In the Empty Node 2D prefab create a Text Block 2D node.The Grid List Box 2D node in the Activity 2D prefab uses this prefab to show the content of a menu that comes from the data source.
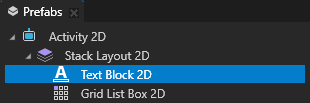
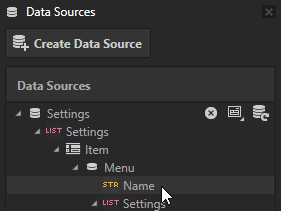
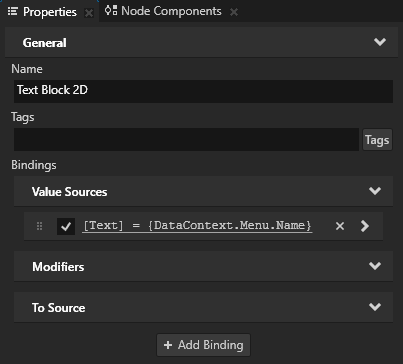
In the Prefabs in the Activity 2D prefab, select the Text Block 2D node. From the Data Sources, drag the Settings > Item > Menu > Name data object to the Properties and drop it on the Text property.
This way you set the Text Block 2D node to show the name of a settings menu from the Settings > Item > Menu > Name list data object.
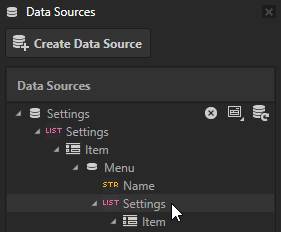
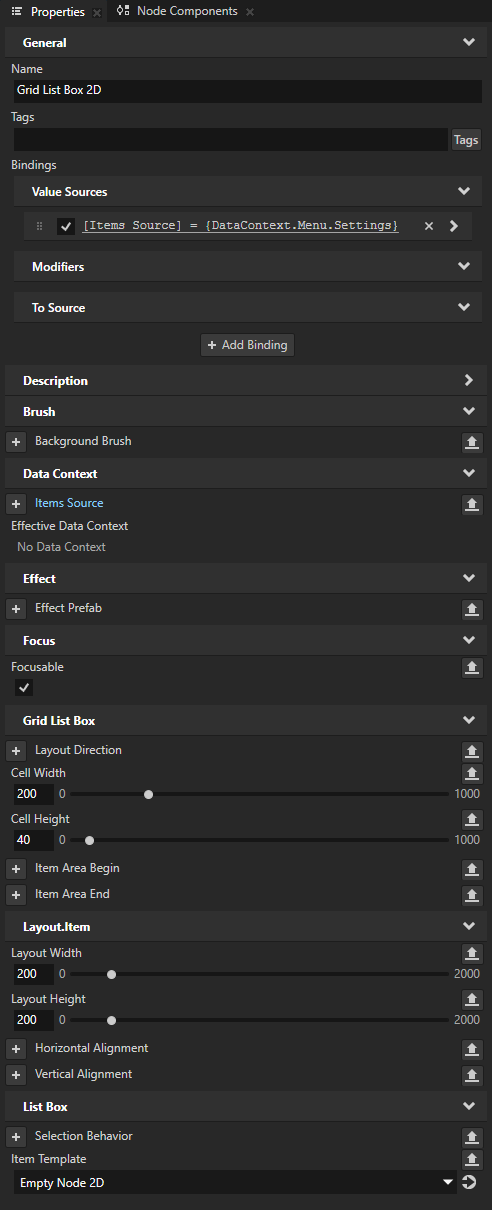
In the Prefabs in the Activity 2D prefab, select the Grid List Box 2D node. From the Data Sources drag the Settings > Item > Menu > Settings list data object to the Properties and drop it on the Items Source property.
This way you set the Grid List Box 2D node to show items in a settings menu from the Settings > Item > Menu > Settings list data object.

In the Prefabs in the Activity 2D prefab, select the Grid List Box 2D node. In the Properties add and set:
Cell Width to 200
Cell Height to 40
Layout Width 200
Layout Height to 200
Item Template to Empty Node 2D prefab
With the Item Template property you set which prefab template you want a Grid List Box node to use for the items in its list.
To learn how to use a Grid List Box, see Using the Grid List Box nodes and Tutorial: Create a contacts list with a Grid List Box.
In the Prefabs in the Empty Node 2D prefab, select the Text Block 2D node. From the Data Sources drag the Settings > Item > Menu > Settings > Item > Setting > Name data object to the Properties and drop it on the Text property.
This way you set the Text Block 2D node to show each item in a settings menu from the Settings > Item > Menu > Settings list data object.

Create and set up a Data-Driven Exclusive Activity Host:
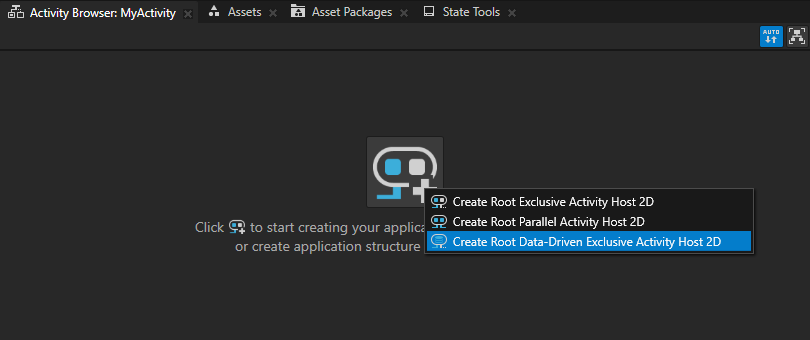
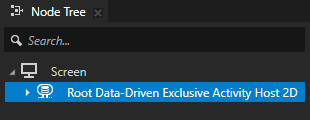
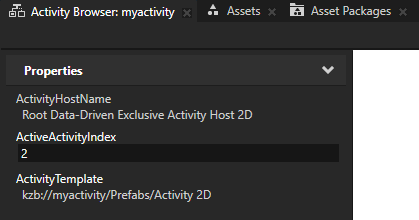
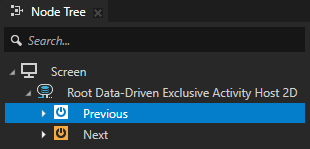
In the Activity Browser, click
 and create a Data-Driven Exclusive Activity Host node.
Kanzi Studio creates a Data-Driven Exclusive Activity Host node under the Screen node.
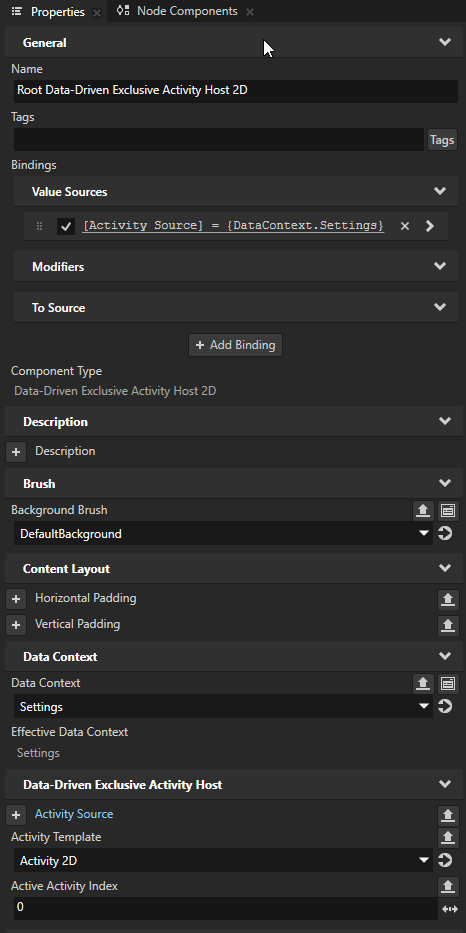
In the Node Tree, select the Data-Driven Exclusive Activity Host node that you created. In the Properties add and set the Data Context > Data Context property to the data source that you created in your project.
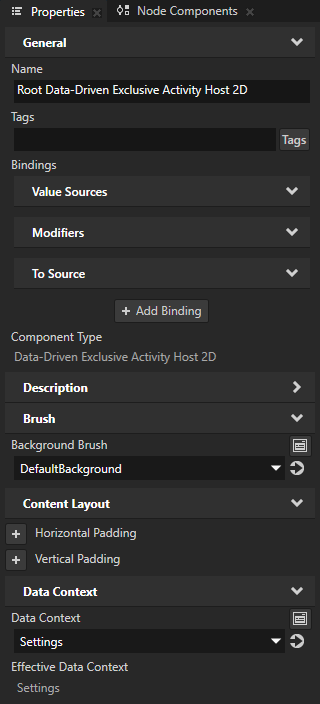
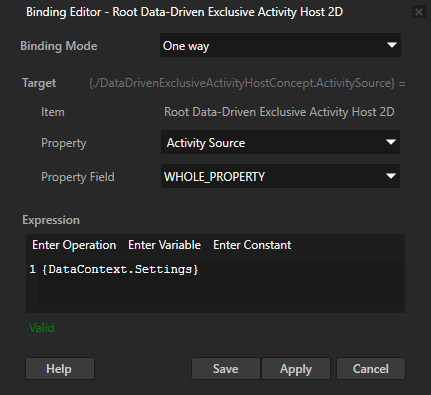
In the Node Tree, select the Data-Driven Exclusive Activity Host. In the Properties click + Add Binding and in the Binding Editor set:
Property to Activity Source
Expression to the data object that you want the Data-Driven Exclusive Activity Host to use to create Activities.
For example, set Expression to
{DataContext.Settings}
Click Save.
In the Properties, add and set:
Activity Template to the Activity 2D prefab that you created earlier.
Data-Driven Exclusive Activity Host uses this prefab to create Activities.
Active Activity Index to the item in the list data object that you want the Data-Driven Exclusive Activity Host to use to create an Activity when the application activates this Data-Driven Exclusive Activity Host.
The value of the Active Activity Index property is zero-based and indicates the position in the list data object in a data source that a Data-Driven Exclusive Activity Host uses to create Activities. Value -1 indicates that no Activities in that Data-Driven Exclusive Activity Host are active.
To learn how to activate and navigate between Activities that a Data-Driven Exclusive Activity Host creates from a data source, see Activating Activities.
Activating Activities
When you activate an Activity, Kanzi:
Creates an Activity node using its prefab.
Attaches the Activity node to the node tree.
Makes the Activity visible.
Sets the key focus to the Activity, if the Activity Host has key focus and is not configured differently. Controlling whether to set focus to an activating Activity.
You can:
Navigate between next and previous Activities in a Data-Driven Exclusive Activity Host. See Activating the next or previous Activity.
Activate with an Action a specific Activity in a Data-Driven Exclusive Activity Host. See Activating an Activity with a Set Property Action.
Activate a specific Activity in a Data-Driven Exclusive Activity Host when a condition is met. See Activating an Activity with an Apply Property Action.
Tip
To simulate the activation of Activities, in the Activity Browser select the Data-Driven Exclusive Activity Host and in the side panel adjust the value of the Active Activity Index property.
Use the Active Activity Index property to tell a Data-Driven Exclusive Activity Host which item in a list data object you want to create.
When you set the value of the Active Activity Index property in the Activity Browser, you change the runtime value of this property. When you restart the Preview or your application, the Data-Driven Exclusive Activity Host reads the value of the Active Activity Index property that you set in the Properties or with a Trigger and Action.
Finding out which Activity is active
To find out which Activity is active in a Data-Driven Exclusive Activity Host, check the value of the Active Activity Index in that Data-Driven Exclusive Activity Host.
The value of the Active Activity Index property is zero-based and indicates the position in the list data object in a data source that a Data-Driven Exclusive Activity Host uses to create Activities. Value -1 indicates that no Activities in that Data-Driven Exclusive Activity Host are active.
Activating the next or previous Activity
When you want to create navigation between the Activities in a Data-Driven Exclusive Activity Host, use the Navigate To Next Activity or Navigate To Previous Activity Actions.
To activate the next or previous Activity:
Create and set up a Data-Driven Exclusive Activity Host. See Creating Activities using a data source.
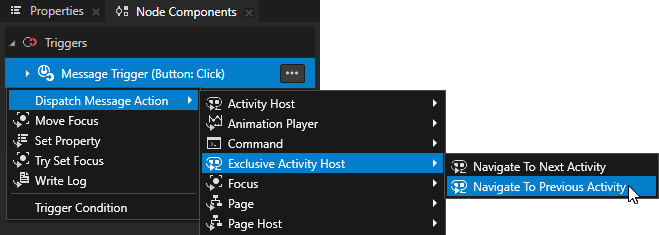
Create nodes with a Trigger that you want to use to activate the next and previous Activities that a Data-Driven Exclusive Activity Host creates from a data source.
For example, create Button nodes and use the Button: Click Trigger.
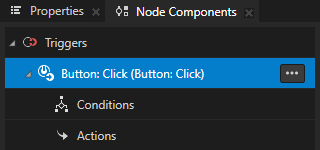
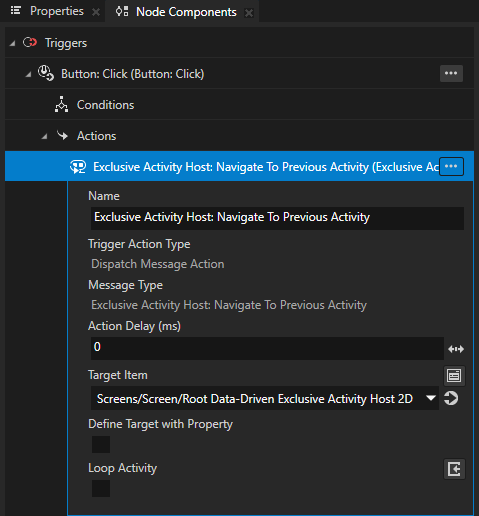
In the Node Tree, select one of the nodes that you created in the previous step. In the Node Components > Triggers, press Alt and right-click the Trigger that you want to use to activate an Activity, select either Navigate To Next Activity or Navigate To Previous Activity Action, and in the Action set:
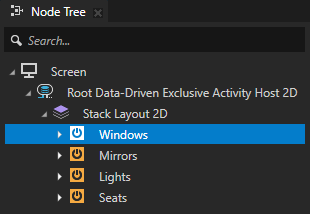
Target Item to the Data-Driven Exclusive Activity Host node between whose Activities you want to navigate.
(Optional) To activate the first or last Activity when you set off the Trigger after you reach the last or first Activity in that Data-Driven Exclusive Activity Host, set the Loop Activity property to enabled.
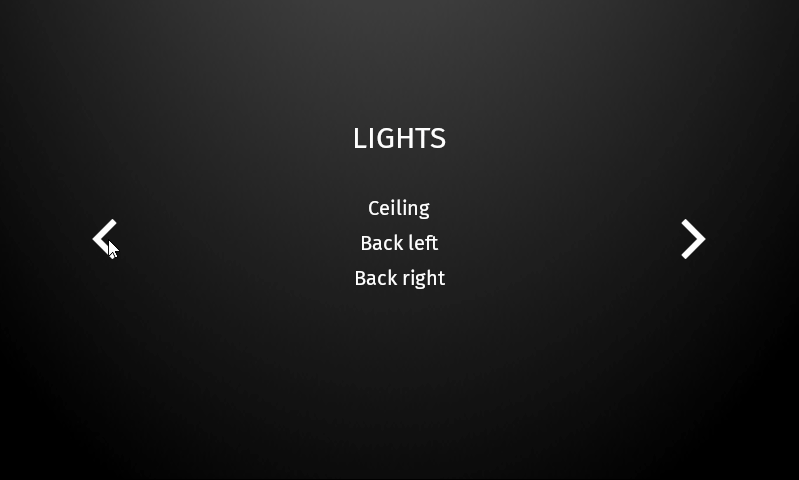
To activate the Activities, in the Preview click the buttons that you created.
Activating an Activity with a Set Property Action
When you know the position of a data object in the list data object from which a Data-Driven Exclusive Activity Host creates an Activity, use a Trigger with a Set Property Action.
To activate an Activity with an Action:
Create and set up a Data-Driven Exclusive Activity Host. See Creating Activities using a data source.
Create nodes with a Trigger that you want to use to activate the next and previous Activities that a Data-Driven Exclusive Activity Host creates from a data source.
For example, create Button nodes and use the Button: Click Trigger.
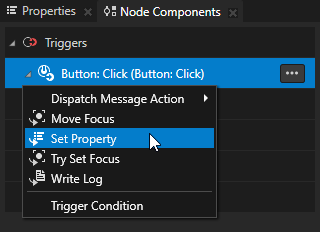
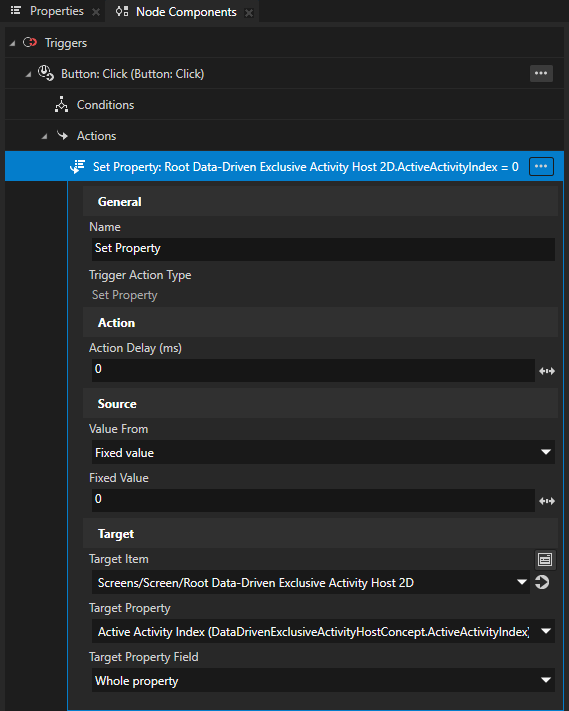
In the Node Tree, select one of the nodes that you created in the previous step. In the Node Components > Triggers, press Alt and right-click the Trigger that you want to use to activate an Activity, select the Set Property Action, and set:
Target Item to the Data-Driven Exclusive Activity Host where you want to activate an Activity.
Target Property to Active Activity Index
The value of the Active Activity Index property is zero-based and indicates the position in the list data object in a data source that a Data-Driven Exclusive Activity Host uses to create Activities. Value -1 indicates that no Activities in that Data-Driven Exclusive Activity Host are active.
Value From to the source that you want to use for the value of the Active Activity Index property in the Data-Driven Exclusive Activity Host:
Fixed value to use a static value.
In the Fixed Value property, set the value.
Message argument to get the value from a message.
In the Message Argument and Message Argument Field properties, set the message argument from which the value comes.
Property to get the value from a property.
In the Source Item, Source Property, and Source Property Field properties, set the node and property from which the value comes.
For example, set Value From to Fixed value and set the Fixed Value property to 0.
This way, when the Trigger is set off, the Data-Driven Exclusive Activity Host creates an Activity from the first data object of the data source that it uses.
To activate the Activities, in the Preview click the buttons that you created.
Activating an Activity with an Apply Property Action
When you know the position of a data object in the list data object from which a Data-Driven Exclusive Activity Host creates an Activity, you can create the Activity when a condition is met. To do this, use a Data Trigger with an Apply Property Action.
For example, use this approach to create and activate an Activity that shows a warning only when a condition for showing that warning is met.
When using a Data Trigger, keep in mind that Actions of a Data Trigger have a higher priority than the Actions of any other Trigger.
To activate an Activity when a condition is met:
Create and set up a Data-Driven Exclusive Activity Host. See Creating Activities using a data source.
Create a data object that you use to control which Activity is active:
In a text editor, add to the
Settings.xmlfile that the Data-Driven Exclusive Activity Host uses to create Activities:<Active> <Setting type="int">0</Setting> </Active>
In the Data Sources next to the data source, click
.
Set the condition:
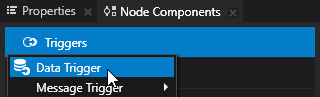
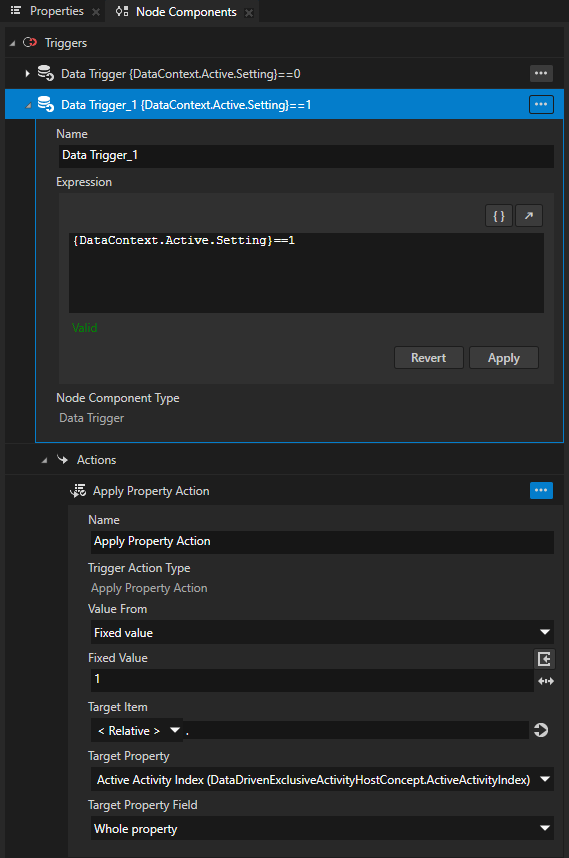
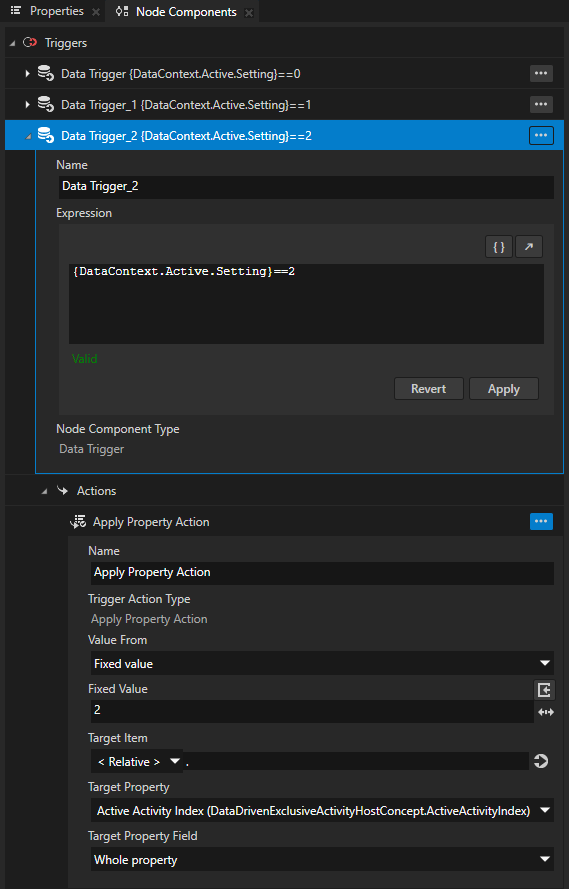
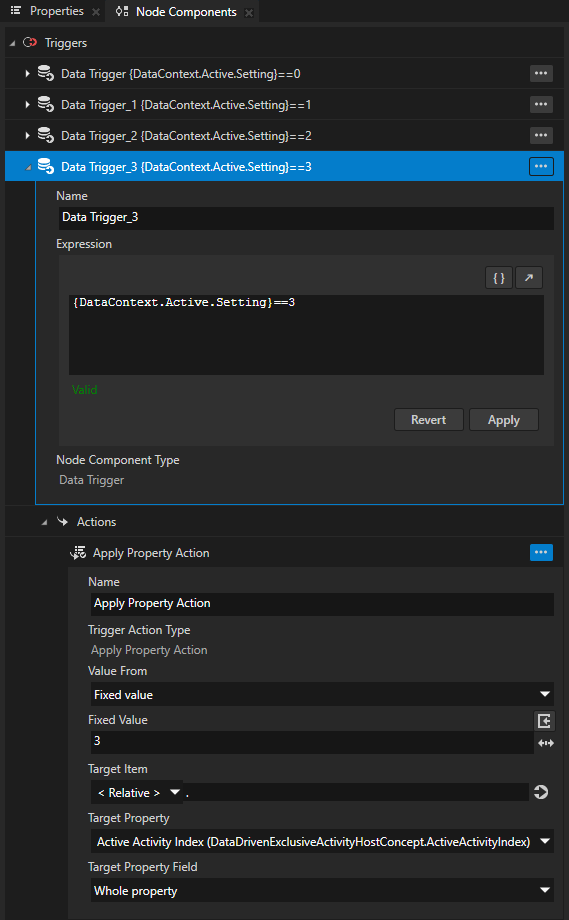
In the Node Tree, create or select a node where you want to set the condition. In the Node Components, press Alt and right-click Triggers and select Data Trigger.
For example, in the Data-Driven Exclusive Activity Host where you want to activate an Activity, create a Data Trigger.
In the Data Trigger, set the condition.
For example, create an expression that compares an expected value to a value that comes from a data source.
{DataContext.Active.Setting}==0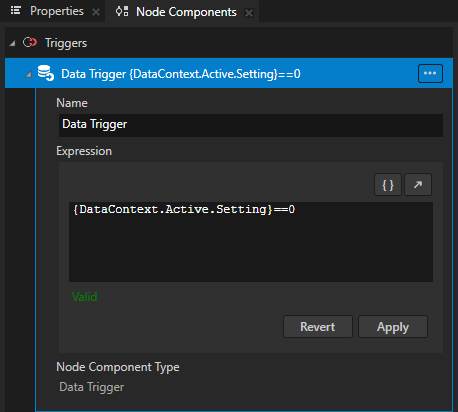
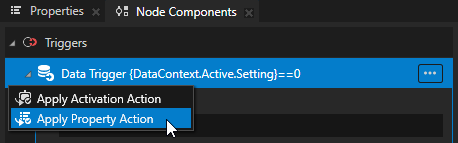
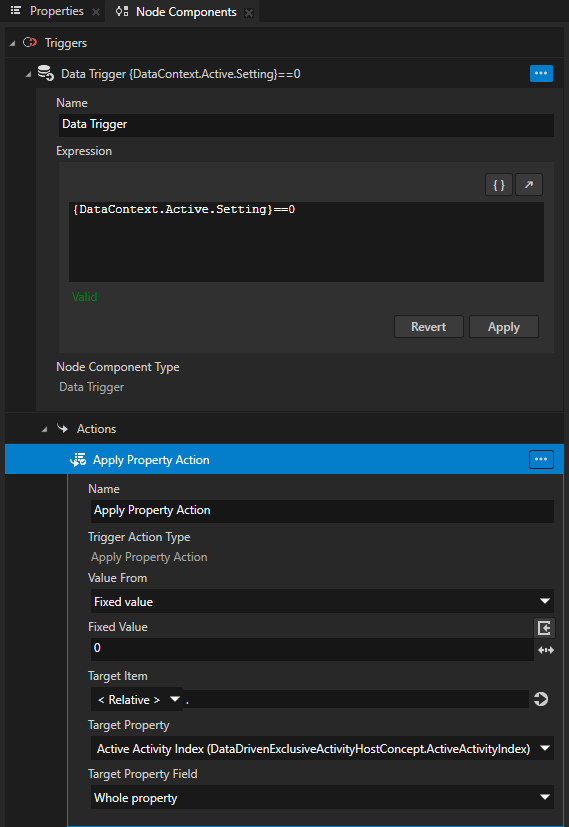
In the Node Components > Triggers, press Alt and right-click the Data Trigger that you created in the previous step, select Apply Property Action, and in the Action set:
Target Item to the Data-Driven Exclusive Activity Host where you want to activate an Activity.
Target Property to Active Activity Index
The value of the Active Activity Index property is zero-based and indicates the position in the list data object in a data source that a Data-Driven Exclusive Activity Host uses to create Activities. Value -1 indicates that no Activities in that Data-Driven Exclusive Activity Host are active.
Value From to the source that you want to use for the value of the Active Activity Index property in the Data-Driven Exclusive Activity Host:
Fixed value to use a static value.
In the Fixed Value property, set the value.
Message argument to get the value from a message.
In the Message Argument and Message Argument Field properties, set the message argument from which the value comes.
Property to get the value from a property.
In the Source Item, Source Property, and Source Property Field properties, set the node and property from which the value comes.
For example, set Value From to Fixed value and set the Fixed Value property to 0.
While the Expression evaluates to
True, the Data Trigger keeps the value in the Apply Property Action applied to the Active Activity Index property. This way the Data-Driven Exclusive Activity Host creates and activates an Activity from a list data object at that index.
(Optional) Repeat the previous two steps to create conditions for additional Activities.
To set which Activity is active, in a text editor edit the value of the Active > Setting data object that you added in this procedure and save the file. Set the value of the data object against which you compare the value in the Data Trigger condition expression.
Using Activities in the API
For details, see the Activity2D, Activity3D, DataDrivenExclusiveActivityHost2D, and DataDrivenExclusiveActivityHost3D classes.