Creating Kanzi Engine plugins
Kanzi Engine plugins extend the functionality of Kanzi Engine. Kanzi Engine executes these plugins on target platforms.
Use a Kanzi Engine plugin to:
Create custom nodes using the Kanzi Engine API, use them in your Kanzi Studio projects, and see in the Kanzi Studio Preview how they work.
Create custom property types and messages using the Kanzi Engine API, and use them in your Kanzi Studio projects.
Define the data entry points to your Kanzi application, and form the contract between the Kanzi application designer and developer.
To learn how you can use Kanzi Engine plugins, see:
To create a native Kanzi Engine plugin:
Create the plugin in one of these ways:
Install the plugin. See Adding a Kanzi Engine plugin to a Kanzi Studio project.
Debug the plugin. See Debugging native Kanzi Engine plugins.
Creating a native Kanzi Engine plugin using a template
You can create a native Kanzi Engine plugin using a template that is installed with Kanzi.
To create a native Kanzi Engine plugin using a template:
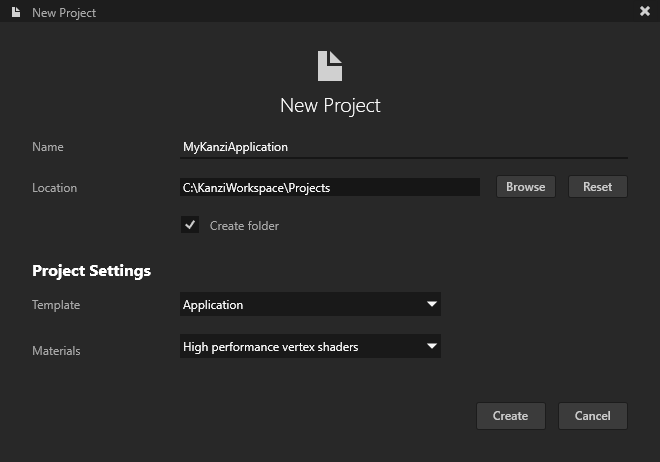
In Kanzi Studio Quick Start screen click New Project.
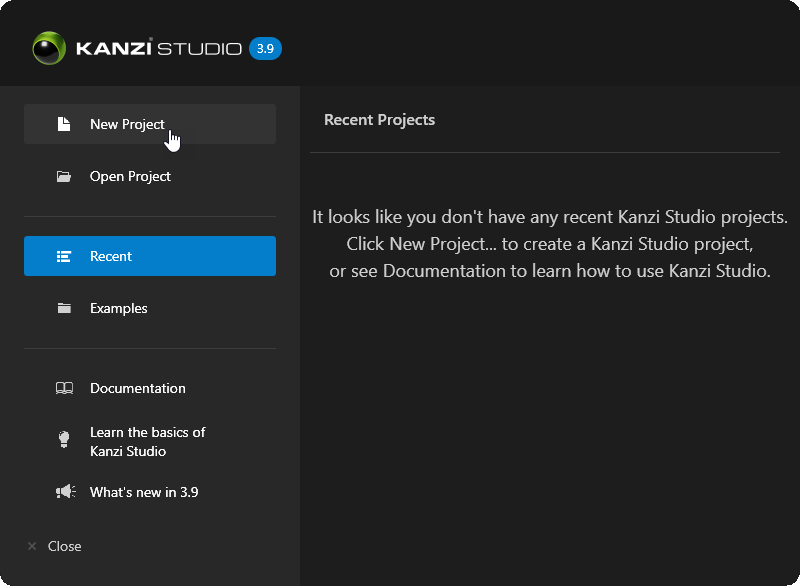
In the New Project window set Template to Application with Kanzi Engine plugin and click Create.
Kanzi creates a Kanzi Studio project in the
<ProjectName>/Tool_projectdirectory and the structure for the application code of your project in the<ProjectName>/Applicationdirectory:bindirectory contains the kzb and configuration files of your project.configsdirectory contains the configuration files for different platforms. By default, Kanzi creates configuration files for several different platforms. The recommended platform for developing Kanzi applications is Microsoft Visual Studio. See Deploying Kanzi applications.srcdirectory contains the source code for your application.CMakeLists.txtfile contains the instructions for CMake to generate the Visual Studio solution for the Kanzi application.generate_cmake_vs<Version>_solution.batis a script that you can use to generate a Visual Studio solution for the Kanzi application. The script generates the Visual Studio solution in the<ProjectName>/Application/build_vs<Version>directory.

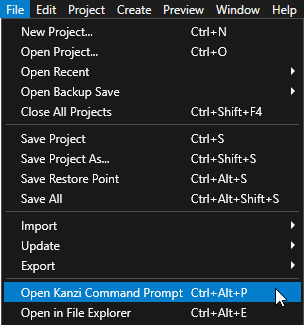
In Kanzi Studio, select File > Open Kanzi Command Prompt.
The Kanzi Command Prompt opens the Windows Command Prompt with the Kanzi environment variables set for the version of Kanzi for which you open a Kanzi Command Prompt.
Use the Kanzi Command Prompt to access Kanzi utilities and build tools, such as Gradle, SCons, and CMake, without using absolute paths or setting environment variables.
Tip
You can find the Kanzi Command Prompt in the Windows Start Menu in the Rightware directory.
When you have more than one version of Kanzi installed, make sure that you launch a Kanzi Command Prompt for the version of Kanzi with which you want to work in that command prompt.
In the Kanzi Command Prompt in the
<ProjectName>/Applicationdirectory, run the script that generates a Visual Studio solution for the application.For example, if you use Visual Studio 2019, run
generate_cmake_vs2019_solution.bat
This script generates a Visual Studio solution for the application in the directory
<ProjectName>/Application/build_vs2019.In Visual Studio open the
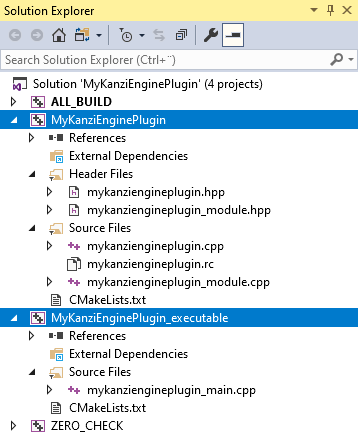
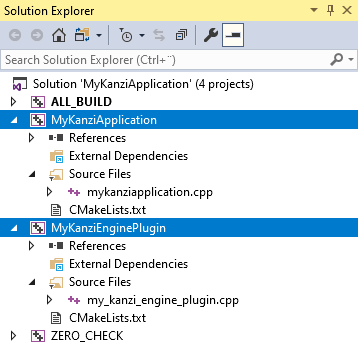
<ProjectName>/Application/build_vs<Version>/<ProjectName>.slnVisual Studio solution.The Visual Studio solution contains:
The project for the Kanzi Engine plugin named
<ProjectName>. Define your Kanzi Engine plugin in this project.The project for the C++ application named <ProjectName>_executable. Define the logic of your Kanzi application in this project.
In Visual Studio create the logic for your Kanzi application and your Kanzi Engine plugin, and configure the custom components in your Kanzi Engine plugin for Kanzi Studio. See Application development, Defining a data source, and Extending the functionality of Kanzi Engine.
When you add or remove files that your Kanzi application or Kanzi Engine plugin use, update in the
CMakeLists.txtthe list of files in thesetcommand and run thegenerate_cmake_vs<Version>_solution.batscript:When you change the files that you use in your Kanzi application, update
<ProjectName>/Application/src/executable/CMakeLists.txtWhen you change the files that you use in your Kanzi Engine plugin, update
<ProjectName>/Application/src/plugin/CMakeLists.txt
For example, to add the
tinyxml2.cppandtinyxml2.hfiles to your Kanzi Engine plugin, update<ProjectName>/Application/src/plugin/CMakeLists.txtto include these filesset(sources_plugin src/tinyxml2.cpp src/tinyxml2.h src/mykanziengineplugin.cpp src/mykanziengineplugin.hpp src/mykanziengineplugin.rc src/mykanziengineplugin_module.cpp src/mykanziengineplugin_module.hpp)
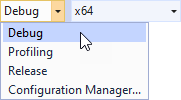
Select the solution configuration that you want to use.
During development select the Debug configuration. When you are ready to create a version for production, select the Release configuration.
Build your Kanzi Engine plugin:
To build only the Kanzi Engine plugin DLL, right-click the
<ProjectName>project and select Build.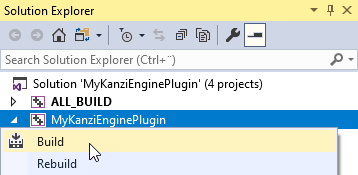
To build the Kanzi Engine plugin DLL and your Kanzi application, right-click the <ProjectName>_executable project and select Build.

Visual Studio builds:
Plugin DLL in the
<ProjectName>/Application/lib/<PlatformName>/<ConfigurationName>and the<ProjectName>/Application/build_vs<Version>/runtime/<ConfigurationName>directoriesKanzi Studio uses the plugin DLL in the
<ProjectName>/Application/libdirectory.Application executable in the
<ProjectName>/Application/build_<Version>/runtime/<ConfigurationName>directory.
Update the Kanzi Engine plugin in the Kanzi Studio project:
For DLL plugins, make sure that the settings in your Kanzi Studio project match the solution configuration that you use in Visual Studio to build your application and plugin projects.
For example, if you use the Release solution configuration in Visual Studio 2019, in your Kanzi Studio project in the Project > Properties set:
Preview OpenGL ES Wrapper to GL (Emulation through desktop OpenGL)
Preview Build Configuration to Release
Preview Visual Studio Version to 2019
Preview Working Directory to
..\Application\bin.
With these settings you set the Kanzi Studio Preview to work with the plugin.
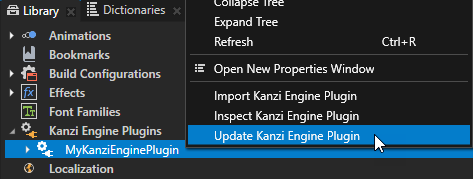
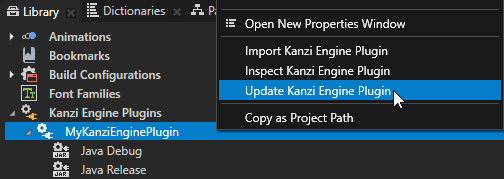
In Kanzi Studio in the project that you created in the first step, in the Library > Kanzi Engine Plugins right-click the plugin and select Update Kanzi Engine Plugin.
This way you update the plugin and take into use the changes that you made in the Visual Studio plugin project.
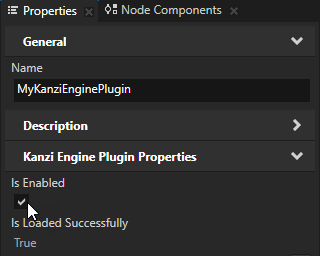
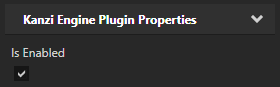
In the Properties make sure that the Is Enabled property is enabled.
Tip
Use the Is Enabled property to enable or disable any Kanzi Engine plugin in your project.
Creating a native Kanzi Engine plugin manually
To create a native Kanzi Engine plugin manually:
In Kanzi Studio New Project window set Template to Application to create a new project with C++ application.
In File Explorer in the
<ProjectName>/Applicationdirectory, create theplugin/srcdirectory.Add to the
<ProjectName>/Application/plugin/srcdirectory the file where you add thecreateModule,deleteModule, andModule::getMetaclassesOverridefunctions, and register all metaclasses that you implement in the plugin.The plugin uses these functions to get the list of functions, metaclasses, and the component inside the DLL. It uses them to register these to Kanzi Engine.
For example, name that file
my_kanzi_engine_plugin.cpp.#include <kanzi/core/module/module.hpp> extern "C" { MY_KANZI_ENGINE_PLUGIN_API kanzi::Module* createModule(uint32_t kanziVersionMajor, uint32_t kanziVersionMinor); } class MY_KANZI_ENGINE_PLUGIN_API MyKanziEnginePluginModule: public kanzi::Module { MetaclassContainer getMetaclassesOverride() override; }; MyKanziEnginePluginModule::MetaclassContainer MyKanziEnginePluginModule::getMetaclassesOverride() { MetaclassContainer metaclasses; return metaclasses; } MY_KANZI_ENGINE_PLUGIN_API kanzi::Module* createModule(uint32_t /*kanziVersionMajor*/, uint32_t /*kanziVersionMinor*/) { return new MyKanziEnginePluginModule; }
Add to the
<ProjectName>/Application/plugindirectory theCMakeLists.txtfile that contains the building instructions.cmake_minimum_required(VERSION 3.5.1) # Define the name of the plugin. project(MyKanziEnginePlugin) # Build the plugin as a dll. if(MSVC) option(BUILD_SHARED_LIBS "Selects whether to build and link to shared or static libraries" ON) endif() # Import the Kanzi CMake targets. Define the path to Kanzi (Kanzi_DIR) either in the # CMakeLists.txt or pass as a parameter when running cmake. if(NOT KANZI_ENGINE_BUILD) find_package(Kanzi REQUIRED CONFIG CMAKE_FIND_ROOT_PATH_BOTH HINTS "$ENV{KANZI_HOME}/Engine/lib/cmake/Kanzi") endif() include(kanzi-common) # Define the sources of the plugin. Produce a library. set(sources src/my_kanzi_engine_plugin.cpp) add_library(MyKanziEnginePlugin ${sources}) # Define Kanzi libraries as the dependencies of the plugin. target_link_libraries(MyKanziEnginePlugin PUBLIC Kanzi::kzcore Kanzi::kzcoreui Kanzi::kzui) target_include_directories(MyKanziEnginePlugin PUBLIC ${CMAKE_CURRENT_SOURCE_DIR}/src) # Define the dll interface macros. if(BUILD_SHARED_LIBS AND MSVC) target_compile_definitions(MyKanziEnginePlugin PRIVATE "MY_KANZI_ENGINE_PLUGIN_API=__declspec(dllexport)") target_compile_definitions(MyKanziEnginePlugin PRIVATE "MY_KANZI_ENGINE_PLUGIN_API_EXPORT") target_compile_definitions(MyKanziEnginePlugin INTERFACE "MY_KANZI_ENGINE_PLUGIN_API=__declspec(dllimport)") else() target_compile_definitions(MyKanziEnginePlugin PUBLIC "MY_KANZI_ENGINE_PLUGIN_API=") endif() # Add a post-build step that copies the plugin dll to a directory where the Kanzi Studio project can find it. # Set the relative path that points from the plugin directory to the application lib directory. if(BUILD_SHARED_LIBS AND MSVC) set(KANZI_PROJECT_PLUGIN_PATH "${PROJECT_SOURCE_DIR}/../lib/${CMAKE_VS_PLATFORM_NAME}/${MSVC_TAG}_$<CONFIG>_DLL") add_custom_command(TARGET MyKanziEnginePlugin POST_BUILD COMMAND ${CMAKE_COMMAND} -E make_directory "${KANZI_PROJECT_PLUGIN_PATH}" COMMAND ${CMAKE_COMMAND} -E copy_if_different "$<TARGET_FILE:MyKanziEnginePlugin>" "${KANZI_PROJECT_PLUGIN_PATH}") endif() install_target_to_output_directory(MyKanziEnginePlugin)In the
<ProjectName>/Applicationdirectory, edit theCMakeLists.txtfile for the main executable project to include the dependency to the Kanzi Engine plugin:add_subdirectory(plugin) target_link_libraries(MyKanziApplication Kanzi::kzui Kanzi::kzcoreui MyKanziEnginePlugin)
In Kanzi Studio, select File > Open Kanzi Command Prompt.
The Kanzi Command Prompt opens the Windows Command Prompt with the Kanzi environment variables set for the version of Kanzi for which you open a Kanzi Command Prompt.
Use the Kanzi Command Prompt to access Kanzi utilities and build tools, such as Gradle, SCons, and CMake, without using absolute paths or setting environment variables.
Tip
You can find the Kanzi Command Prompt in the Windows Start Menu in the Rightware directory.
When you have more than one version of Kanzi installed, make sure that you launch a Kanzi Command Prompt for the version of Kanzi with which you want to work in that command prompt.
In the Kanzi Command Prompt in the
<ProjectName>/Applicationdirectory, run the script that generates a Visual Studio solution for the application.For example, if you use Visual Studio 2019, run
generate_cmake_vs2019_solution.bat
This script generates a Visual Studio solution for the application in the directory
<ProjectName>/Application/build_vs2019.In Visual Studio open the
<ProjectName>/Application/build_vs<Version>/<ProjectName>.slnVisual Studio solution. The Visual Studio solution contains:The project for the Kanzi Engine plugin named MyKanziEnginePlugin. Here you create the Kanzi Engine plugin.
The project for the C++ application named <ProjectName>. Here you can create the logic for your application.
In Visual Studio create the logic for your Kanzi application and your Kanzi Engine plugin, and configure the custom components in your Kanzi Engine plugin for Kanzi Studio. See Application development, Creating Kanzi Engine plugins, Defining a data source, and Extending the functionality of Kanzi Engine.
When you add or remove files that your Kanzi application or Kanzi Engine plugin use, update in the
CMakeLists.txtthe list of files in thesetcommand and run thegenerate_cmake_vs<Version>_solution.batscript:When you change the files that you use in your Kanzi application, update
<ProjectName>/Application/src/executable/CMakeLists.txtWhen you change the files that you use in your Kanzi Engine plugin, update
<ProjectName>/Application/src/plugin/CMakeLists.txt
For example, to add the
tinyxml2.cppandtinyxml2.hfiles to your Kanzi Engine plugin, update<ProjectName>/Application/src/plugin/CMakeLists.txtto include these filesset(sources_plugin src/tinyxml2.cpp src/tinyxml2.h src/mykanziengineplugin.cpp src/mykanziengineplugin.hpp src/mykanziengineplugin.rc src/mykanziengineplugin_module.cpp src/mykanziengineplugin_module.hpp)
Select the solution configuration that you want to use.
During development select the Debug configuration. When you are ready to create a version for production, select the Release configuration.
Build your Kanzi Engine plugin:
To build only the Kanzi Engine plugin DLL, right-click the
<ProjectName>project and select Build.
To build the Kanzi Engine plugin DLL and your Kanzi application, right-click the <ProjectName>_executable project and select Build.
Visual Studio builds:
Plugin DLL in the
<ProjectName>/Application/lib/<PlatformName>/<ConfigurationName>and the<ProjectName>/Application/build_vs<Version>/runtime/<ConfigurationName>directoriesKanzi Studio uses the plugin DLL in the
<ProjectName>/Application/libdirectory. See Adding a Kanzi Engine plugin to a Kanzi Studio project.Application executable in the
<ProjectName>/Application/build_vs<Version>/runtime/<ConfigurationName>directory.
Creating a Java Kanzi Engine plugin using a template
You can create a Java Kanzi Engine plugin using a template that is installed with Kanzi.
To use Java Kanzi Engine plugins from Kanzi Studio, you need:
64-bit JDK 11 or 17
We recommend using JDK 17 that is installed with Android Studio.
Alternatively, you can install a standalone OpenJDK. For example, from https://github.com/adoptium/temurin17-binaries/releases/download/jdk-17.0.8.1%2B1/OpenJDK17U-jdk_x64_windows_hotspot_17.0.8.1_1.zip.
Note that you can only use Java plugins with Kanzi Android framework (droidfw) applications.
To create a Java Kanzi Engine plugin using a template:
In Kanzi Studio Quick Start screen click New Project.
In the New Project window set Template to Android Application with Java plugin and click Create.
Kanzi creates a Kanzi Studio project in the
<ProjectName>/Tool_projectdirectory and the structure for the application code of your project in the<ProjectName>/Applicationdirectory:bindirectory contains the kzb and configuration files of your project.configs/platforms/android_gradledirectory contains the configuration files for Kanzi Android framework (droidfw). See Developing with the Kanzi Android framework (droidfw).configs/platforms/android_gradle/app/src/maincontains the source code for your application.configs/platforms/android_gradle/<ProjectName>plugin/src/maincontains the source code for your Java plugin.

In Android Studio open
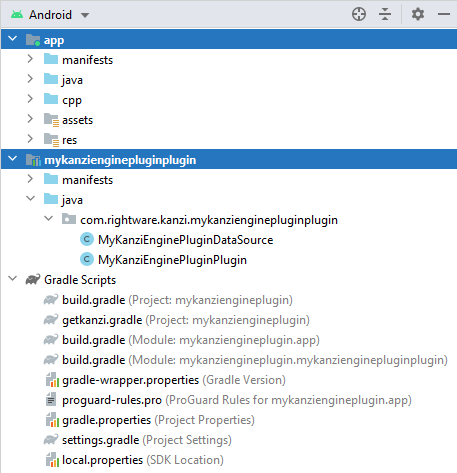
<ProjectName>/Application/configs/platforms/android_gradleAndroid Studio project.The Android Studio project contains:
The project for the Kanzi Engine plugin named
<ProjectName>plugin. Define your Kanzi Engine plugin in this project.The project for the Java application named app. Define the logic of your Kanzi application in this project.
In Android Studio create the logic for your Kanzi application and your Kanzi Engine plugin, and configure the custom components in your Kanzi Engine plugin for Kanzi Studio. See Extending the functionality of Kanzi Engine.
Build your Kanzi Engine plugin:
To build only the Kanzi Engine plugin JAR used by Kanzi Studio run the
exportJarDebugorexportJarReleaseGradle target.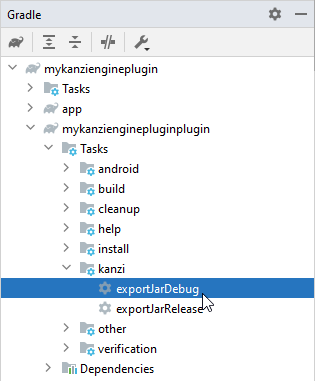
To build the Kanzi Engine plugin and your Kanzi application, select the app Java Module and then select Build > Make Project.
Update the Kanzi Engine plugin in the Kanzi Studio project:
In Kanzi Studio in the project that you created in the first step, in the Library > Kanzi Engine Plugins right-click the plugin and select Update Kanzi Engine Plugin.
This way you update the plugin and take into use the changes that you made in the Android Studio plugin project.
In the Properties make sure that the Is Enabled property is enabled.
Tip
Use the Is Enabled property to enable or disable any Kanzi Engine plugin in your project.
Creating a Java Kanzi Engine plugin manually
To create a Java Kanzi Engine plugin manually:
In Kanzi Studio New Project window set Template to Android Application to create a new project with Java application.

Create the directories and files that define a Java Kanzi Engine plugin:
In the
Application/configs/platforms/android_gradledirectory create the directory structureMyKanziplugin/src/main/java/com/rightware/kanzi/MyKanziplugin.In the
MyKanziplugin/src/main/java/com/rightware/kanzi/MyKanziplugindirectory create theMyKanziDataSource.javafile and add to it a basic customDataSource.package com.rightware.kanzi.mykanziplugin; import com.rightware.kanzi.DataObject; import com.rightware.kanzi.DataObjectInt; import com.rightware.kanzi.DataObjectReal; import com.rightware.kanzi.DataObjectString; import com.rightware.kanzi.DataSource; import com.rightware.kanzi.Domain; import com.rightware.kanzi.Metaclass; import com.rightware.kanzi.Metadata; public class MyKanziDataSource extends DataSource { @Metadata private static final Metaclass metaclass = new Metaclass("MyKanziDataSource"); private ObjectRef<DataObject> mRoot; public static ObjectRef<MyKanziDataSource> create(Domain domain, String name) { return DataSource.createDerived(domain, name, metaclass); } public static Metaclass getStaticMetaclass() { return sStaticMetaclass; } public DataObject getData() { return mRoot.get(); } private MyKanziDataSource(Domain domain, long native Metaclass metaclass) { super(domain, native, metaclass); // Construct the data object tree of the data source. mRoot = DataObject.create(domain, "Root"); DataObject root = mRoot.get(); root.addChild(DataObjectInt.create(domain, "Integer value", 1).get()); root.addChild(DataObjectString.create(domain, "String value", "Placeholder value").get()); root.addChild(DataObjectReal.create(domain, "Real value", 0.5).get()); } }
In the
MyKanziplugin/src/main/java/com/rightware/kanzi/MyKanziplugindirectory create theMyKanziPlugin.javafile and add to it the plugin definition.package com.rightware.kanzi.mykanziplugin; import com.rightware.kanzi.MetaclassRegistry; import com.rightware.kanzi.Plugin; public class MyKanziPlugin extends Plugin { @Override public String getName() { return "mykanziplugin"; } @Override public void registerClasses(MetaclassRegistry metaclassRegistry) { metaclassRegistry.registerClass(MyKanziDataSource.class); } }
Tip
The string returned from
Plugin.getNamemust match the name of the Jar file.In the
MyKanziplugin/src/maindirectory create theAndroidManifest.xmlfile and add to it the plugin Android manifest.<manifest xmlns:android="http://schemas.android.com/apk/res/android" package="com.rightware.kanzi.mykanziplugin"> </manifest>
In the
Application/configs/platforms/android_gradle/MyKanziplugindirectory create thebuild.gradlefile and add to it the Gradle build instructions.apply plugin: 'com.android.library' android { compileSdkVersion 28 defaultConfig { minSdkVersion 26 targetSdkVersion 28 versionCode 1 versionName "1.0" } buildTypes { release { minifyEnabled false proguardFiles getDefaultProguardFile('proguard-android.txt'), 'proguard-rules.pro' } } } android.buildTypes.all { buildType -> task "exportJar${buildType.name.capitalize()}"(type: Jar, group: 'Kanzi') { archiveBaseName = project.name destinationDir = file("${rootDir}/../../../lib/java/${buildType.name.capitalize()}") description "Export ${buildType.name} JAR plugin into ${destinationDirectory.get().toString()}." manifest { attributes 'Plugin-Version': "${android.defaultConfig.versionName}", 'Plugin-Class': 'com.rightware.kanzi.mykanziplugin.MyKanziPlugin' } from("build/intermediates/javac/${buildType.name}/classes/") dependsOn("assemble${buildType.name.capitalize()}") } } java { sourceCompatibility = JavaVersion.VERSION_1_7 targetCompatibility = JavaVersion.VERSION_1_7 } dependencies { implementation 'com.rightware.kanzi:kzjava@aar' }
In the Kanzi Android framework (droidfw) project add a reference to the Java Kanzi Engine plugin. In the
Application/configs/platforms/android_gradledirectory:In the
settings.gradlefile add the reference to the plugin project that you created.include ':MyKanziplugin'
In the
appdirectory, in thebuild.gradlefile add the plugin to thedependenciessection.implementation project(':MyKanziplugin')
In the
app/src/main/java/com/rightware/kanzi/<ProjectName>directory, in the<ProjectName>Activity.javafile make these changes:To the imports add:
import com.rightware.kanzi.mykanziplugin.MyKanziPlugin;
At the beginning of the
onCreatemethod add:mRuntimeRef.get().getDomain().registerPlugin(new MyKanziPlugin());
In Android Studio build your Kanzi Engine plugin:
To build the Kanzi Engine plugin JAR that Kanzi Studio uses, run the
exportJarDebugorexportJarReleaseGradle target.
To build the Kanzi Engine plugin and your Kanzi application, select the app Java Module and then select Build > Make Project.
Android Studio builds the JAR file that Kanzi Studio uses in
Application/lib/java/<buildType>/MyKanziplugin.jar. To use the plugin, import it to Kanzi Studio. See Adding a Kanzi Engine plugin to a Kanzi Studio project.
Adding a Kanzi Engine plugin to a Kanzi Studio project
To add a Kanzi Engine plugin to a Kanzi Studio project:
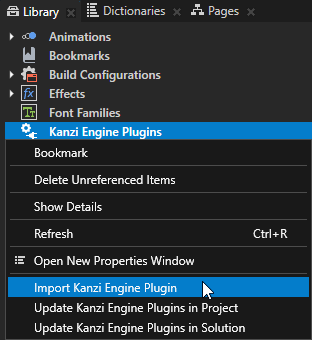
In the Library right-click Kanzi Engine Plugins and select Import Kanzi Engine Plugin.
Tip
You can automate the importing of Kanzi Engine plugins using a script. See Importing a Kanzi Engine plugin using a script.
Select the DLL or JAR file of the plugin that you want to import and click Open.
Note
Starting with Kanzi Studio 3.9.5, the path of Kanzi Java plugins must follow this pattern:
For debug, the path must be
lib/java/Debug/<PluginName>.jar.For release, the path must be
lib/java/Release/<PluginName>.jar.
See Changes in support for Debug and Release build types for Kanzi Engine Java plugins.
When you select in the Library > Kanzi Engine Plugins the plugin that you imported, in the Properties you can see a list of the content that the plugin brings to the Kanzi Studio project. For example, in the Properties you can see a list of property types, component, data source, render pass, node component, and trigger action types provided by the selected plugin.
For DLL plugins, make sure that the settings in your Kanzi Studio project match the solution configuration that you use in Visual Studio to build your application and plugin projects.
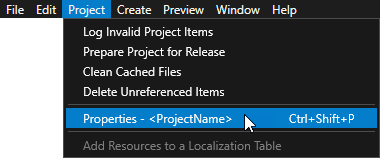
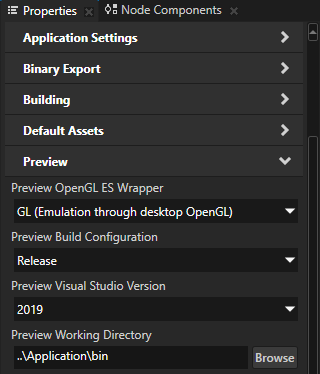
For example, if you use the Release solution configuration in Visual Studio 2019, in your Kanzi Studio project in the Project > Properties set:
Preview OpenGL ES Wrapper to GL (Emulation through desktop OpenGL)
Preview Build Configuration to Release
Preview Visual Studio Version to 2019
Preview Working Directory to
..\Application\bin.
With these settings you set the Kanzi Studio Preview to work with the plugin.
In the Library > Kanzi Engine Plugins select the plugin and in the Properties make sure that the Is Enabled property is enabled.
Tip
Use the Is Enabled property to enable or disable any Kanzi Engine plugin in your project.
Restart the Preview by pressing Ctrl F8, or by selecting Preview > Restart Preview.
You can now use the content provided by the Kanzi Engine plugin in your Kanzi Studio project.