Working with Kanzi Android framework (droidfw) projects
Adding Kanzi Android framework (droidfw) to your Android application
To add Kanzi Android framework (droidfw) to an Android application that you created using Android Studio templates either:
Integrate Kanzi as a library sub-project. This is the recommended approach to start using Kanzi on Android. See Integrating Kanzi as a library sub-project.
Integrate Kanzi as a pre-built library. Use this approach if the separation meets the requirements of your workflow. For example, if you benefit from not installing Kanzi or required tooling. See Integrating Kanzi as a prebuilt library (AAR).
Integrating Kanzi as a library sub-project
Tip
This is the recommended approach to start using Kanzi on Android.
When you integrate Kanzi as a library sub-project, you add Kanzi CMake integration to your application as an Android library sub-project.
To integrate Kanzi as a library sub-project:
From the
<KanziWorkspace>/Templates/Android_librarydirectory, copy to the root of your Android project:getkanzi.gradlefilekanzinativedirectory
In the
settings.gradleorsettings.gradle.ktsfile of your project, add:dependencyResolutionManagement { repositories { flatDir { apply from: 'getkanzi.gradle' dirs getKanziAndroidLibrariesPath() } } }
dependencyResolutionManagement {
  repositories {
     flatDir {
       apply(from ="getkanzi.gradle")
       dirs(extra.get("getKanziAndroidLibrariesPath"))
     }
  }
}
This utility helps your project find Kanzi libraries from your local Kanzi installation or platform package.
You can either:
Keep your project in the Kanzi workspace directory
Point
KANZI_HOMEenvironment variable to your Kanzi workspaceIn your project
local.properties, set thekanzi.homeproperty to your Kanzi workspace or platform packageInclude Kanzi libraries from your own location or repository
To include
kanzinativeas a sub-project, in thesettings.gradleorsettings.gradle.ktsfile of your project add:include ':kanzinative'
include(":kanzinative")
To make your application depend on prebuilt Kanzi Android libraries and
kanzinativesub-project, in theapp/build.gradleorapp/build.gradle.ktsfile of your project, add:dependencies { implementation 'com.rightware.kanzi:kanziruntime-droidfw@aar' implementation 'com.rightware.kanzi:kzjava@aar' implementation project(':kanzinative') }
dependencies {
  implementation("com.rightware.kanzi:kanziruntime-droidfw@aar")
  implementation("com.rightware.kanzi:kzjava@aar")
  implementation(project(":kanzinative"))
}
In the
app/build.gradleorapp/build.gradle.ktsfile of your project, ensure that the Java language version is set to 8 (1.8) or higher:android { compileOptions { sourceCompatibility JavaVersion.VERSION_1_11 targetCompatibility JavaVersion.VERSION_1_11 } }
android {
    compileOptions {
       sourceCompatibility = JavaVersion.VERSION_11
       targetCompatibility = JavaVersion.VERSION_11
    }
}
Integrating Kanzi as a prebuilt library (AAR)
In this mode, you link the C++ libraries, including the required C++ plugins, into an AAR once, and then reuse it from your application projects.
This means that:
Building your application project does not require access to the Kanzi workspace or platform package, as long as it can reach the prebuilt Kanzi AARs from your package management system or version control.
Building your application project does not perform a C++ build and therefore does not require NDK or CMake. This makes your application build faster.
Use this approach if such separation meets the requirements of your workflow. For example, if you benefit from not installing Kanzi or required tooling, when building your application project.
Instantiating your library project
Copy the <KanziWorkspace>/Templates/Android_library directory to the location that you want to use.
Building an AAR from the library
To build and install AAR libraries for all build configurations, run:
gradlew installNativeAARs
To build and install an AAR for one build configuration use install<Configuration>NativeAAR task. For example, to build the debug version of AAR, run:
gradlew installDebugNativeAAR
By default, the resulting AAR contains Kanzi C++ libraries for all available architectures. All install tasks support the arch property with which you can specify a comma-separated list of ABIs. For example, to build and install debug AAR library for x86_64 architecture, run:
gradlew installDebugNativeAAR -Parch=x86_64
The default definitions of these tasks install the AAR with kanzinative-<configuration>.aar name to the Kanzi Android libraries directory.
To change the name of the AAR, you can either:
In your project
local.properties, set thekanzi.aar.nameproperty.Set the
aarNameproperty when executing the installtask.For example, to build and install AAR libraries with
my-kanzi-aarname, run:gradlew installNativeAARa -PaarName=my-kanzi-aar
To change where install tasks put AAR libraries, you can either:
In your project
local.properties, set thekanzi.aar.destinationproperty.Set the
aarDestproperty when executing the installtask.For example, to build and install AAR libraries to
C:/MyKanziWorkspace, run:gradlew installNativeAARa -PaarDest=C:/MyKanziWorkspace
Importing Kanzi into your application project
To import Kanzi into your application project:
Make Kanzi prebuilt and native AARs libraries reachable to you Android project with the package management system that you use.
For example, to import Kanzi from the default Kanzi workspace and default install location of native AARs libraries:
From the
<KanziWorkspace>/Templates/Android_librarydirectory, copygetkanzi.gradlefile to the root of your Android project.In the
settings.gradleorsettings.gradle.ktsfile of your project, add:dependencyResolutionManagement { repositories { flatDir { apply from: 'getkanzi.gradle' dirs getKanziAndroidLibrariesPath() } } }
dependencyResolutionManagement {
  repositories {
     flatDir {
       apply(from ="getkanzi.gradle")
       dirs(extra.get("getKanziAndroidLibrariesPath"))
     }
  }
}
This utility helps your project find Kanzi libraries from your local Kanzi installation or platform package.
You can either:
Keep your project in the Kanzi workspace directory
Point
KANZI_HOMEenvironment variable to your Kanzi workspaceIn your project
local.properties, set thekanzi.homeproperty to your Kanzi workspace or platform packageInclude Kanzi libraries from your own location or repository
Import Kanzi prebuilt AARs and native AARs that you built from your library project to the
app/build.gradleorapp/build.gradle.ktsfile of your project.dependencies { implementation 'com.rightware.kanzi:kanziruntime-droidfw@aar' implementation 'com.rightware.kanzi:kzjava@aar' debugImplementation 'com.rightware.kanzi:kanzinative-debug@aar' releaseImplementation 'com.rightware.kanzi:kanzinative-release@aar' "profilingImplementation"('com.rightware.kanzi:kanzinative-profiling@aar') }
dependencies {
  implementation("com.rightware.kanzi:kanziruntime-droidfw@aar")
  implementation("com.rightware.kanzi:kzjava@aar")

  debugImplementation("com.rightware.kanzi:kanzinative-debug@aar")
  releaseImplementation("com.rightware.kanzi:kanzinative-release@aar")
  "profilingImplementation("com.rightware.kanzi:kanzinative-profiling@aar")
}
In the
app/build.gradleorapp/build.gradle.ktsfile of your project, ensure that the Java language version is set to 8 (1.8) or higher:android { compileOptions { sourceCompatibility JavaVersion.VERSION_1_11 targetCompatibility JavaVersion.VERSION_1_11 } }
android {
    compileOptions {
       sourceCompatibility = JavaVersion.VERSION_11
       targetCompatibility = JavaVersion.VERSION_11
    }
}
Adding Kanzi Studio project assets to your application
To add Kanzi Studio assets to your Android application:
Import Kanzi Studio project assets, such as kzb and cfg files, to your Android Studio project, using one of these options:
In the
app/build.gradleorapp/build.gradle.ktsof your Android Studio project, set the path to the<ProjectName>/Application/bindirectory of your Kanzi Studio project:android { defaultConfig { sourceSets { main { assets.srcDirs = "<ProjectName>/Application/bin" } } } }
android {
  defaultConfig {
    sourceSets.named("main") {
      assets.srcDirs("<ProjectName>/Application/bin")
    }
  }
}
Copy the content of the
<ProjectName>/Application/bindirectory of your Kanzi Studio project to theapp/src/main/assetsdirectory of your Android Studio project.In Kanzi Studio, in the Project > Properties set the Binary Export Directory property of your Kanzi Studio project to the
app/src/main/assetsdirectory of your Android Studio project.This way you tell Kanzi Studio where to export your project kzb file.
Note
Kanzi Studio does not export the
application.cfgfile. Copy the file manually to theapp/src/main/assetsdirectory of your Android Studio project.
Disable compression of the assets files that you import, so Kanzi Engine can load them. In the
app/build.gradleorapp/build.gradle.ktsfile of your project add:android { aaptOptions { noCompress "kzb", "cfg", "json" } }
android {
  androidResources {
    noCompress += listOf("kzb", "cfg", "json")
  }
}
Creating an Android application in Kanzi Studio
To create an Android application in Kanzi Studio, in the New tab of the Quick Start window:
Select the project template that you want to use for your Android application:
Android application template creates a Kanzi Studio project with a Kanzi Android framework-based application.
Android application with Java plugin template creates a Kanzi Studio project with a Kanzi Android framework-based application that contains a Kanzi Engine Java plugin.
See Creating a Java Kanzi Engine plugin using a template and Using Java and Kotlin.
(Optional) Set Android Package Name to the name of the Android package for the project.
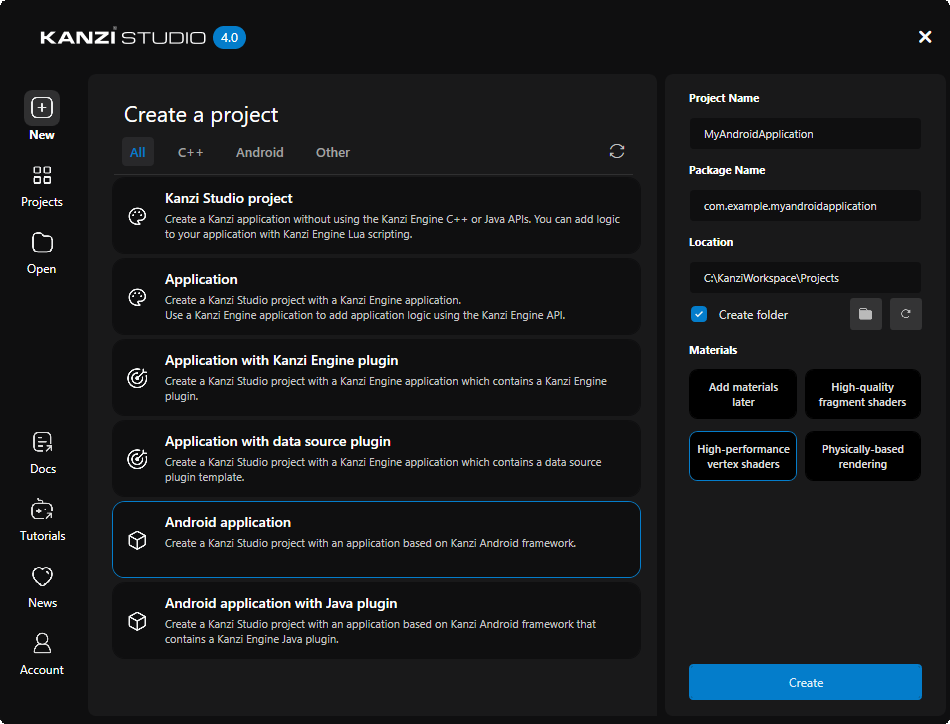
Click Create.
Kanzi Studio creates a project in the project directory that you set in the New tab of the Quick Start window in Location, and an Android application project in the
<ProjectName>/Application/configs/platforms/android_gradledirectory.
To learn how to build and deploy your application, see Deploying Kanzi applications to Android.
Loading kzb files from a custom location
By default, Kanzi reads kzb files from the assets directory of an APK.
To set a different location, call KanziRuntime.setResourceDirectory.
After this call, Kanzi reads kzb files from the specified location across all views of the application.
For example, to load kzb files from the external storage directory:
mRuntimeRef.get().setResourceDirectory(Environment.getExternalStorageDirectory().toPath());
To revert to the default location, call the interface with an empty string.