Creating a project
To create a project:
In Kanzi Studio, either:
In the main menu, select File > New Project.
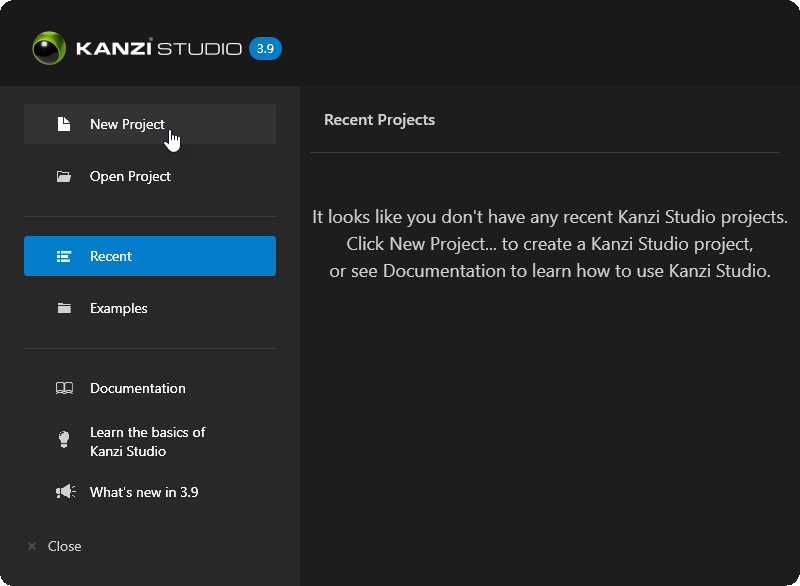
In the Quick Start window, click New Project.
The Quick Start window is available when you open Kanzi Studio or close a project. If the Quick Start window is not visible, to open it, in the main menu select File > Show Quick Start.
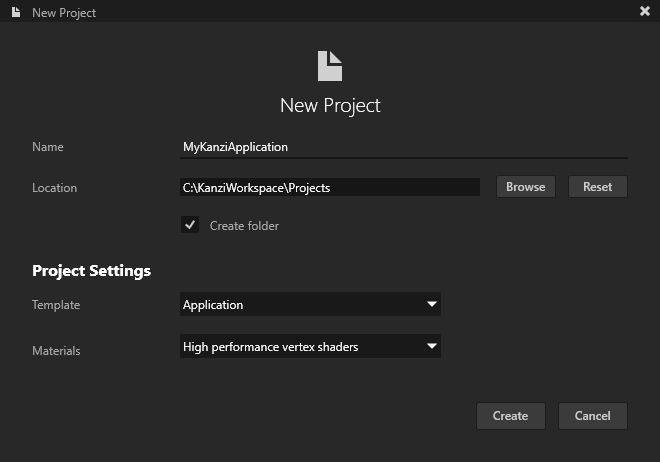
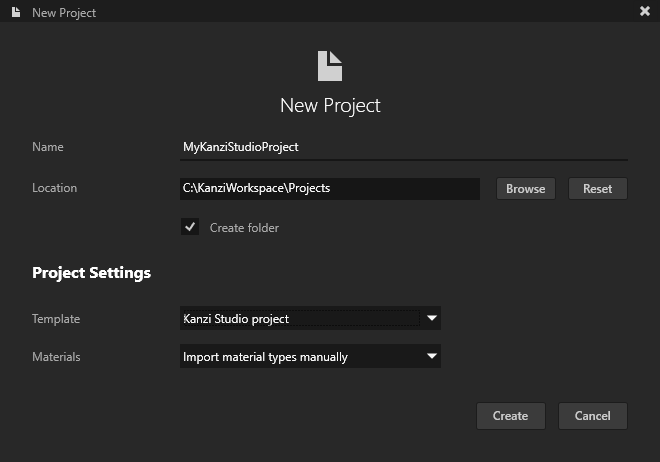
In the New Project window, set:
Name to the name that you want to use for the project.
Location to the directory where you want to create the project.
If you do not want to create a directory for the project, deselect Create folder.
Template to the type of application that you want to create:
To create an application using the Kanzi Engine C++ API, see C++.
To create an application for Android using the Kanzi Engine Java API, see Android (Java, Kotlin).
To create only a Kanzi Studio project, see Kanzi Studio project.
Materials to the materials that you want to import to your project. See Material types.
Click Create.
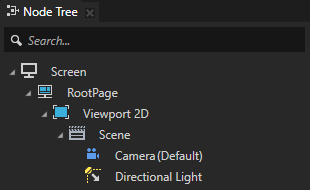
Kanzi Studio creates a project. You can see the structure of the project in the Kanzi Studio Node Tree and in the directory that you set in Location.
After you create a project, you can import 2D and 3D content that you created outside of Kanzi Studio and start building your Kanzi application. See Tutorials.
You can configure your project in Kanzi Studio. See Configuring Kanzi Studio projects.
Application types
C++
To create application logic using the Kanzi Engine C++ API, in the New Project window, set Template to one of these templates:
Application template creates a Kanzi Studio project with a Kanzi Engine application.
Use this template to create a Kanzi application for which you can create application logic using the Kanzi Engine C++ API. See Tutorial: Hello world!
Application with Kanzi Engine plugin template creates a Kanzi Studio project with a Kanzi Engine application that contains a Kanzi Engine plugin.
Use Kanzi Engine plugins to extend the functionality of Kanzi for your application. See Extending the functionality of Kanzi Engine.
Application with data source plugin template creates a project with a Kanzi Engine application that contains a data source plugin template.
Use Kanzi Engine data source plugins to define data sources for your Kanzi application. See Tutorial: Get application data from a data source and Defining a data source.
Kanzi Studio creates a project where:
Applicationdirectory contains the structure and template source code for the application and plugin of your project.Tool_projectdirectory contains the Kanzi Studio project.
Android (Java, Kotlin)
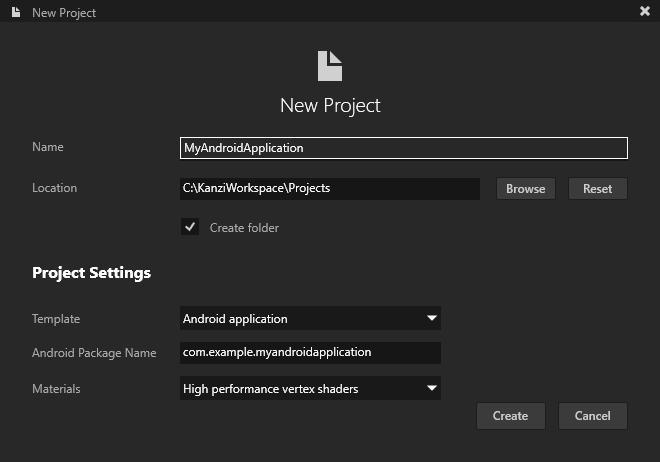
To create an application for Android with the Kanzi Engine Java API, in the New Project window, set:
Template to one of these templates:
Android application template creates a Kanzi Studio project with a Kanzi Android framework-based application.
See Tutorial: Getting started with Kanzi Android framework (droidfw)
Android application with Java plugin template creates a Kanzi Studio project with a Kanzi Android framework-based application that contains a Kanzi Engine Java plugin.
Use Kanzi Engine Java plugins to split your reusable application logic.
See Tutorial: Data sources for Android, Creating a Java Kanzi Engine plugin using a template, and Extending the functionality of Kanzi Engine with Java.
Android Package Name to the name of the Android package for the project.
Kanzi Studio creates a project where:
Applicationdirectory contains the structure and template source code for the application and possible plugin of your project.Application/configs/platforms/Android_gradledirectory contains the source code of the Android application project.Tool_projectdirectory contains the Kanzi Studio project.
See Application development and Developing with the Kanzi Android framework (droidfw).
Kanzi Studio project
You can create a Kanzi Studio project without a Kanzi Engine application. For example, you can combine multiple Kanzi Studio projects into a Kanzi Studio solution. See Combining Kanzi Studio projects into a Kanzi application.
To create only a Kanzi Studio project, in the New Project window, set Template to Kanzi Studio project.
You can deploy a Kanzi Studio-only project to Windows. See Building and deploying Kanzi applications to Windows from Kanzi Studio.
Material types
When you create a Kanzi Studio project, you can select the materials that you want to include in your project.
In the New Project window, set Materials:
To start with a template that does not contain any predefined material types, select Import material types manually. You can add material types from the Kanzi Studio material library to the project when you need them, or create your own material types. See Adding a material type to your project.
High performance vertex shaders template is intended for low precision and high performance OpenGL ES2 applications. It contains vertex-based shaders optimized for use with OpenGL ES2. Most of the GPU specific computation, including applying lights using the Phong reflection model, is done in the vertex shader. This is a good starting point for most devices.
High quality fragment shaders template is intended for high precision OpenGL ES2 applications. It contains pixel-shader based materials for use with OpenGL ES2. Most of the GPU specific computation, including applying lights using the Phong reflection model, is done in the fragment shader. This offers better image quality often at the cost of performance.
Physically based rendering template is intended for OpenGL ES3 applications. It contains materials based on shaders that implement physically-based rendering (PBR) principles. The properties of these materials represent physical properties, such as metalness, and are therefore intuitive to control. Most of the GPU specific computation, including applying lights using a physically-based lighting model, is done in the fragment shader. This offers a more realistic rendering result in many lighting conditions.
High performance vertex shaders, High quality fragment shaders, and Physically based rendering project templates define a set of material types that are available in the project materials library, each with fragment and vertex shaders. See Shaders.
If you are not sure which set of materials to choose, select Import material types manually, and add the materials as you need them.
Developing the application logic in Visual Studio
When you create a project using the Application, Application with data source plugin, or Application with Kanzi Engine plugin template, Kanzi creates in the Application directory the structure and template source code for the application of your project. To use Visual Studio to develop the application logic, you must generate a Visual Studio solution with CMake.
To develop the application logic in Visual Studio:
In Kanzi Studio, create a project using one of these templates:
Application
Application with data source plugin
Application with Kanzi Engine plugin
Kanzi creates a Kanzi Studio project in the
<ProjectName>/Tool_projectdirectory and the structure for the application code of your project in the<ProjectName>/Applicationdirectory:bindirectory contains the kzb and configuration files of your project.configsdirectory contains the configuration files for different platforms. By default, Kanzi creates configuration files for several different platforms. The recommended platform for developing Kanzi applications is Microsoft Visual Studio. See Deploying Kanzi applications.srcdirectory contains the source code for your application.CMakeLists.txtfile contains the instructions for CMake to generate the Visual Studio solution for the Kanzi application.generate_cmake_vs<Version>_solution.batis a script that you can use to generate a Visual Studio solution for the Kanzi application. The script generates the Visual Studio solution in the<ProjectName>/Application/build_vs<Version>directory.
See Creating a project.
In Kanzi Studio, select File > Open Kanzi Command Prompt.
The Kanzi Command Prompt opens the Windows Command Prompt with the Kanzi environment variables set for the version of Kanzi for which you open a Kanzi Command Prompt.
Use the Kanzi Command Prompt to access Kanzi utilities and build tools, such as Gradle, SCons, and CMake, without using absolute paths or setting environment variables.
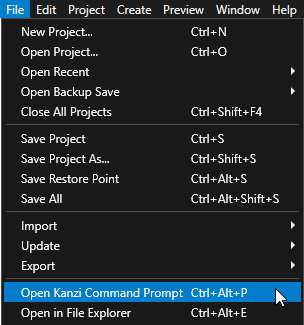
Tip
You can find the Kanzi Command Prompt in the Windows Start Menu in the Rightware directory.
When you have more than one version of Kanzi installed, make sure that you launch a Kanzi Command Prompt for the version of Kanzi with which you want to work in that command prompt.
In the Kanzi Command Prompt in the
<ProjectName>/Applicationdirectory, run the script that generates a Visual Studio solution for the application.For example, if you use Visual Studio 2019, run
generate_cmake_vs2019_solution.bat
This script generates a Visual Studio solution for the application in the directory
<ProjectName>/Application/build_vs2019.In Visual Studio, open the
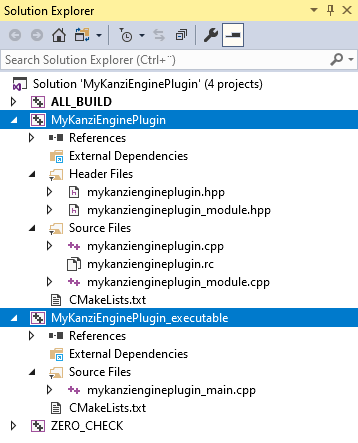
<ProjectName>/Application/build_vs<Version>/<ProjectName>.slnVisual Studio solution.For example, if you used the Application with data source plugin or Application with Kanzi Engine plugin template, the Visual Studio solution contains:
The project for the Kanzi Engine plugin named
<ProjectName>. Define your Kanzi Engine plugin in this project.The project for the C++ application named <ProjectName>_executable. Define the logic of your Kanzi application in this project.
In Visual Studio, create the logic for your Kanzi application and your Kanzi Engine plugin, and configure the custom components in your Kanzi Engine plugin for Kanzi Studio. See Application development, Creating Kanzi Engine plugins, Defining a data source, and Extending the functionality of Kanzi Engine.
When you add or remove files that your Kanzi application or Kanzi Engine plugin use, update in the
CMakeLists.txtthe list of files in thesetcommand and run thegenerate_cmake_vs<Version>_solution.batscript:When you change the files that you use in your Kanzi application, update
<ProjectName>/Application/src/executable/CMakeLists.txtWhen you change the files that you use in your Kanzi Engine plugin, update
<ProjectName>/Application/src/plugin/CMakeLists.txt
For example, to add the
tinyxml2.cppandtinyxml2.hfiles to your Kanzi Engine plugin, update<ProjectName>/Application/src/plugin/CMakeLists.txtto include these filesset(sources_plugin src/tinyxml2.cpp src/tinyxml2.h src/mykanziengineplugin.cpp src/mykanziengineplugin.hpp src/mykanziengineplugin.rc src/mykanziengineplugin_module.cpp src/mykanziengineplugin_module.hpp)
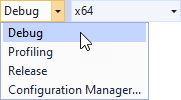
Select the solution configuration that you want to use.
During development select the Debug configuration. When you are ready to create a version for production, select the Release configuration.
Build your application:
To build only the Kanzi Engine plugin DLL, right-click the
<ProjectName>project and select Build.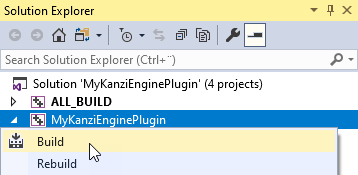
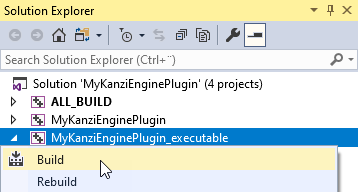
To build the Kanzi Engine plugin DLL and your Kanzi application, right-click the <ProjectName>_executable project and select Build.
Visual Studio builds:
Plugin DLL in the
<ProjectName>/Application/lib/<PlatformName>/<ConfigurationName>and the<ProjectName>/Application/build_vs<Version>/runtime/<ConfigurationName>directoriesKanzi Studio uses the plugin DLL in the
<ProjectName>/Application/libdirectory.Application executable in the
<ProjectName>/Application/build_vs<Version>/runtime/<ConfigurationName>directory.
Run your application:
In Kanzi Studio, select File > Export > Export KZB.
Kanzi Studio exports the project kzb and configuration files to the
<ProjectName>/Application/bindirectory.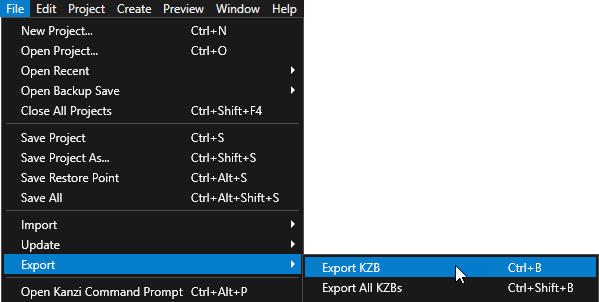
Place these files to the same directory:
From the
<ProjectName>/Application/build_vs<Version>/runtime/<ConfigurationName>the exe and DLL files.From the
<ProjectName>/Application/bindirectory copy the kzb and cfg files.From the
<KanziWorkspace>/Engine/lib/<PlatformName>/<ConfigurationName>copy all DLL files.
For example, place these files to the
<ProjectName>/Application/bindirectory.Run your application by executing the exe file that Visual Studio built.
Tip
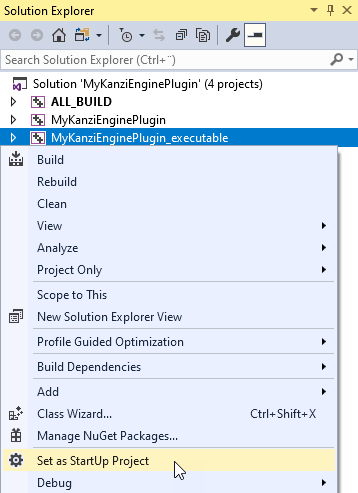
To build and run your application from Visual Studio:
In Kanzi Studio, export the kzb file.
In Visual Studio, right-click the <ProjectName>_executable and select Set as StartUp Project.
Select the solution configuration that you want to use and run the application.

See also
Configuring Kanzi Studio projects
Developing with the Kanzi Android framework (droidfw)