Applying anti-aliasing
You can apply anti-aliasing to an entire Kanzi application, or only to selected nodes:
If most of the content in your application requires anti-aliasing, apply anti-aliasing to the entire application. See Applying anti-aliasing to an entire application.
If only parts of your application require anti-aliasing, use sampling only on those parts that need it:
Multisampling requires less computation, but not all hardware supports it. See Using multisampling.
Supersampling requires more resources, but you can use it on a wider range of hardware. See Using supersampling.
By default, the Kanzi Studio Preview and the Kanzi Application Player on Windows apply anti-aliasing using four samples. For both you can configure the amount of anti-aliasing that you want to use.
See Setting anti-aliasing in the Preview and Application Player.
You can set the preferred multisampling method for your Kanzi application. See Setting the multisampling method.
Applying anti-aliasing to an entire application
When you apply anti-aliasing for the entire application you set the number of anti-aliasing surface samples you want to use. Because this value depends on the device on which you want to run your Kanzi application, check the documentation of that device for supported values. If you set the number of anti-aliasing surface samples to a value which your device does not support, Kanzi Engine clamps the value to the largest value supported by the device driver.
To apply anti-aliasing to the entire application:
In the
application.cfgconfiguration file set theSurfaceSamplesAntialiasingparameter to the number of anti-aliasing surface samples that you want to use. See Application configuration reference.For example, to use four samples for anti-aliasing, add to the
application.cfgSurfaceSamplesAntialiasing = 4
or
In the C++ application in the
onConfigure()function set theconfiguration.defaultSurfaceProperties.antiAliasingparameter to the number of anti-aliasing surface samples that you want to use.For example, to use four samples for anti-aliasing, add to the
onConfigure()configuration.defaultSurfaceProperties.antiAliasing = 4;
See Surface properties.
Setting anti-aliasing in the Preview and Application Player
By default, the Kanzi Studio Preview and the Kanzi Application Player on Windows apply anti-aliasing using four samples. For both you can configure the amount of anti-aliasing that you want to use.
If you have a Kanzi application with a C++ application, to see your content in the Kanzi Studio Preview and Kanzi Application Player the same way as when running your Kanzi application on a target device, you can set anti-aliasing in an application.cfg file. See Applying anti-aliasing to an entire application.
To set anti-aliasing in the Kanzi Studio Preview for a Kanzi application without a C++ application:
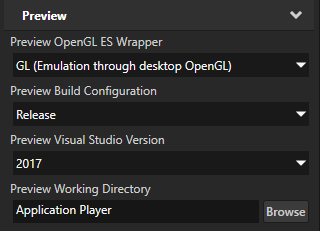
In the Kanzi Studio main menu select Project > Properties and in the Properties in the Preview section set the value of the Preview Working Directory property to the directory where you want to store the
application.cfgto configure the Preview.For example, set the Preview Working Directory property to
Application Player. This way you can apply the same anti-aliasing setting to the Preview and the Kanzi Application Player on Windows. If the<ProjectName>/Application Playerdirectory does not yet exist, select File > Export > Export as KZB Player for Windows. See Building and deploying Kanzi applications to Windows from Kanzi Studio.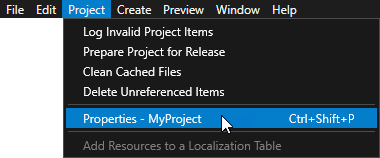
In the directory that you set in the previous step, create or open the
application.cfgfile, and add and set theSurfaceSamplesAntialiasingparameter to the number of anti-aliasing samples that you want the Preview to use.For example, to disable anti-aliasing in the Preview, in the
application.cfgadd:SurfaceSamplesAntialiasing = 0
In Kanzi Studio restart the Preview.

Using multisampling
Use multisampling (MSAA) to reduce aliasing in selected parts of your Kanzi application. For multisampling to work, the hardware on which you want to run your Kanzi application must meet any of these requirements:
If you use Nvidia GPU with OpenGL ES 2.0, you need the GL_NV_framebuffer_blit and GL_NV_framebuffer_multisample extensions.
If you use Imagination Technologies GPU OpenGL ES 2.0, you need the GL_IMG_multisampled_render_to_texture extension.
For other OpenGL ES 2.0 hardware, you need the GL_EXT_multisampled_render_to_texture extension.
Multisampling requires less resources than supersampling. When rasterizing a polygon, multisampling generates extra samples only for the fragments at the edges of the polygon, while supersampling generates extra samples for all fragments in the polygon.
When using tile-based multisampling, usually on mobile platforms, the GPU generates multiple samples only for one GPU tile at a time. The GPU resolves the samples implicitly when writing that tile back to texture memory, saving memory and GPU bandwidth.
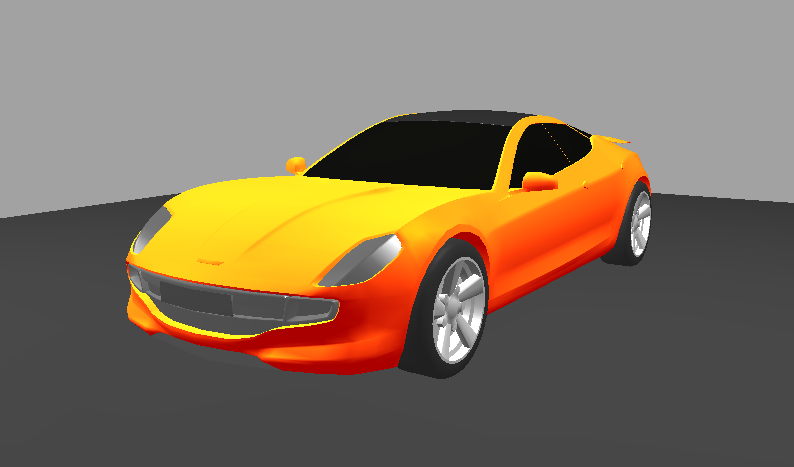
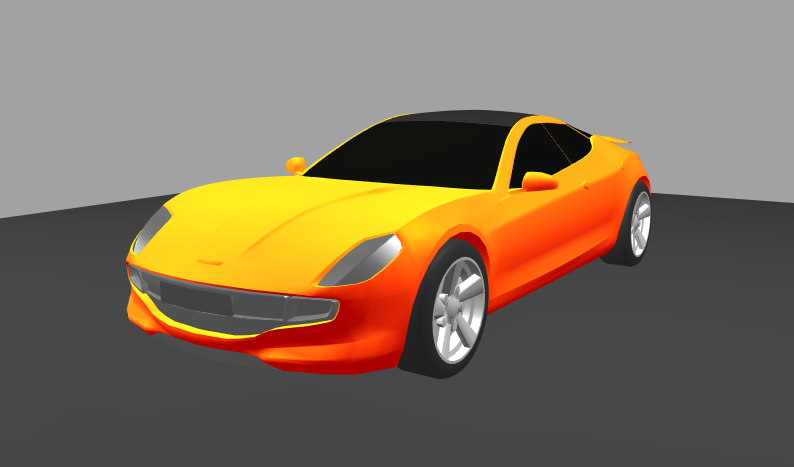
In the first image no anti-aliasing is applied. In the second image multisampling with 8 samples is applied.
To use multisampling, in the Composition Target Render Pass that you use to render your content, set the Multisample Level property to the number of anti-aliasing samples you want to use.
See the documentation of the device on which you want to run your Kanzi application for supported values, because the number of anti-aliasing samples depends on the device. If you set the Multisample Level property to a value which your device does not support, Kanzi Engine clamps the value to the largest value supported by the device driver.
For example:
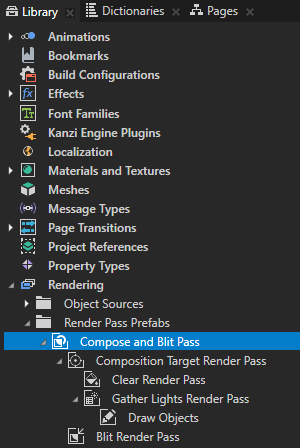
In the Library press Alt and right-click Rendering, and select Compose and Blit Pass.
Compose and Blit Pass contains the render pass structure that enables you to blit to the screen Composition Target Render Pass render passes or textures using a specific material.
The Compose and Blit Pass render pass preset contains these render passes:
Composition Target Render Pass renders itself and its descendant render passes to one or more composition targets.
Clear Render Pass clears some or all of the buffers of the current render context.
By default the Clear Render Pass in the Compose and Blit Pass clears the first color buffer with transparent black color and the depth buffer with value 1.
For example, to clear the first color buffer with a different color, set the Clear Color 0 property to the color that you want to use as the background color of the content that Kanzi renders to the Composition Target Render Pass.
Gather Lights Render Pass collects the Light nodes in the Viewport 2D node that you set to use the Compose and Blit Pass, and passes them to its child Draw Objects Render Pass render pass.
Draw Objects Render Pass named Draw Objects allows you to set a Camera node to render a specific list of nodes, to filter those nodes, and to control frustum culling. Draw Objects Render Pass by default renders nodes using the lights provided by its nearest ancestor Gather Lights Render Pass. By default the Draw Objects Render Pass uses the default Camera node to render all nodes in a Viewport 2D node.
Blit Render Pass blits one or more textures on the screen using a specific material.
By default this Blit Render Pass draws on the screen the first color texture to which the Composition Target Render Pass renders its content.

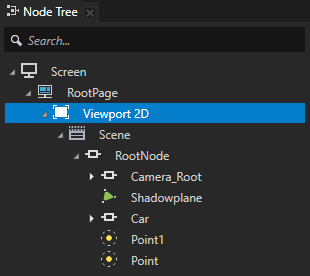
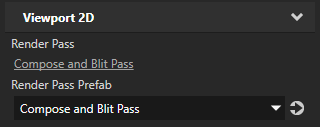
In the Node Tree select the Viewport 2D node for whose content you want to reduce aliasing and in the Properties set the Render Pass Prefab property to the Compose and Blit Pass render pass prefab.
Kanzi now renders the scene in the Viewport 2D node using the Compose and Blit Pass render pass prefab.
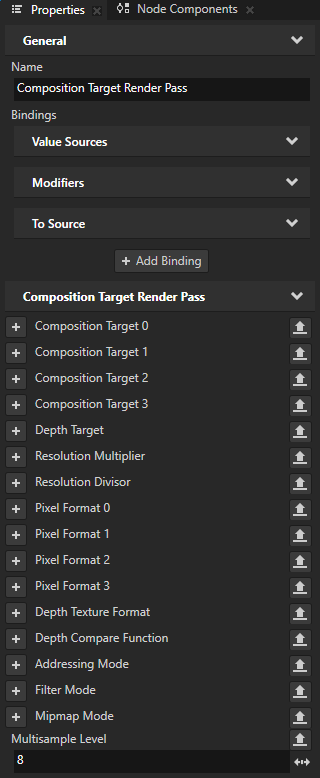
In the Library select the Compose and Blit Pass > Composition Target Render Pass, in the Properties add the Multisample Level property, and set it to the number of anti-aliasing samples you want to use.
For example, set Multisample Level to 8.
See the documentation of the device on which you want to run your Kanzi application for supported values, because the number of anti-aliasing samples depends on the device. If you set the Multisample Level property to a value which your device does not support, Kanzi Engine clamps the value to the largest value supported by the device driver.
Kanzi now applies anti-aliasing to the content of the Viewport 2D node.
Using supersampling
Use supersampling (SSAA) to reduce aliasing in selected parts of your Kanzi application if your hardware does not support multisampling. Supersampling requires more resources than multisampling. When rasterizing a polygon, supersampling generates extra samples for all fragments in the polygon, while multisampling generates extra samples only for the fragments at the edges of the polygon.
Supersampling a composition target
You can supersample a composition target texture when you render 3D content with a Composition Target Render Pass. To supersample a composition target texture you must use the composition target which the Composition Target Render Pass creates automatically.
To supersample a composition target:
In the Library press Alt and right-click Rendering, and select Compose and Blit Pass.
Compose and Blit Pass contains the render pass structure that enables you to blit to the screen Composition Target Render Pass render passes or textures using a specific material.
The Compose and Blit Pass render pass preset contains these render passes:
Composition Target Render Pass renders itself and its descendant render passes to one or more composition targets.
Clear Render Pass clears some or all of the buffers of the current render context.
By default the Clear Render Pass in the Compose and Blit Pass clears the first color buffer with transparent black color and the depth buffer with value 1.
For example, to clear the first color buffer with a different color, set the Clear Color 0 property to the color that you want to use as the background color of the content that Kanzi renders to the Composition Target Render Pass.
Gather Lights Render Pass collects the Light nodes in the Viewport 2D node that you set to use the Compose and Blit Pass, and passes them to its child Draw Objects Render Pass render pass.
Draw Objects Render Pass named Draw Objects allows you to set a Camera node to render a specific list of nodes, to filter those nodes, and to control frustum culling. Draw Objects Render Pass by default renders nodes using the lights provided by its nearest ancestor Gather Lights Render Pass. By default the Draw Objects Render Pass uses the default Camera node to render all nodes in a Viewport 2D node.
Blit Render Pass blits one or more textures on the screen using a specific material.
By default this Blit Render Pass draws on the screen the first color texture to which the Composition Target Render Pass renders its content.
In the Node Tree select the Viewport 2D node whose content you want to supersample and in the Properties set the Render Pass Prefab property to the Compose and Blit Pass render pass prefab.
Kanzi now renders the scene in the Viewport 2D node using the Compose and Blit Pass render pass prefab.
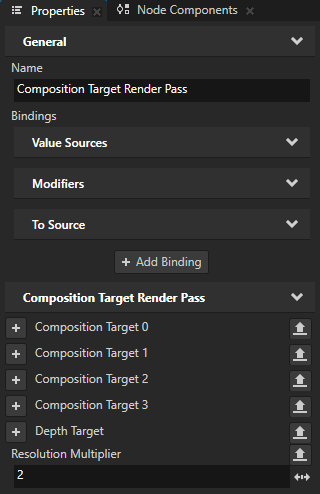
In the Composition Target Render Pass that you use to render the nodes which you want to supersample, add the Resolution Multiplier property, and set it to the value by which you want to multiply the resolution of the composition target texture.
Supersampling a render target texture
You can supersample a render target texture which you use in a Texture Brush or as an image in an Image node.
To supersample a render target texture:
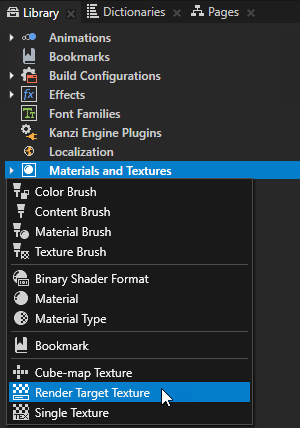
In the Library press Alt and right-click Materials and Textures, and select Render Target Texture. See Using render target textures.
This is the texture to which you render the contents of the node for which you want to reduce aliasing.
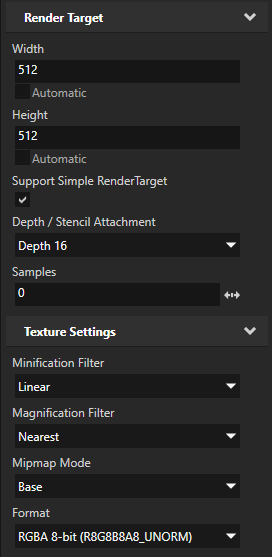
In the Library select the Render Target Texture you just created and in the Properties set:
Height and Width of the render target texture to double the size of the final size of the content for which you want to reduce aliasing.
When you use a large texture which you scale down, you smooth the rough edges that cause aliasing.
Minification Filter to Linear
Mipmap Mode to Base
Format to RGBA 8-bit
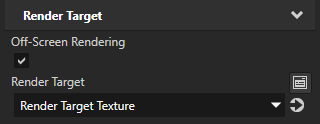
In the Node Tree select the node to which you want to apply supersampling, and in the Properties add and set:
Off-Screen Rendering to enabled
Render Target to the render target texture you created in the first step
Apply the Render Target Texture you created in the first step to a node where you want to show the supersampled image of the node you selected in the previous step.
For example:
In the Node Tree press Alt and right-click and select Empty Node 2D.
In the Node Tree select the Empty Node 2D node, in the Properties add the Background Brush property, and in the dropdown menu select + Texture Brush.

Next to the Background Brush property click
 and set the Brush Texture property of the Texture Brush to the Render Target Texture you want to show in the Empty Node 2D you created in the first step.
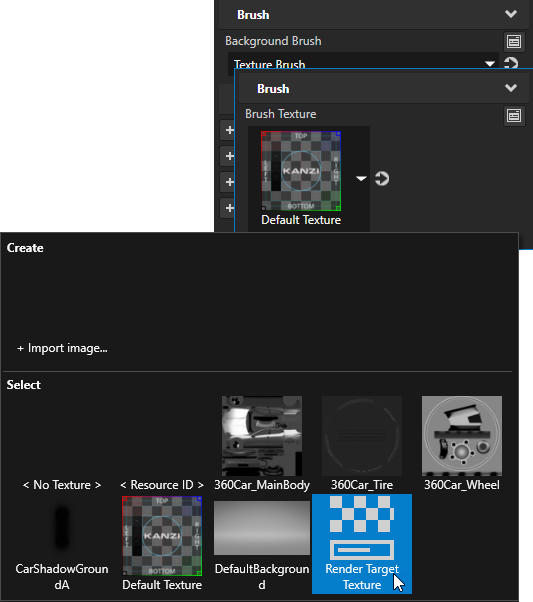
In the Node Tree select the Empty Node 2D, and in the Properties add and set the Layout Width and Layout Height properties to the size in which you want to show the content of the Render Target Texture.
Setting the multisampling method
You can set the multisampling method that your Kanzi application uses when available: blitting from renderbuffer or implicit multisampling.
When blitting from renderbuffer Kanzi first renders into a multisampled renderbuffer. When the rendering is done, Kanzi resolves the samples by blitting the result into a regular texture. Blitting from renderbuffer requires one of these:
Your platform supports OpenGL (ES) 3 or higher.
The GL_ARB_framebuffer_object extension is available.
The GL_NV_framebuffer_blit and GL_NV_framebuffer_multisample extensions are available.
Implicing multisampling means that Kanzi performs multisampled rendering to a texture without requiring an explicit resolve of the multisample data, that is, downsampling the data to single sample per pixel. Implicit multisampling requires that one of these extensions is available:
GL_EXT_multisampled_render_to_texture
GL_IMG_multisampled_render_to_texture
By default Kanzi chooses the multisampling method it deems the best:
On desktop platforms, Kanzi blits from renderbuffer.
On platforms that use OpenGL ES, Kanzi uses implicit multisampling.
To set the multisampling method, either:
In the
application.cfgconfiguration file set theMultisamplePreferenceparameter to the multisampling method that you want Kanzi to prefer:BlitorImplicit. See Using the application.cfg.For example, to prefer blitting from renderbuffer, add to the
application.cfgMultisamplePreference = Blit
In the C++ application in the
onConfigure()function set theconfiguration.multisamplePreferenceparameter to the multisampling method that you want Kanzi to prefer:MultisamplePreferenceBlitorMultisamplePreferenceImplicit.For example, to prefer blitting from renderbuffer, add to the
onConfigure()configuration.multisamplePreference = Renderer::RendererSettings::MultisamplePreferenceBlit;