Tutorial: Control application UI
In this tutorial, you learn how to use conditions to control the application UI. You learn how to control the activation state of Activities that make up the UI by creating popup windows that an application shows only when a condition in a Data Trigger is met. In the Data Trigger, you use an Apply Activation Action to activate a specific Activity.
A Data Trigger with an Apply Activation Action keeps an Activity active for as long as the condition in that Data Trigger is met.
You set the condition in a Data Trigger in the form of a binding expression that evaluates to either True or False.
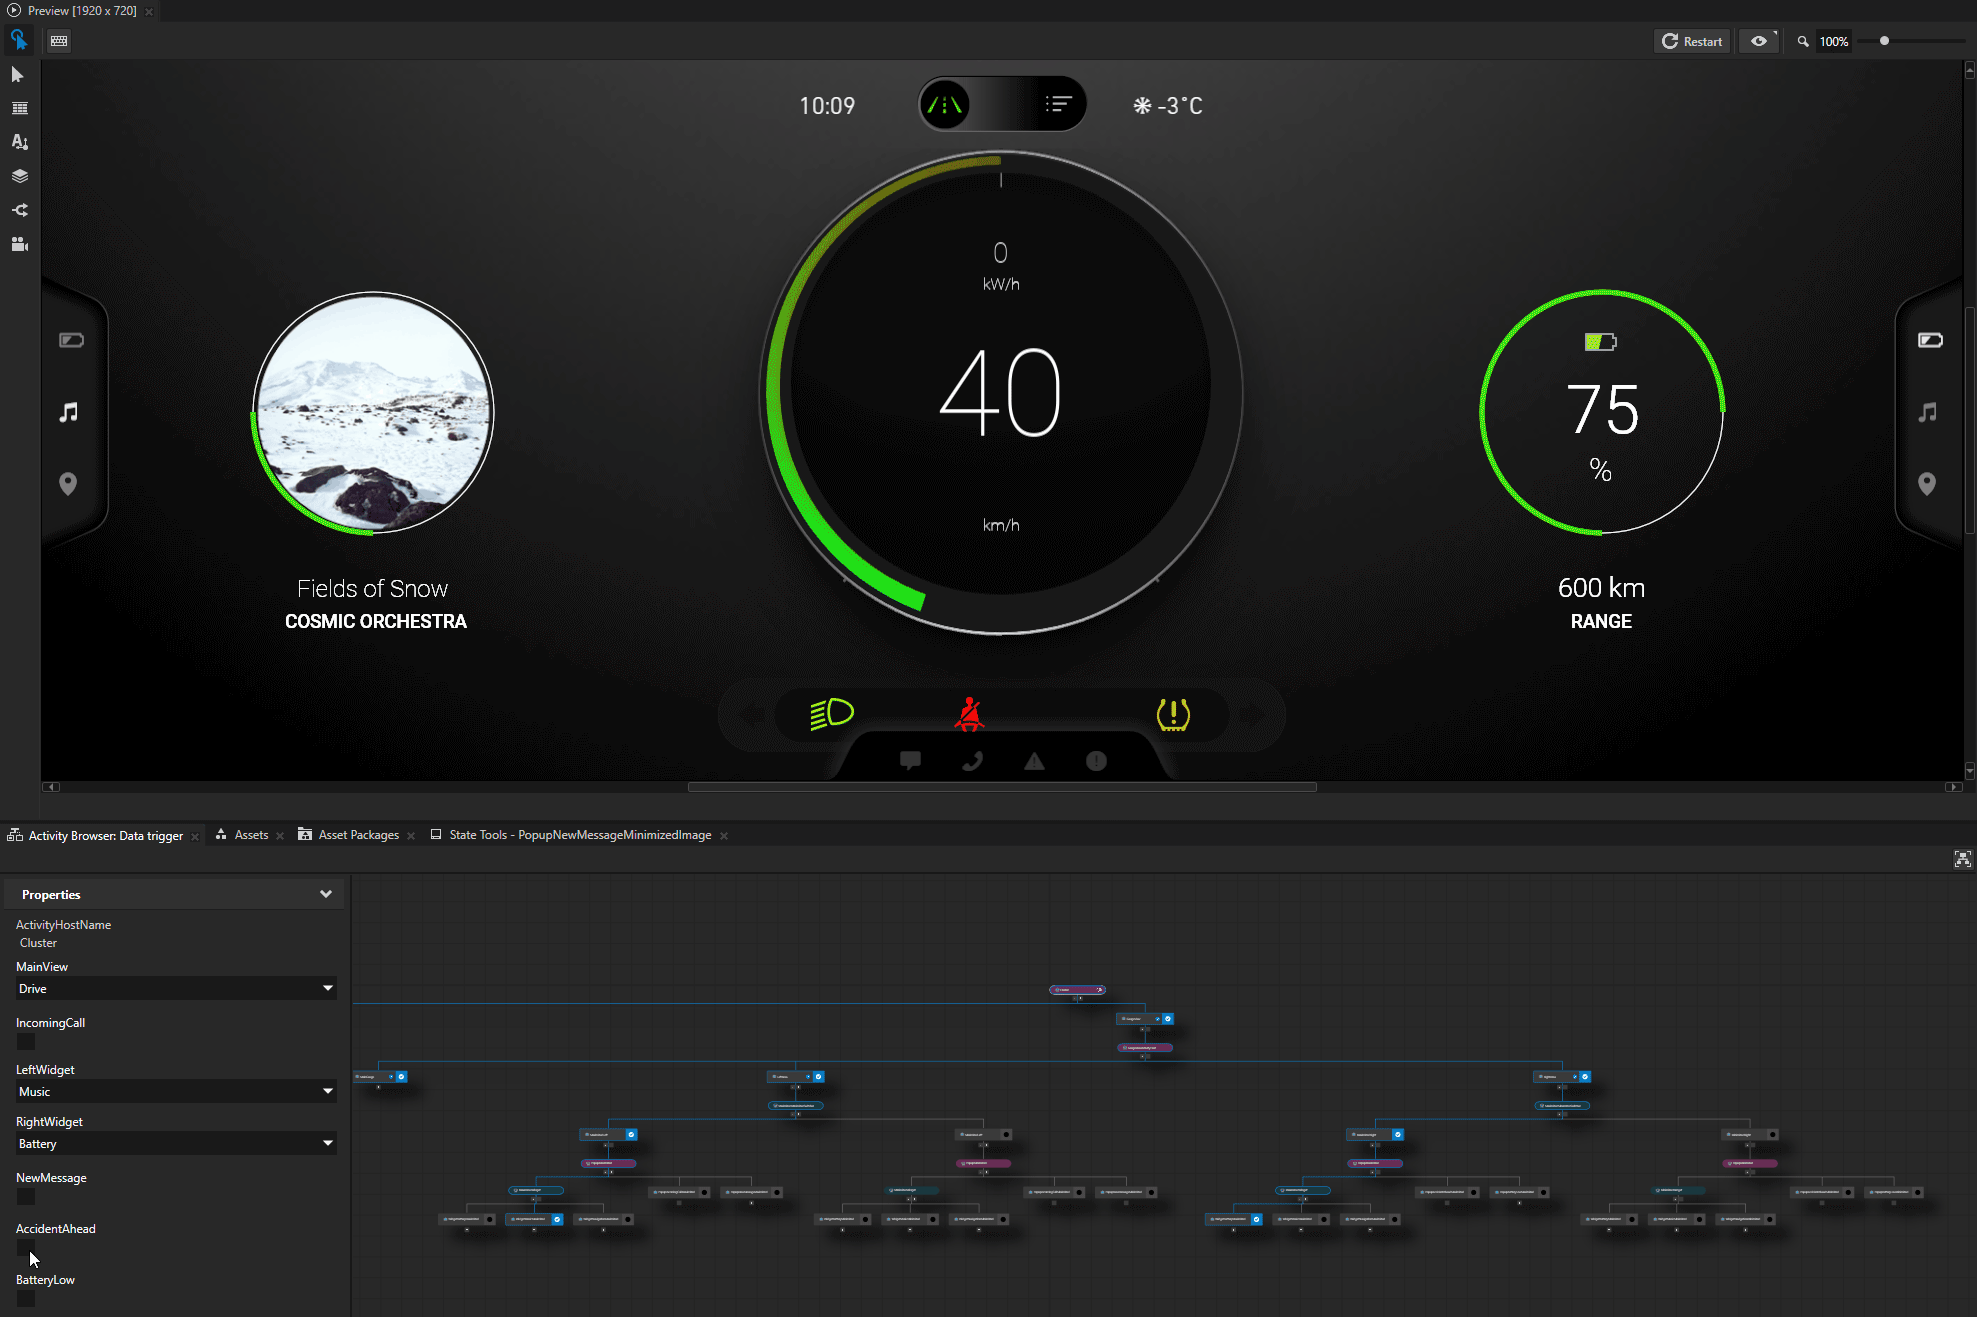
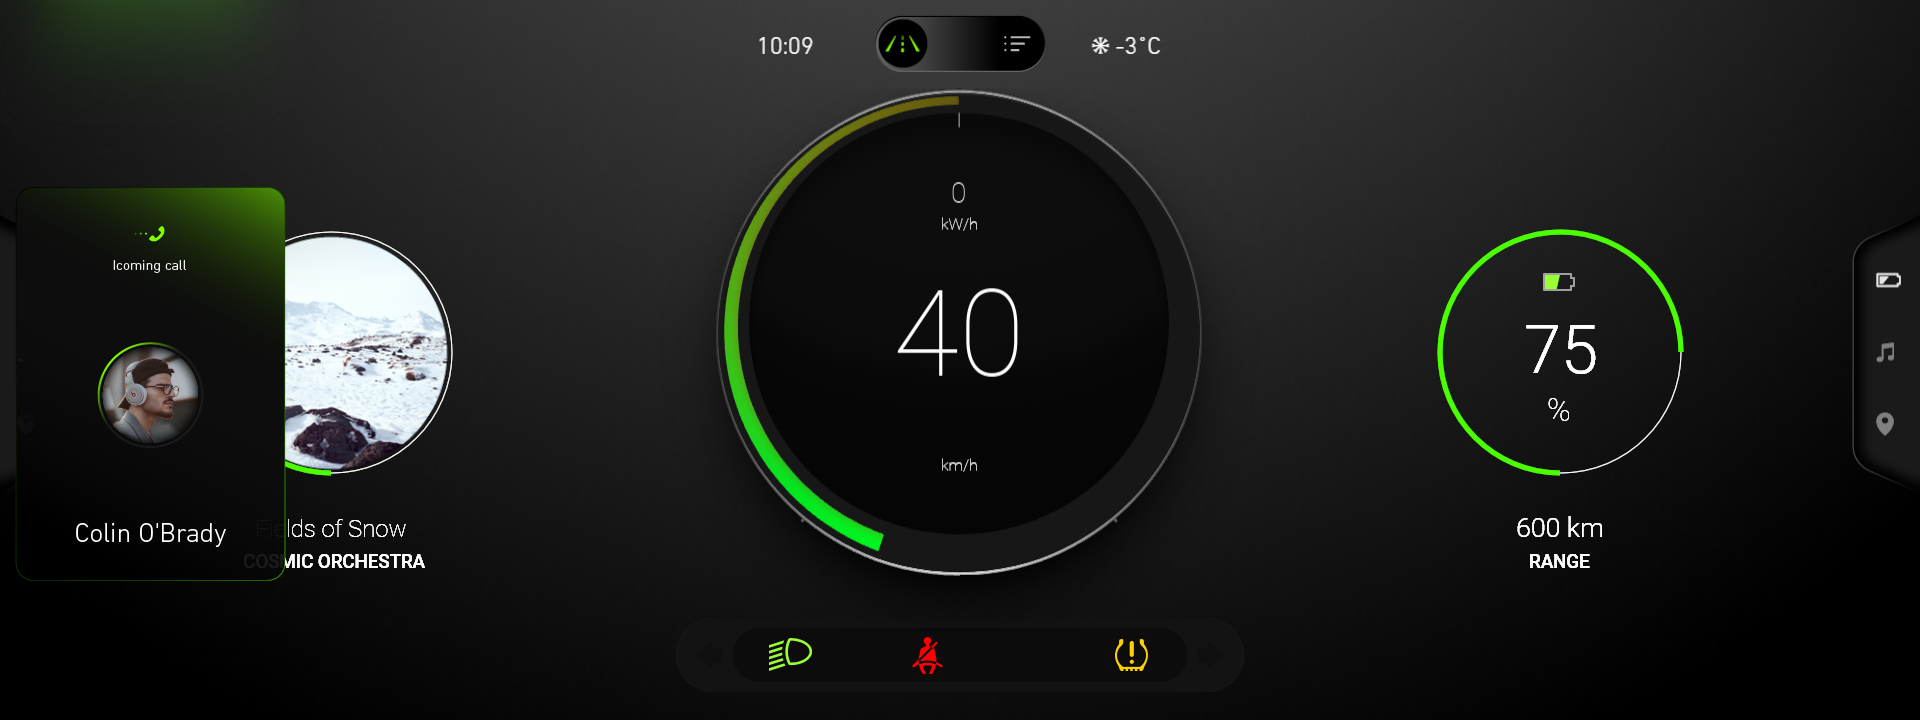
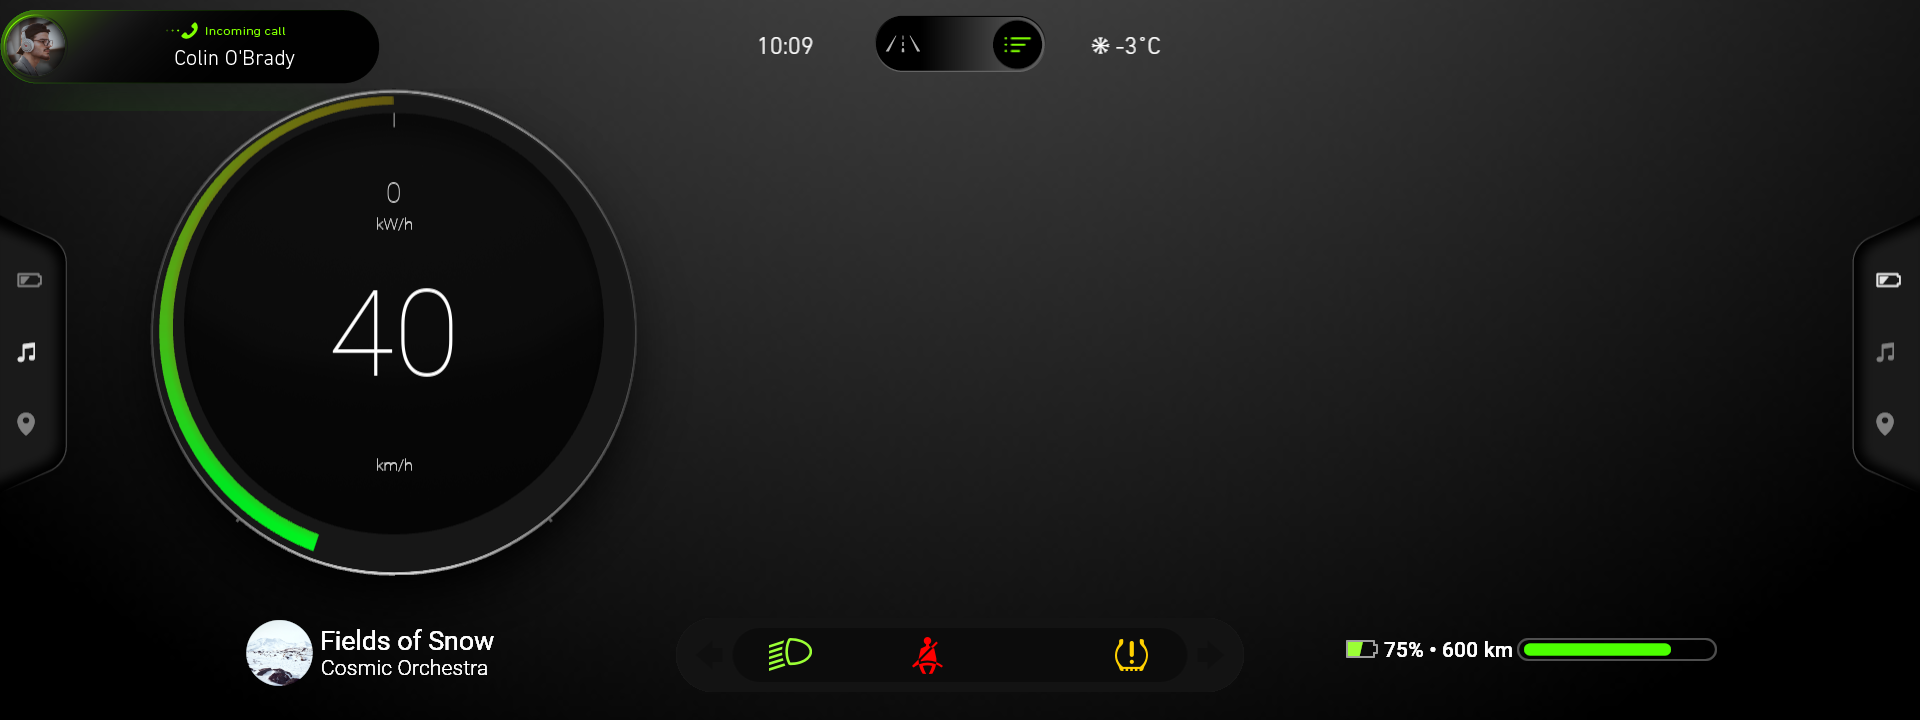
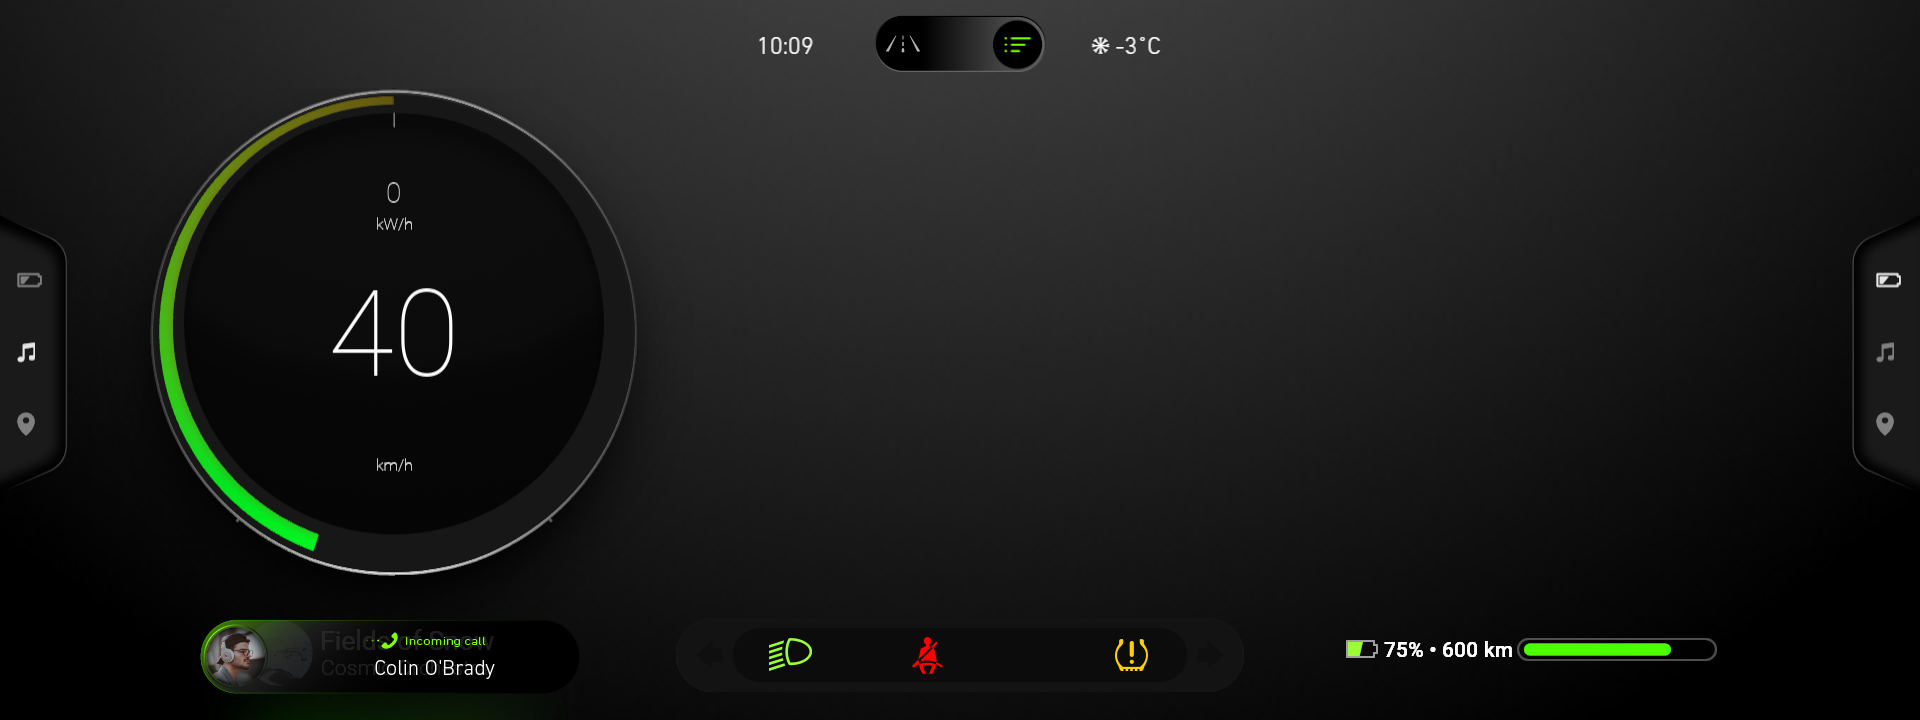
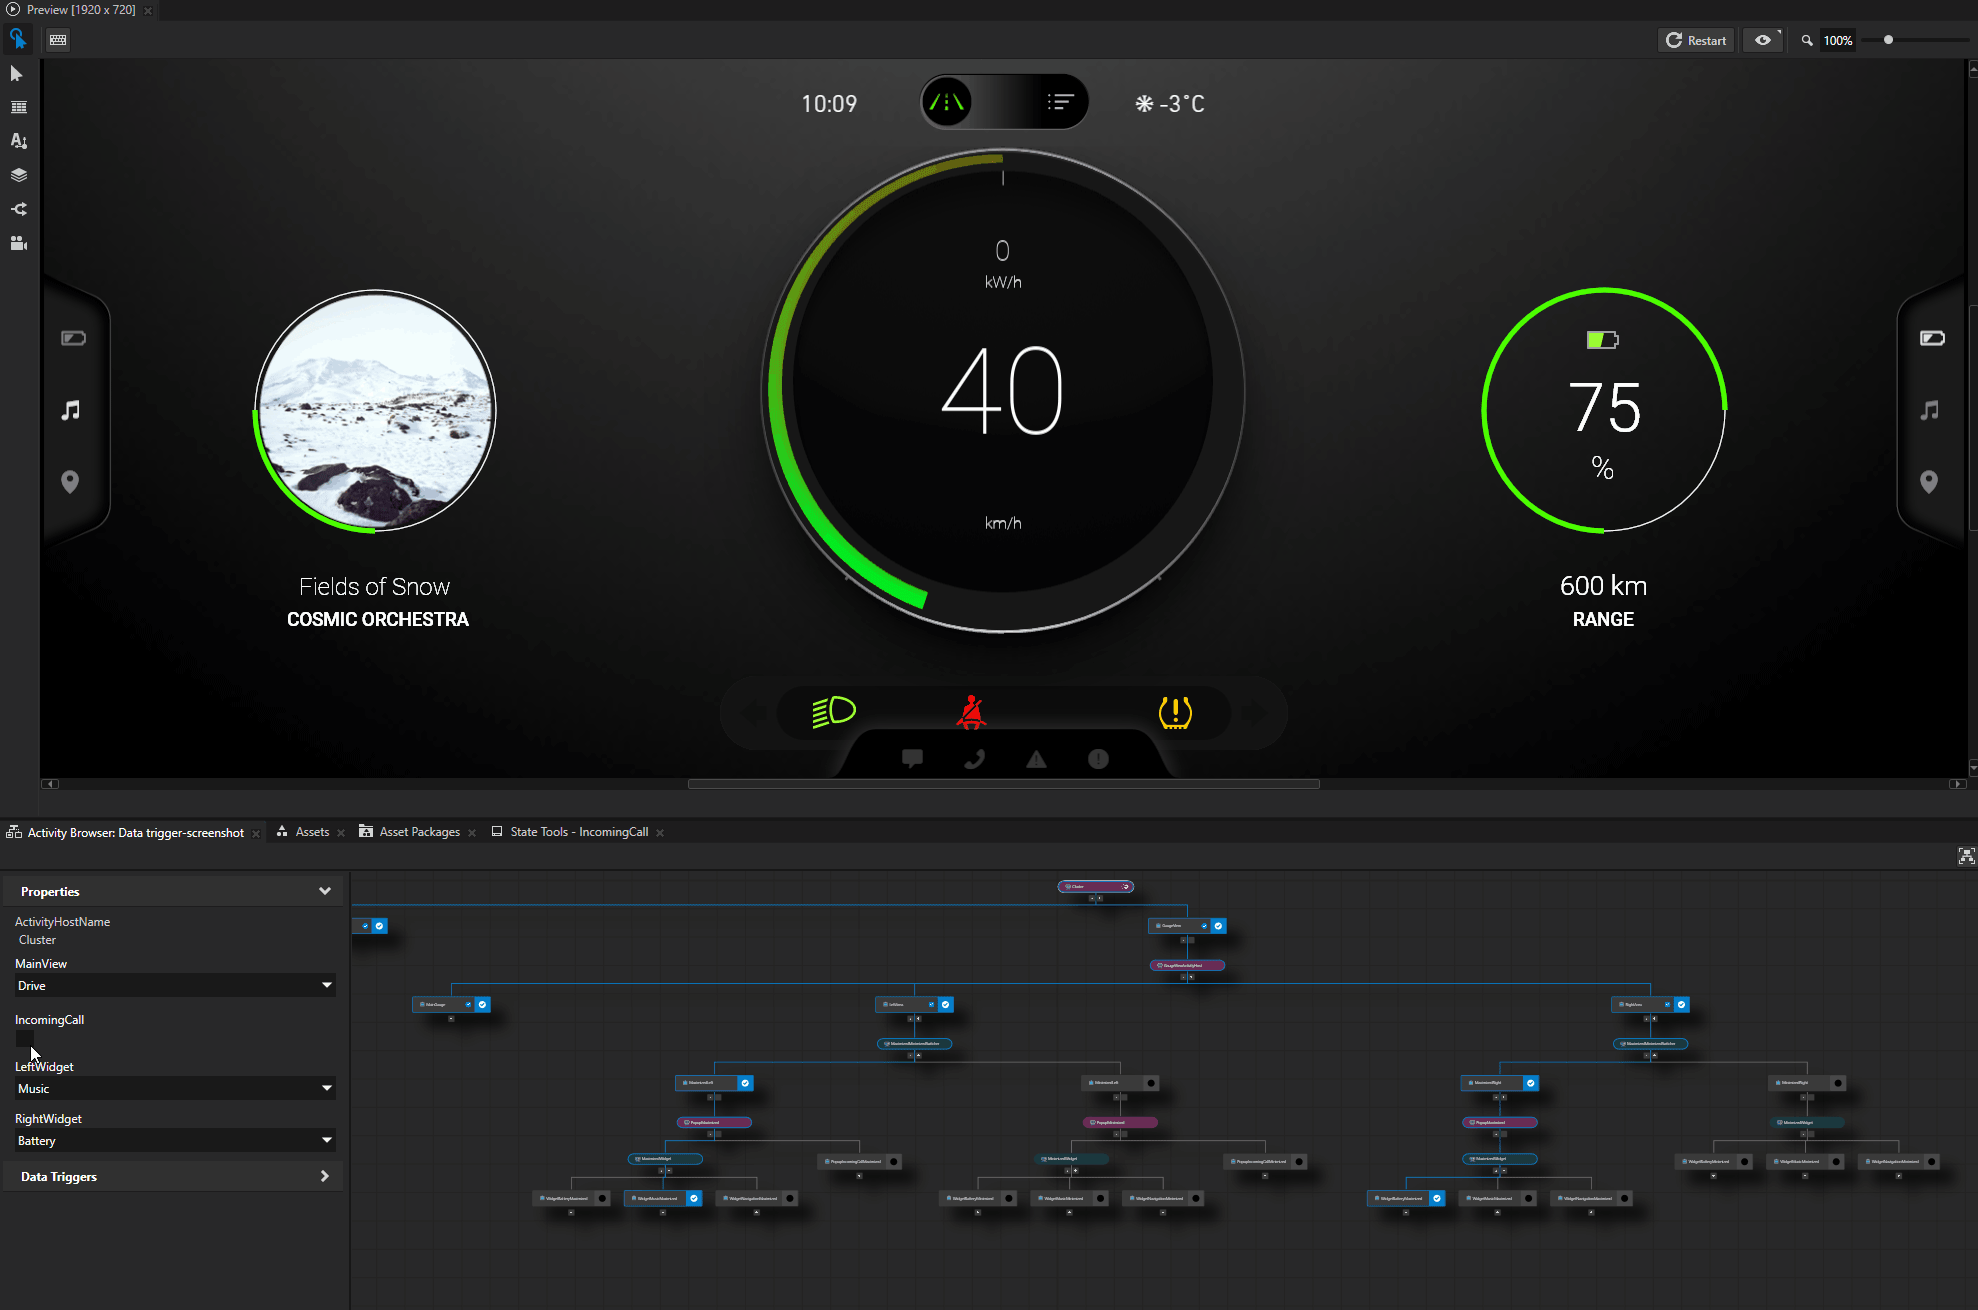
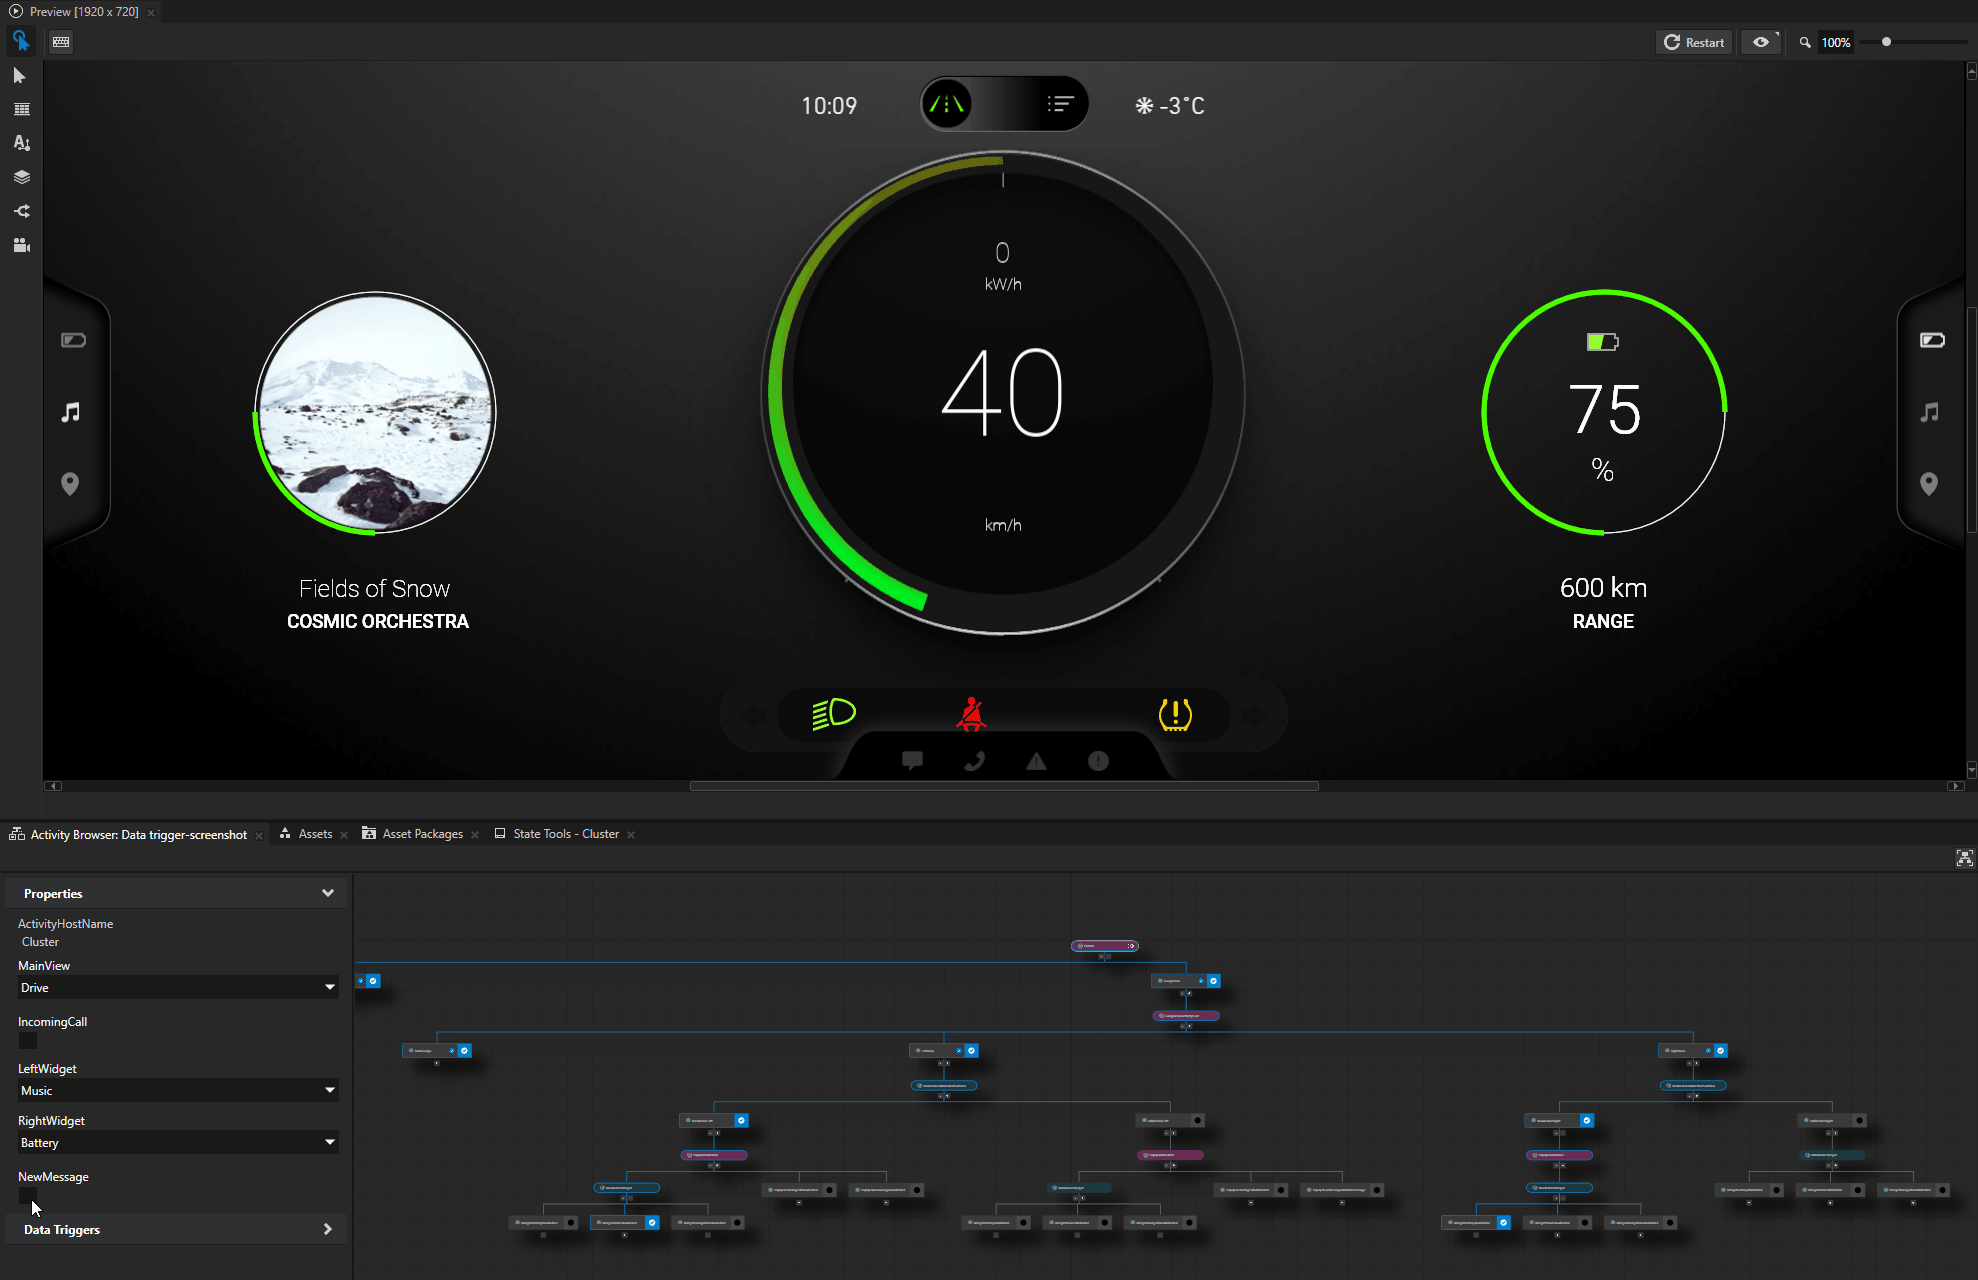
This video shows the result of the tutorial.
This tutorial assumes that you understand the basics of working with the Activity system. The best entry point for that is the Tutorial: Structure application UI.
Assets for the tutorial
The starting point of this tutorial is the <KanziWorkspace>/Tutorials/Data trigger/Start/Tool_project/Data trigger.kzproj Kanzi Studio project. To learn about the content of this project and how to create such a project, see Tutorial: Structure application UI.
You can find the completed tutorial in the <KanziWorkspace>/Tutorials/Data trigger/Completed directory.
The starting point project contains the assets that you need to complete this tutorial:
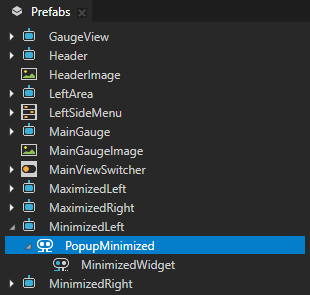
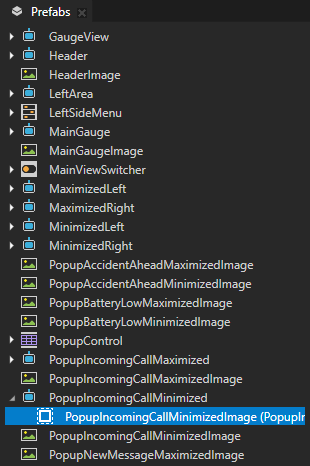
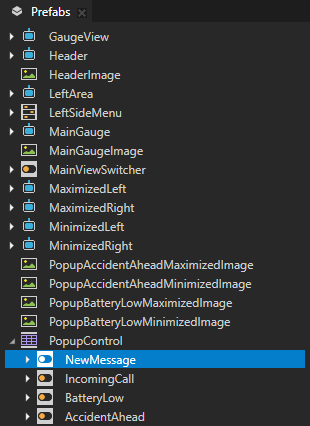
These prefabs:
The images of UI elements that you use in this tutorial
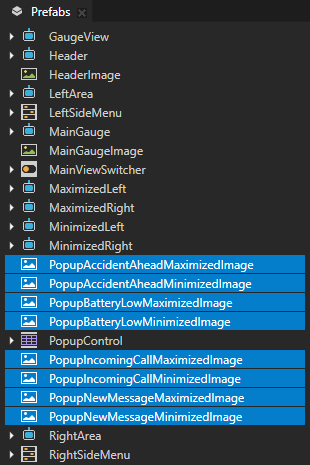
UI controls that you use to control the activation of Activities that you create in this tutorial
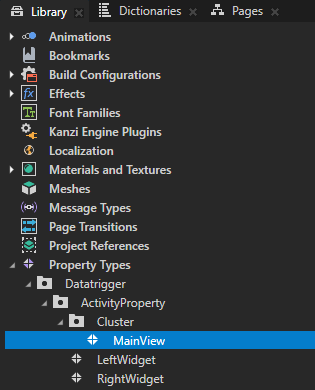
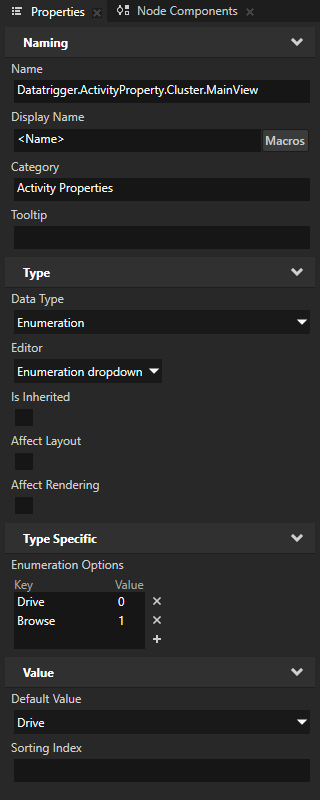
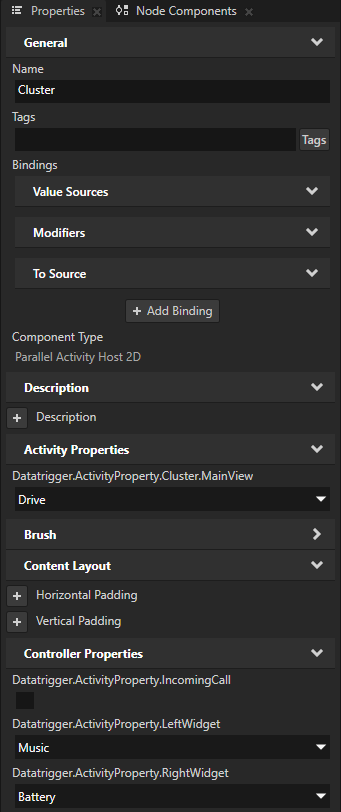
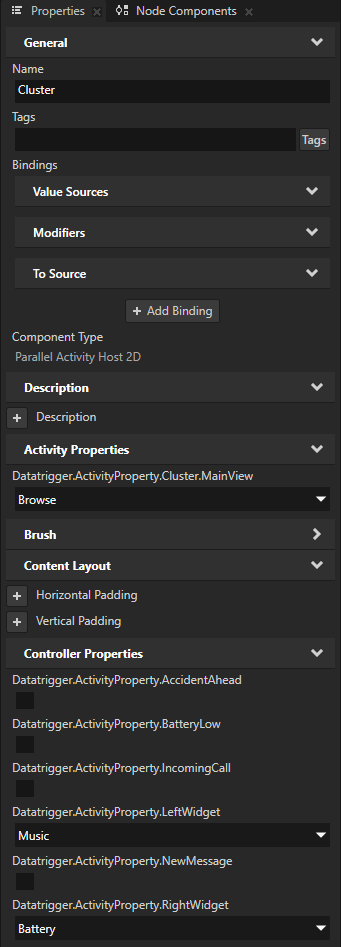
The Datatrigger.ActivityProperty.Cluster.MainView property type that you use to control and check the state of the cluster. In Data Triggers, you use the value of this property to decide which Activity you want to activate.
Create the structure
In this section, you create the structure for the popup windows.
To create the structure:
In Kanzi Studio, open the
<KanziWorkspace>/Tutorials/Data trigger/Start/Tool_project/Data trigger.kzprojproject.Create the Activity structure for the popup windows when they are maximized:
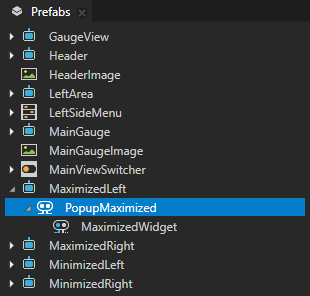
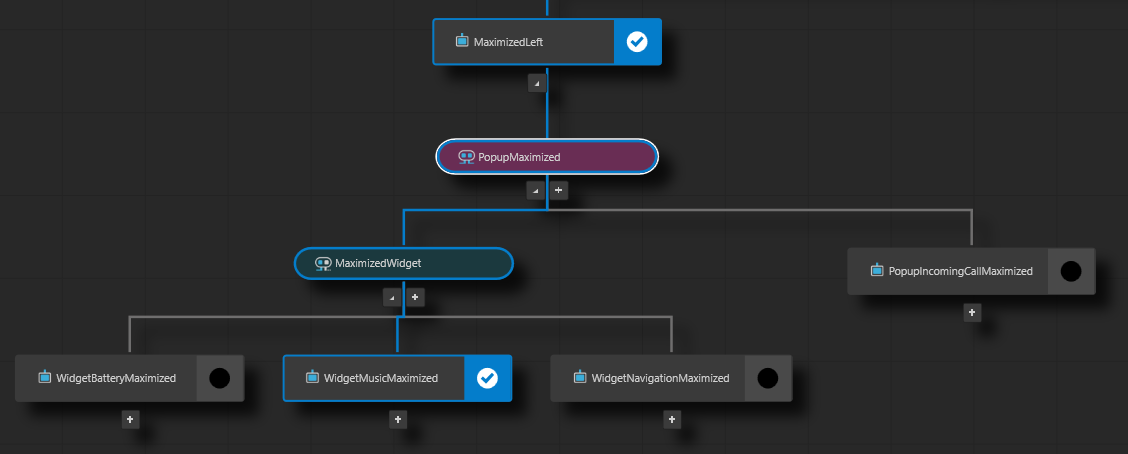
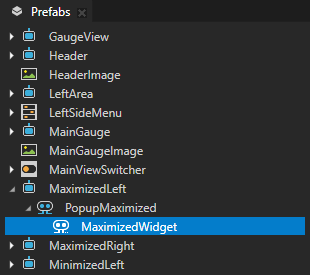
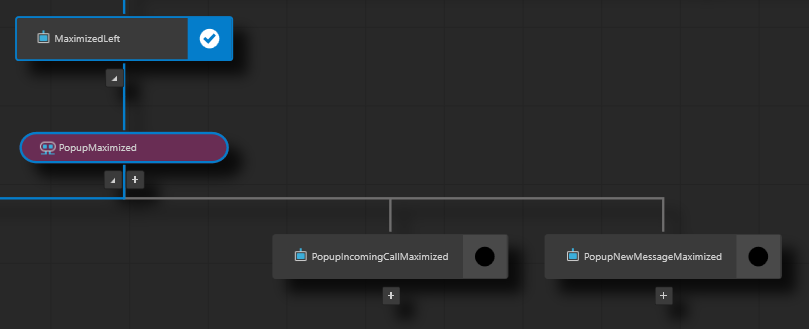
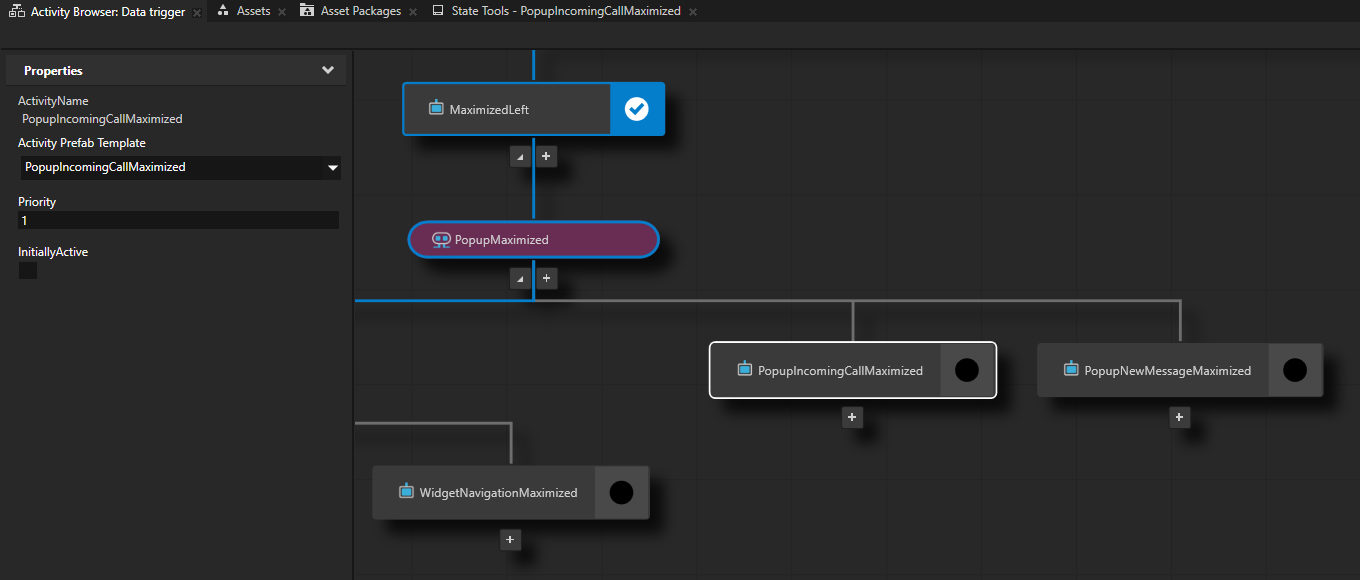
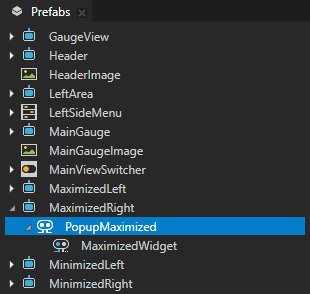
In the Prefabs > MaximizedLeft prefab, create a Parallel Activity Host named PopupMaximized and drag the MaximizedWidget Exclusive Activity Host to the PopupMaximized Activity Host.
With a Parallel Activity Host, you can activate multiple popup windows at a time and show the popup windows on top of the currently activated widget.
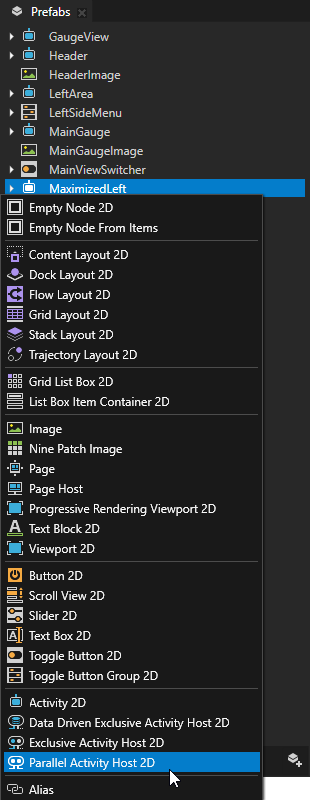
In the Activity Browser, below the PopupMaximized Activity Host, click
 , select Create Activity, and name the Activity and its prefab PopupIncomingCallMaximized.
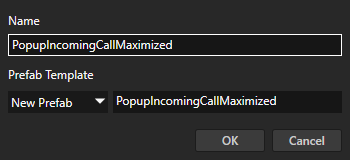
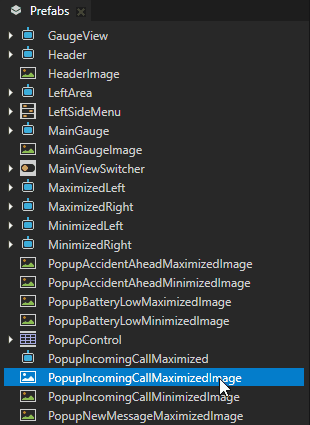
In the Prefabs, drag the PopupIncomingCallMaximizedImage to the PopupIncomingCallMaximized Activity.
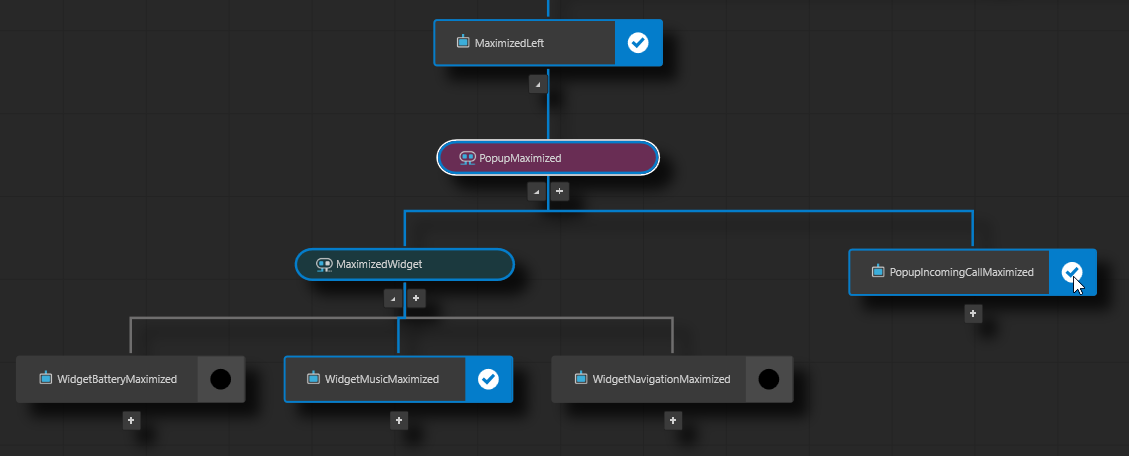
In the Activity Browser, in the PopupIncomingCallMaximized Activity, click
 .
.This way you simulate the activation of this Activity so that you can see its content in the Preview.
In the Prefabs, select the MaximizedLeft > PopupMaximized > MaximizedWidget Activity Host. From the Properties, drag the Horizontal Padding property to the Prefabs > MaximizedLeft > PopupMaximized Activity Host.
This way you set the padding for all Activities of the PopupMaximized Activity Host.
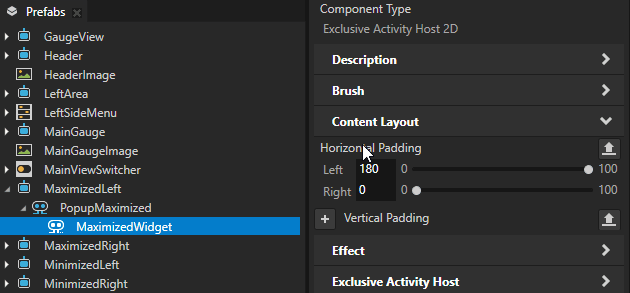
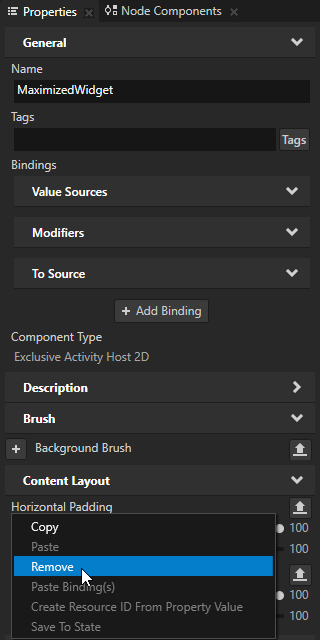
In the Prefabs, select the MaximizedWidget Activity Host. In the Properties, remove the Horizontal Padding property.
Create the Activity structure for the popups when they are minimized:
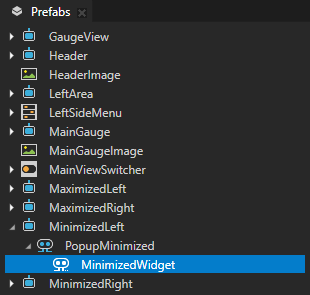
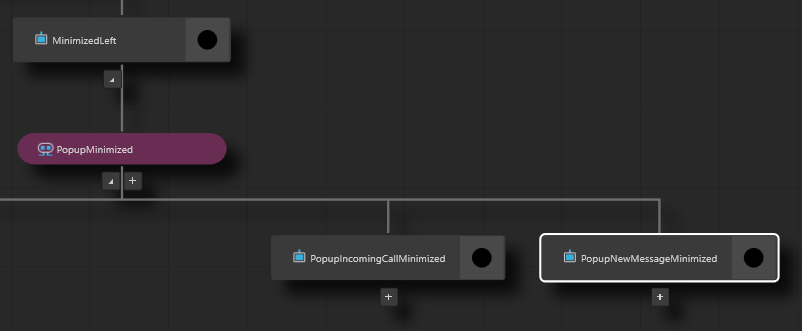
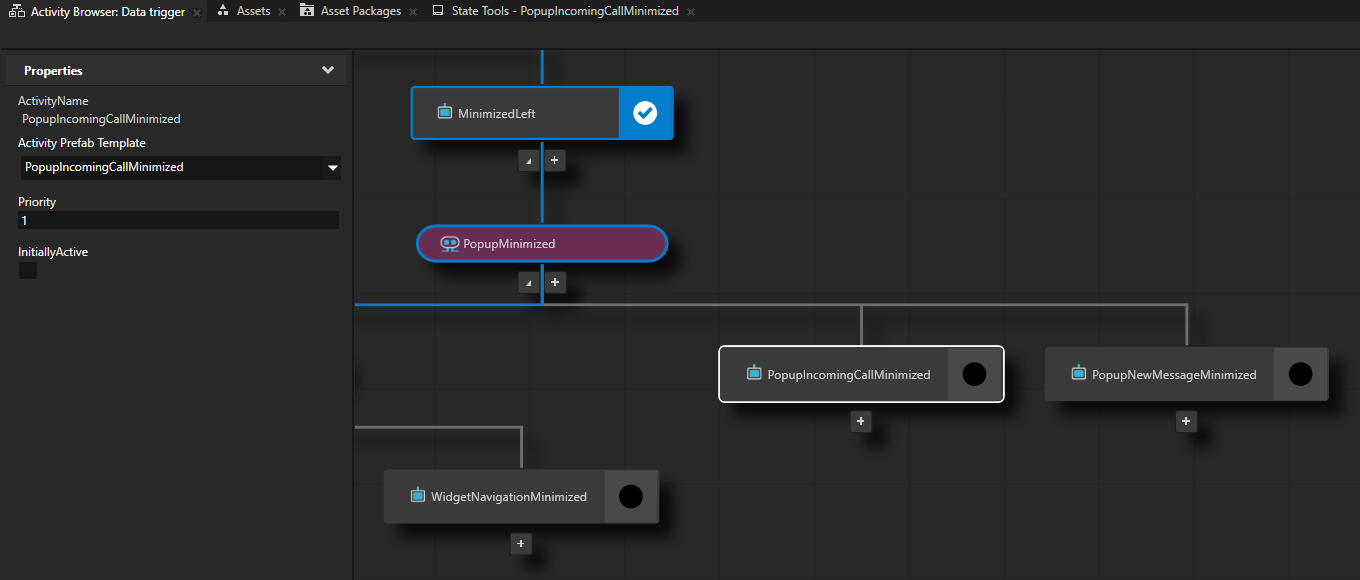
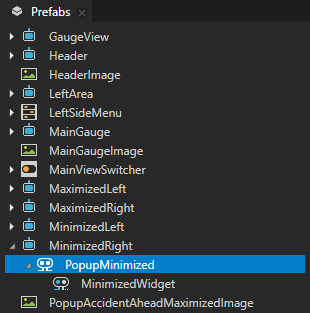
In the Prefabs > MinimizedLeft prefab, create a Parallel Activity Host named PopupMinimized and drag the MinimizedWidget Activity to the PopupMinimized Activity Host.
In the Activity Browser, in the PopupMinimized Activity Host, add an Activity, and name it and its prefab PopupIncomingCallMinimized.


In the Prefabs, drag the PopupIncomingCallMinimizedImage to the PopupIncomingCallMinimized Activity.
In the Activity Browser, in the PopupIncomingCallMinimized Activity, click
.This way you simulate the activation of this Activity so that you can see its content in the Preview.
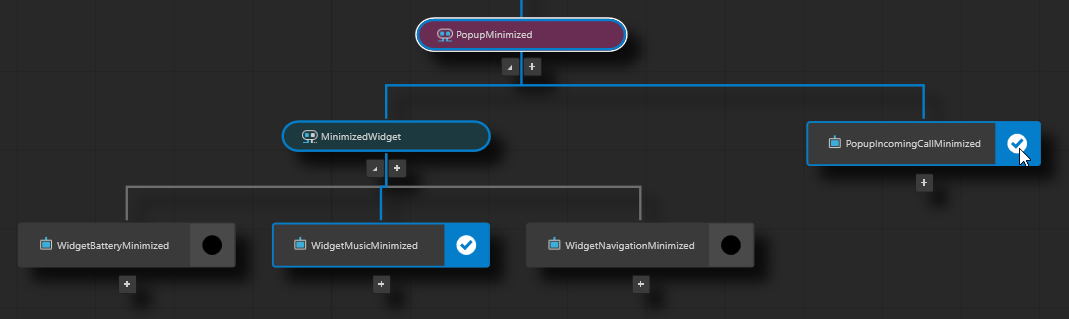
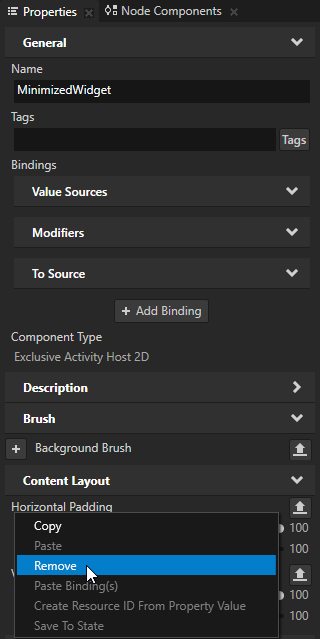
In the Prefabs, select the MinimizedLeft > PopupMinimized > MinimizedWidget Activity Host. From the Properties, drag the Horizontal Padding and Vertical Padding properties to the Prefabs > MinimizedLeft > PopupMinimized Activity Host.
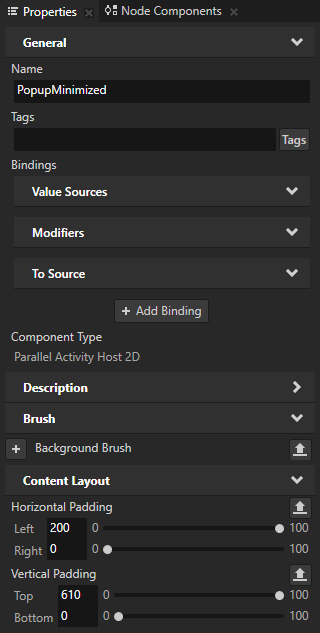
In the Prefabs, select the MinimizedWidget Activity Host. In the Properties, remove the Horizontal Padding and Vertical Padding properties.
Use conditions to control the activation state of Activities
In this section, you learn how to use a Data Trigger with an Apply Activation Action to control the activation state of an Activity when a condition in that Data Trigger is met.
To use conditions to control the activation state of Activities:
Create a property type that you use to set the state of an Activity:
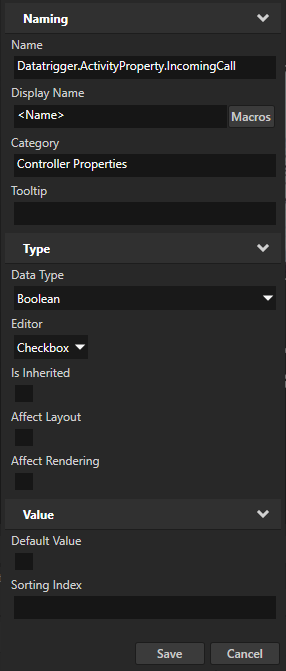
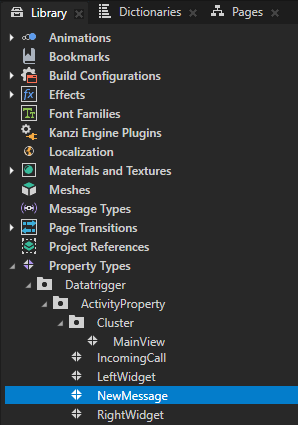
In the Library > Property Types > Datatrigger > ActivityProperty, press Alt and right-click, and select Property Type. In the New Property Type, window set:
Name to Datatrigger.ActivityProperty.IncomingCall
Category to Controller Properties
Data Type to Boolean
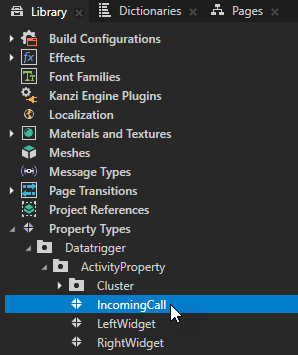
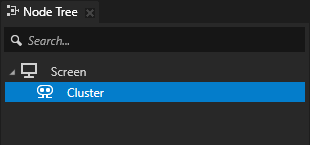
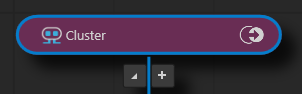
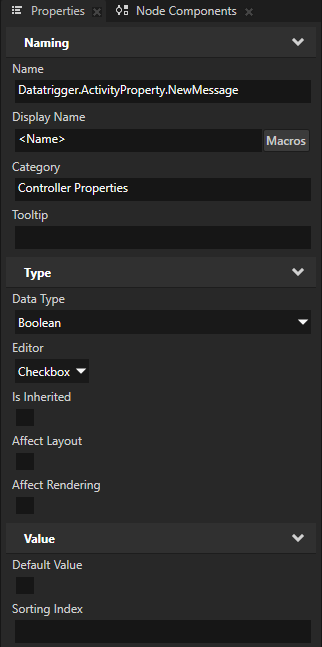
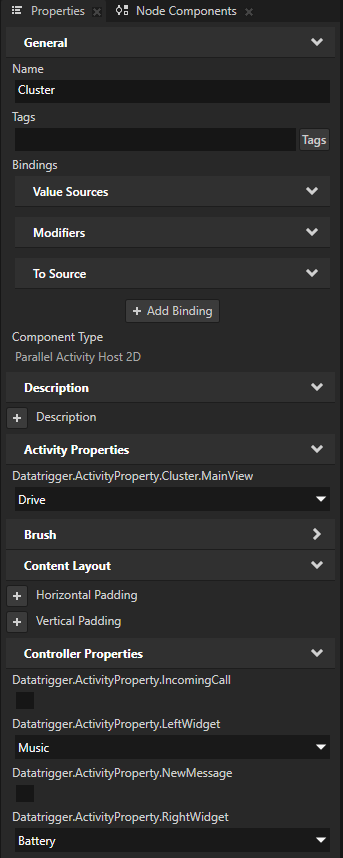
In the Node Tree, select the Cluster node. In the Properties, add the Controller Properties > Datatrigger.ActivityProperty.IncomingCall property.
You add the Datatrigger.ActivityProperty.IncomingCall property to the Cluster Activity Host because you want to control the activation state of the IncomingCall Activities from this node.
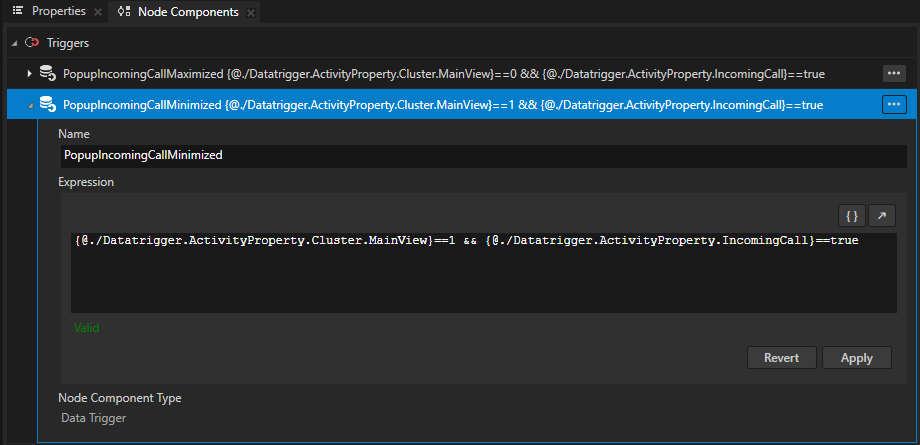
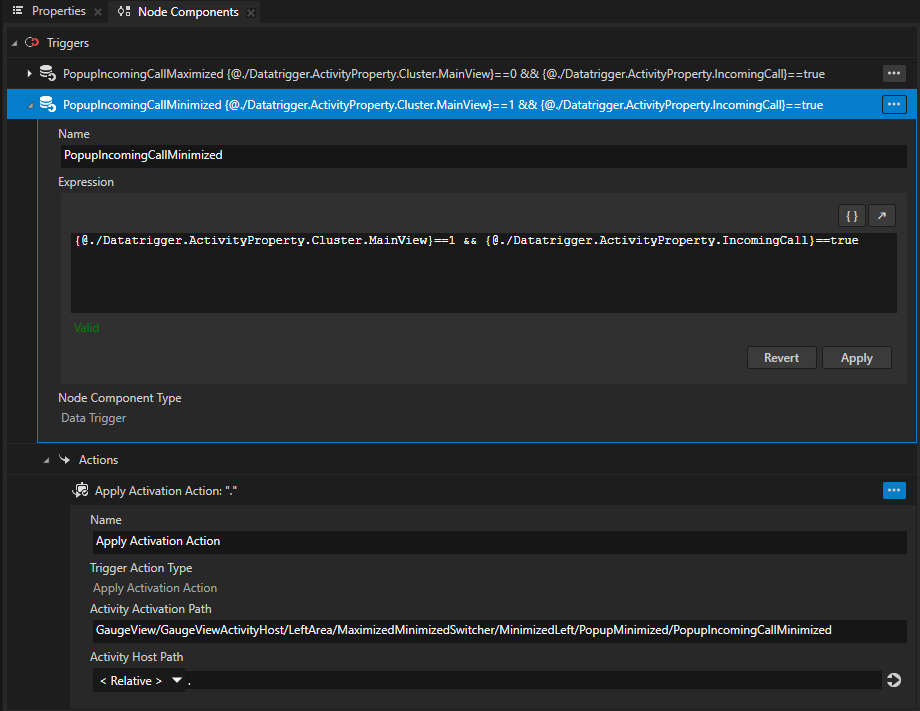
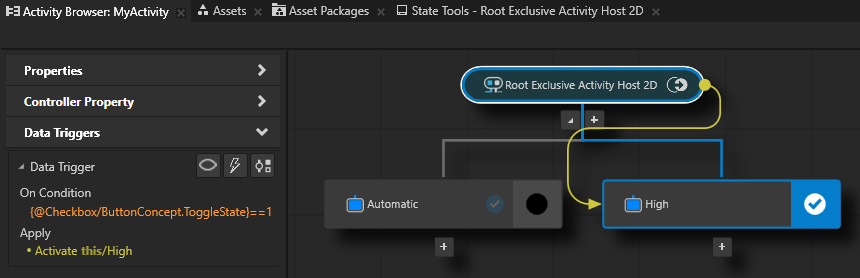
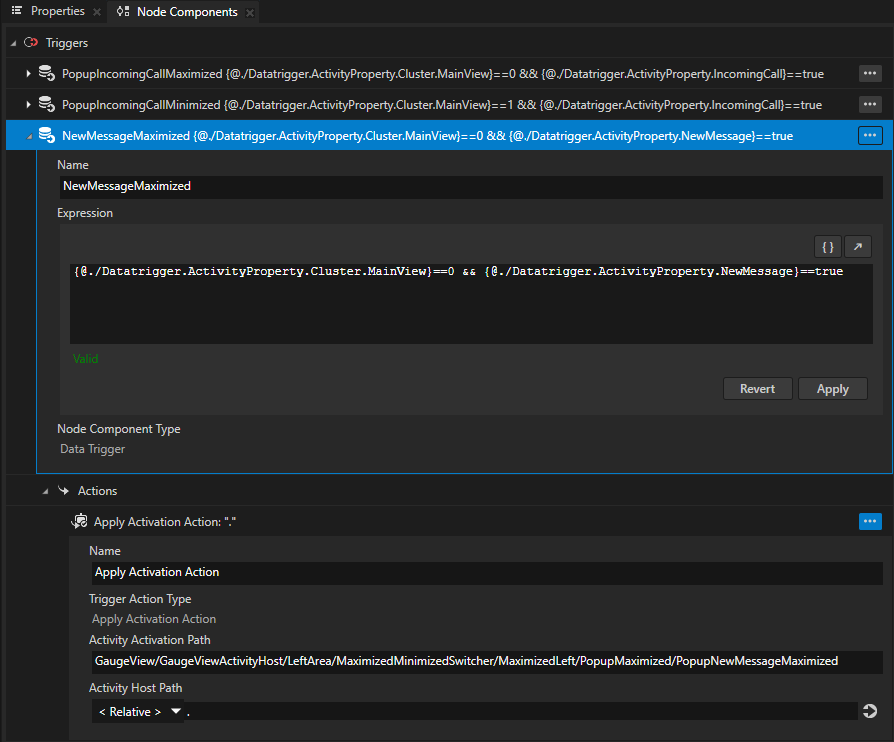
Create a Data Trigger that controls the activation state of an Activity based on a condition:
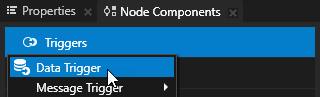
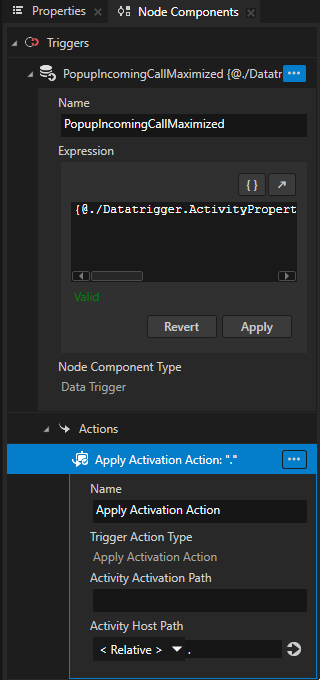
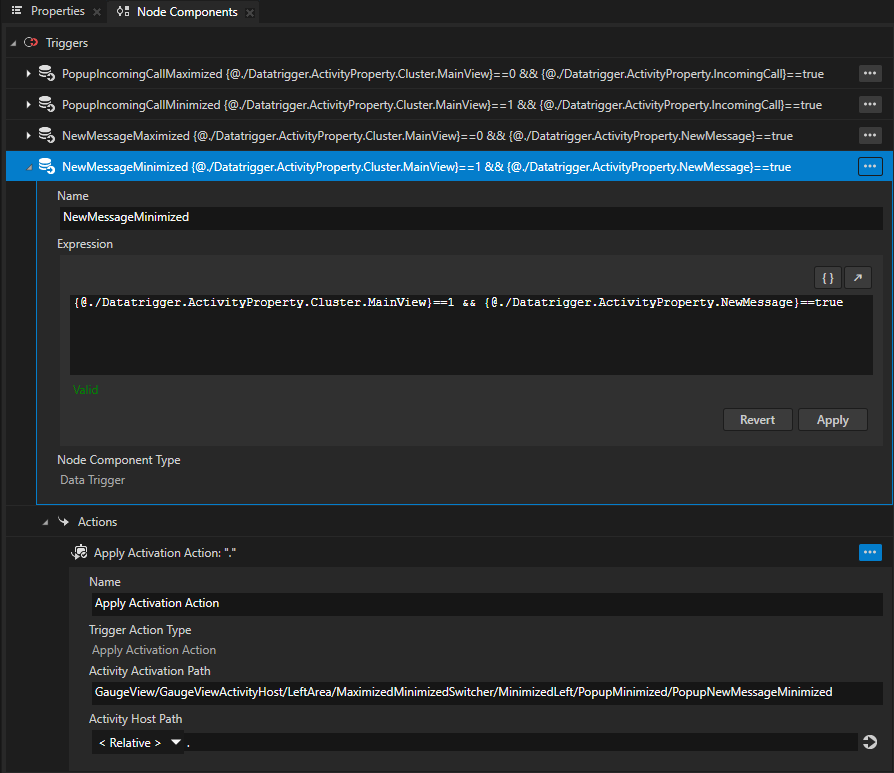
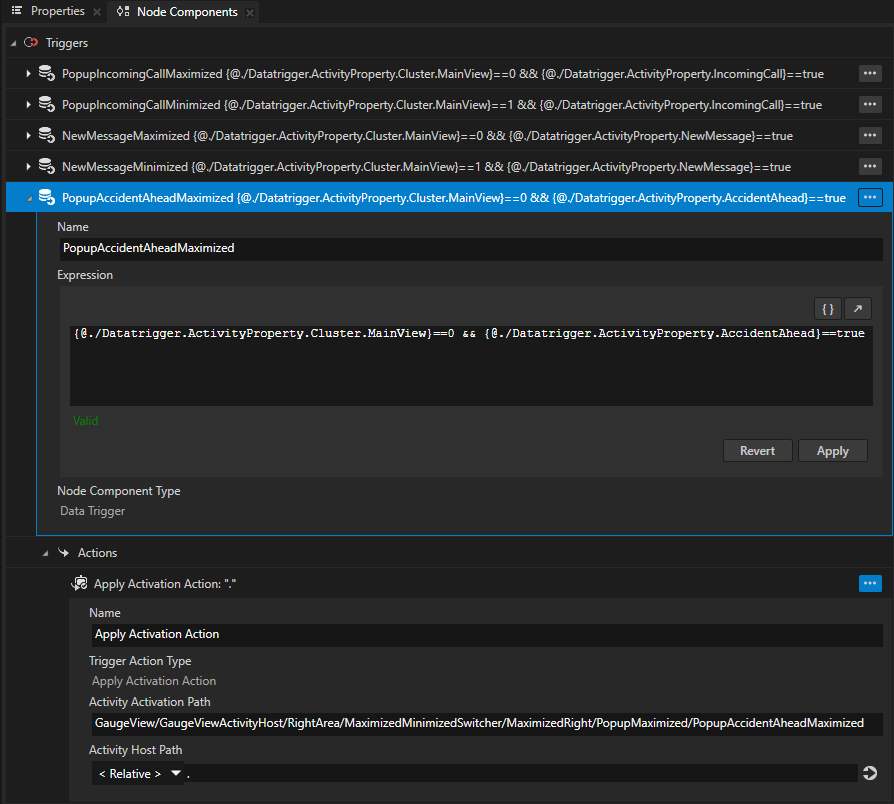
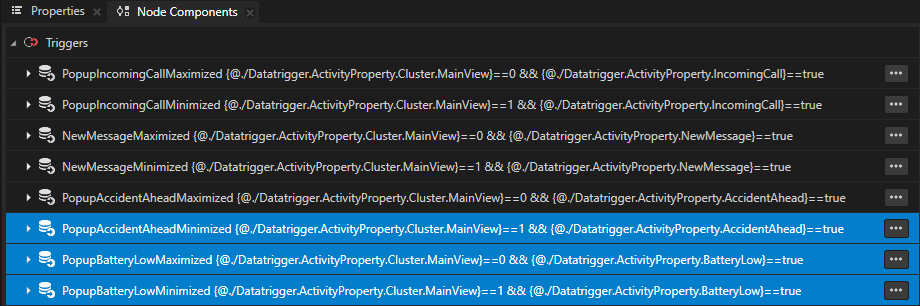
In the Node Tree, select the Cluster node. In the Node Components, press Alt and right-click Triggers, select Data Trigger, and name it PopupIncomingCallMaximized.
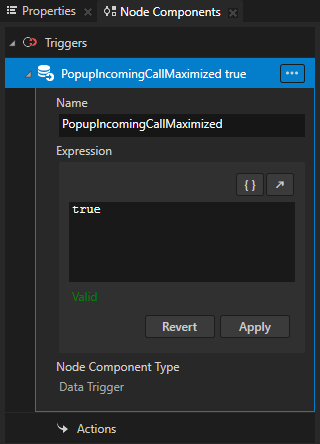
In the Data Trigger, in the Condition Expression, click
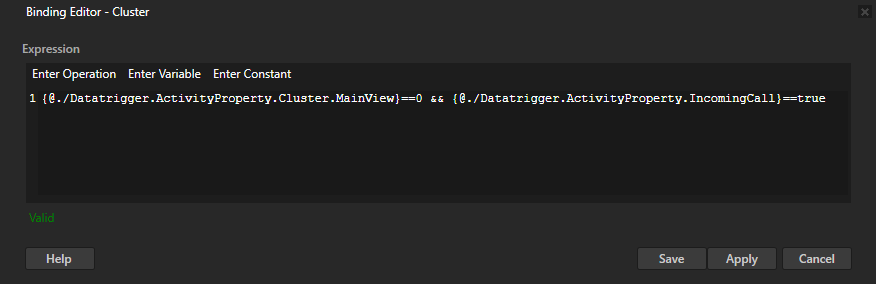
 , select the Properties window, drag the Datatrigger.ActivityProperty.Cluster.MainView and Datatrigger.ActivityProperty.IncomingCall properties to the Expression field, and edit the expression to
{@./Datatrigger.ActivityProperty.Cluster.MainView}==0 && {@./Datatrigger.ActivityProperty.IncomingCall}==trueA condition expression in a Data Trigger must evaluate to either
TrueorFalse.Click Save.
This way, you set the Data Trigger to keep an Apply Action in that Data Trigger applied only when these conditions are met:
The Datatrigger.ActivityProperty.Cluster.MainView is set to Drive (enumeration value 0).
The Datatrigger.ActivityProperty.IncomingCall is enabled (Boolean value
True).
You add an Apply Activation Action in the next step.
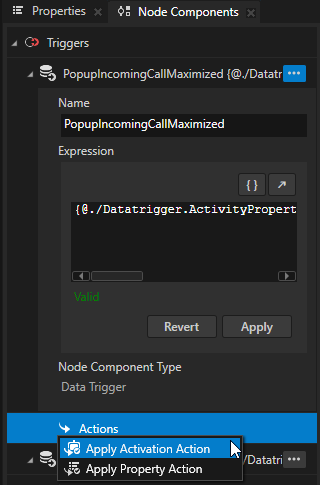
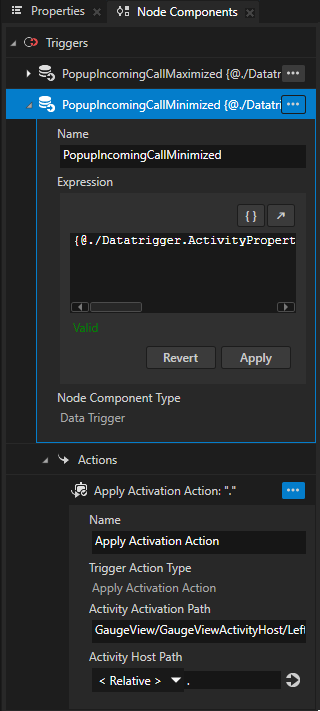
Create an Apply Activation Action that activates and deactivates an Activity:
In the PopupIncomingCallMaximized Data Trigger, press Alt and right-click Actions, and select Apply Activation Action.
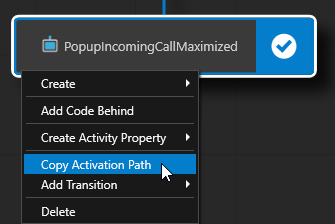
In the Activity Browser, right-click the PopupIncomingCallMaximized Activity and select Copy Activation Path.
In the Node Tree, select the Cluster node. In the Node Components, in the Apply Activation Action, set:
Activity Host Path to < Relative > and .
Activity Activation Path to the path that you copied from the Activity Browser and from the beginning of the path remove
Cluster/
The path to the Activity that you set in the Activity Activation Path property is relative to the Activity Host node that you set in the Activity Host Path property.
The Data Trigger and Apply Activation Action keep this Activity active for as long as the condition in the Data Trigger is met.
The Activity Browser indicates that an Activity Host has a Data Trigger with the
 icon.
icon.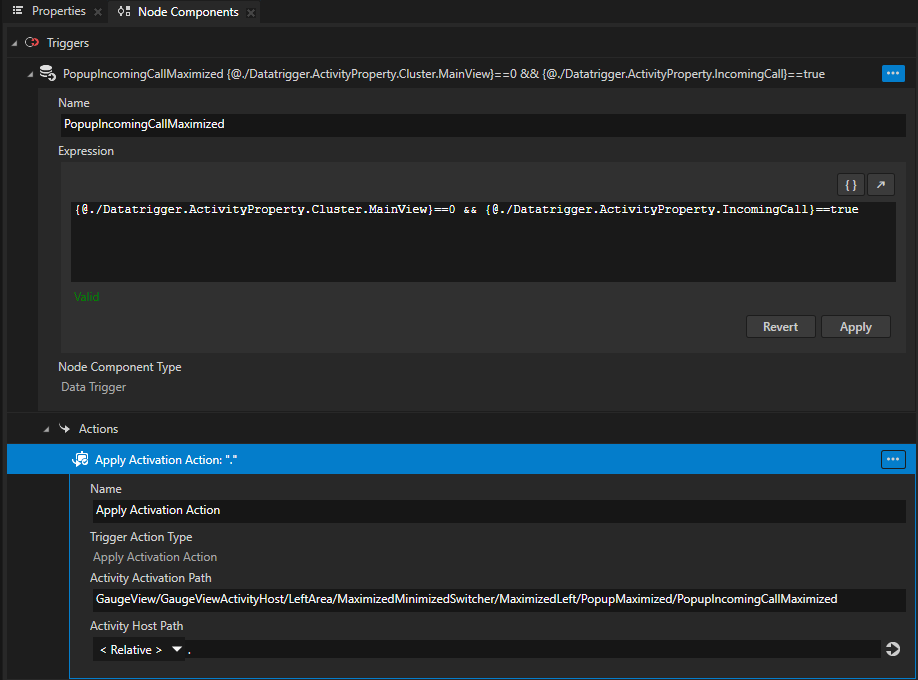
Set the Cluster Activity Host to activate the PopupIncomingCallMinimized Activity when the Cluster is in Browse mode and the Datatrigger.ActivityProperty.IncomingCall is enabled:
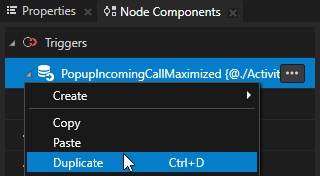
In the Node Components, right-click the PopupIncomingCallMaximized Data Trigger, select Duplicate, and rename the Data Trigger to PopupIncomingCallMinimized.
In the Condition Expression, edit the expression to
{@./Datatrigger.ActivityProperty.Cluster.MainView}==1 && {@./Datatrigger.ActivityProperty.IncomingCall}==trueClick Apply.
In the Activity Browser, right-click the PopupIncomingCallMinimized Activity and select Copy Activation Path. In the PopupIncomingCallMinimized Data Trigger Apply Activation Action, paste the copied path, and remove
Cluster/from the beginning of the path.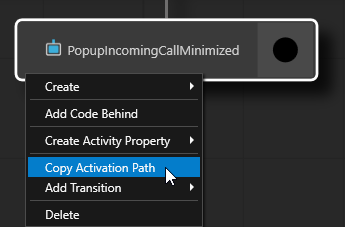
Create a UI element to control the activation of the IncomingCall Activities.
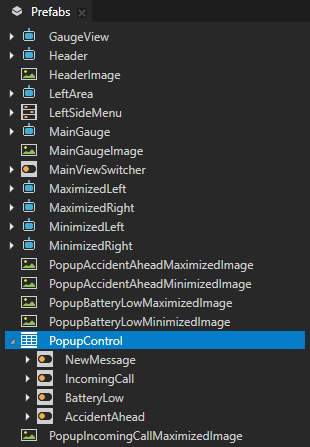
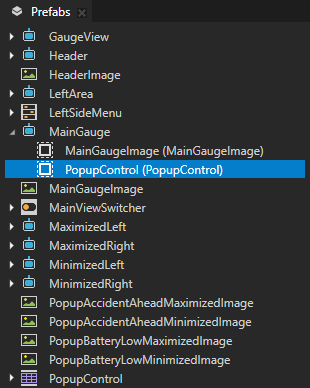
In the Prefabs, drag the PopupControl prefab to the MainGauge prefab.
The PopupControl prefab contains the Toggle Buttons that you can use to control the activation of popup Activities.
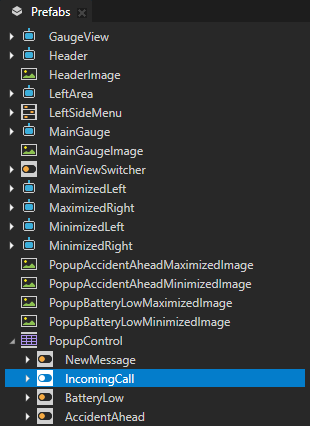
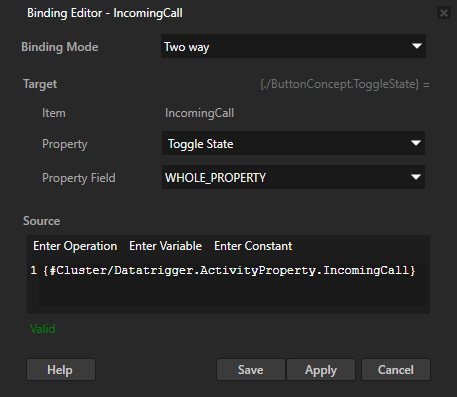
In the Prefabs, select the PopupControl > IncomingCall node. In the Properties, click + Add Binding and in the Binding Editor set:
Binding Mode to Two way
Property to Toggle State
Expression to
{#Cluster/Datatrigger.ActivityProperty.IncomingCall}Click Save.
This binding enables the IncomingCall Toggle Button to get and set the value of the Datatrigger.ActivityProperty.IncomingCall property in the Cluster Activity Host. This way the Toggle Button controls the state of the IncomingCall Activity.
Tip
During the application development, use these Data Trigger tools in the Activity Browser side panel:
Tool |
Description |
|---|---|
Shows where a Data Trigger is and where the source and target Activitites of that Data Trigger are. |
|
Simulates the state when you apply a Data Trigger. This enables you to see the state of your application when the conditions for a Data Trigger are met without having to change the property values in your application. |
|
Shows the selected Data Trigger in the Node Components window. |
You can now control the activation state of the IncomingCall popup in these ways:
In the Preview, click the
 Toggle Button.
In the Activity Browser, select the Cluster Activity Host and in the side panel, set the IncomingCall property.
Create additional popup windows
To create popup windows for a new message notification and control that notification with a Data Trigger, repeat the procedures above with these differences:
In the Activity Browser, add these Activities:
In the PopupMaximized, add an Activity named PopupNewMessageMaximized whose prefab uses the PopupNewMessageMaximizedImage.
In the PopupMinimized, add an Activity named PopupNewMessageMinimized whose prefab uses the PopupNewMessageMinimizedImage.

To control the activation state, create a controller Boolean property type called Datatrigger.ActivityProperty.NewMessage and add it to the Cluster Activity Host.
In the Cluster Activity Host, in the Node Components, duplicate the PopupIncomingCallMaximized Data Trigger, rename it to PopupNewMessageMaximized and:
Set Expression to
{@./Datatrigger.ActivityProperty.Cluster.MainView}==0 && {@./Datatrigger.ActivityProperty.NewMessage}==trueClick Apply.
In the Apply Activation Action, set the Activity Activation Path property to the activation path of the PopupNewMessageMaximized Activity.
In the Cluster Activity Host, in the Node Components, duplicate the PopupNewMessageMaximized Data Trigger, rename it to PopupNewMessageMinimized and:
Set Condition Expression to
{@./Datatrigger.ActivityProperty.Cluster.MainView}==1 && {@./Datatrigger.ActivityProperty.NewMessage}==trueClick Apply.
In the Apply Activation Action, set the Activity Activation Path property to the activation path of the PopupNewMessageMinimized Activity.
In the Prefabs, select the PopupControl > NewMessage node. In the Properties, click + Add Binding and in the Binding Editor set:
Binding Mode to Two way
Property to Toggle State
Expression to
{#Cluster/Datatrigger.ActivityProperty.NewMessage}Click Save.
This binding enables the NewMessage Toggle Button to get and set the value of the Datatrigger.ActivityProperty.NewMessage property in the Cluster Activity Host. This way the Toggle Button controls the state of the NewMessage Activity.

In the Activity Browser, select the PopupIncomingCallMaximized Activity and in the side panel, set the Priority to 1.
This way you set the priority of the PopupIncomingCallMaximized Activity to be higher than the priority of the PopupNewMessageMaximized Activity. The Activity with higher priority shows on top.
Repeat the previous step for the PopupIncomingCallMinimized Activity.
You can now control the activation state of the NewMessage popup in these ways:
In the Preview, click the
 Toggle Button.
In the Activity Browser, select the Cluster Activity Host and in the side panel set the NewMessage property.
What's next?
In this tutorial, you learned how to control the activation state of Activities with condition expressions. The application shows popup windows only when a condition in a Data Trigger is met.
To continue practicing the use of Data Triggers and Apply Activation Actions, you can repeat the entire tutorial to create the structure for the popup windows in the right-hand area of the cluster UI. Here are some useful tips for creating that structure:
In the Prefabs:
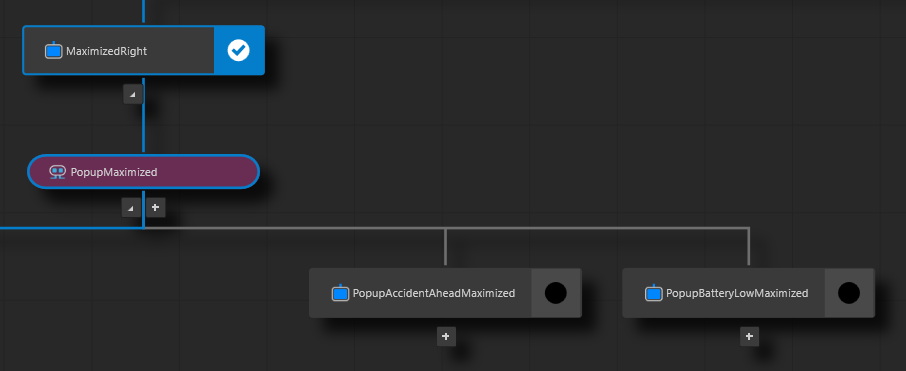
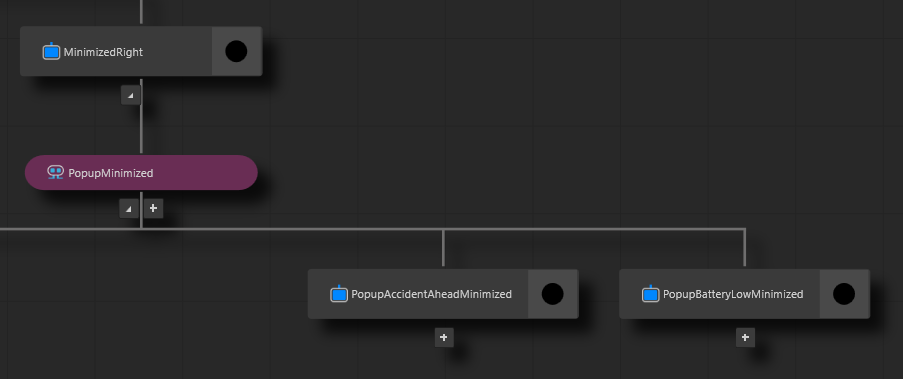
In the MaximizedRight Activity, create a Parallel Activity Host named PopupMaximized, and drag the MaximizedWidget Activity Host to the PopupMaximized Activity Host.
From the MaximizedWidget Activity Host, drag the Horizontal Padding property to the PopupMaximized Activity Host. Remove the Horizontal Padding property from the MaximizedWidget Activity.
Repeat the previous step for the MinimizedRight Activity, but name the Parallel Activity Host PopupMinimized and drag the Horizontal Padding and Vertical Padding properties. Remove the Horizontal Padding and Vertical Padding properties from the MinimizedWidget Activity Host.
In the Activity Browser:
In the PopupMaximized Activity Host, create Activities:
PopupAccidentAheadMaximized
PopupBatteryLowMaximized
In the PopupMinimized Activity Host, create Activities:
PopupAccidentAheadMinimized
PopupBatteryLowMinimized
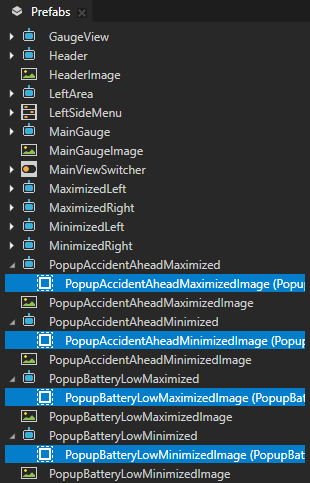
In the Prefabs, drag:
PopupAccidentAheadMaximizedImage to PopupAccidentAheadMaximized
PopupAccidentAheadMinimizedImage to PopupAccidentAheadMinimized
PopupBatteryLowMaximizedImage to PopupBatteryLowMaximized
PopupBatteryLowMinimizedImage to PopupBatteryLowMinimized
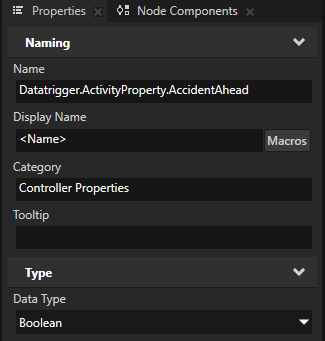
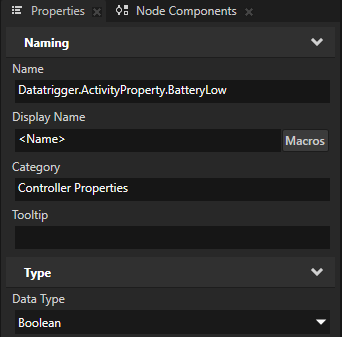
In the Library > Property Types > Datatrigger > ActivityProperty, create Datatrigger.ActivityProperty.AccidentAhead and Datatrigger.ActivityProperty.BatteryLow property types, and set:
Category to Controller Properties
Data Type to Boolean
Add to the Cluster Activity Host the Datatrigger.ActivityProperty.AccidentAhead and Datatrigger.ActivityProperty.BatteryLow property types.
In the Node Components, duplicate an existing Data Trigger and set:
Name to PopupAccidentAheadMaximized
Condition Expression to
{@./Datatrigger.ActivityProperty.Cluster.MainView}==0 && {@./Datatrigger.ActivityProperty.AccidentAhead}==trueClick Apply.
Activity Activation Path to the path of the PopupAccidentAheadMaximized Activity
Repeat the previous step for the PopupAccidentAheadMinimized, PopupBatteryLowMaximized, and PopupBatteryLowMinimized, but set the relevant name, expression, and Activity that the corresponding Data Trigger activates.
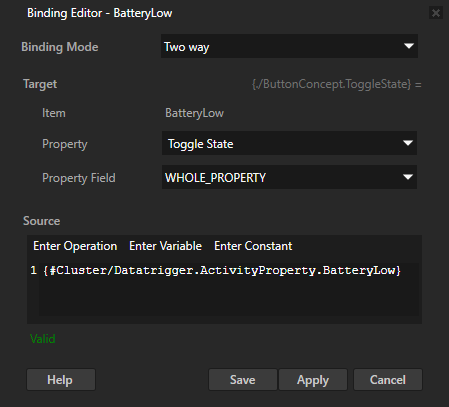
In the Prefabs, select the PopupControl > BatteryLow node. In the Properties, click + Add Binding and in the Binding Editor set:
Binding Mode to Two way
Property to Toggle State
Expression to
{#Cluster/Datatrigger.ActivityProperty.BatteryLow}Click Save.
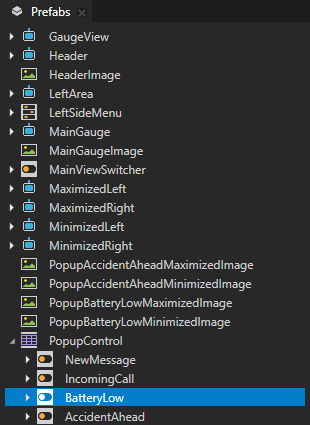
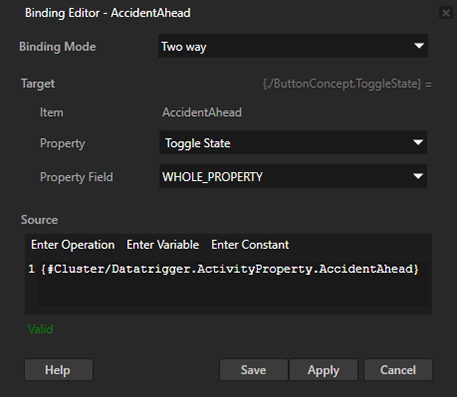
Repeat the previous step for the PopupControl > AccidentAhead node, but set the binding expression to:
{#Cluster/Datatrigger.ActivityProperty.AccidentAhead}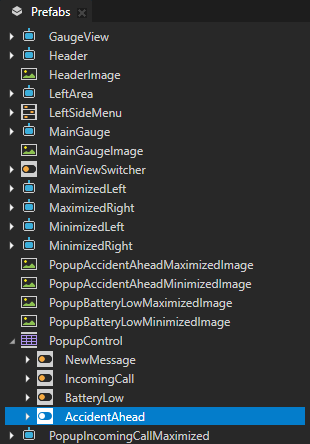
The completed tutorial project has the popup window functionality that you can control from the Cluster Activity Host for both the left- and right-hand areas. You can find the completed Kanzi Studio project in the <KanziWorkspace>/Tutorials/Data trigger/Completed directory.
See also
To learn more about how to use the Activity Browser, see Using the Activity Browser.
To learn more about the Activity system, see Activities.