Step 1 - Define a data source
In this step of the tutorial you create a Kanzi Engine plugin in which you define a data source. You use the data source to provide the data to your application.
Assets for the tutorial
The starting point of this tutorial is stored in the <KanziWorkspace>/Tutorials/Data sources/Start directory:
Tool_projectdirectory contains the Kanzi Studio project with the user interface for which you define a data source. You use the data from this data source to control the user interface defined in this Kanzi Studio project.Applicationdirectory contains the template that you use to define the data source for the user interface in the Kanzi Studio project.
You can find the completed tutorial in the <KanziWorkspace>/Tutorials/Data sources/Completed directory.
Define a data source
To define a data source:
In Windows Explorer from the
<KanziWorkspace>/Tutorials/Data sources/Assets/TinyXML-2directory copy thetinyxml2.cppandtinyxml2.hfiles to the<KanziWorkspace>/Tutorials/Data sources/Start/Application/src/plugin/srcdirectory.In this tutorial you use the
TinyXML-2library to process the XML file which you use as a data source.In the
<KanziWorkspace>/Tutorials/Data sources/Start/Application/src/plugin/CMakeLists.txtadd to thesetcommand thetinyxml2.cppandtinyxml2.hfiles.set(sources_plugin src/tinyxml2.cpp src/tinyxml2.h src/xmldatasource.cpp src/xmldatasource.hpp src/xmldatasource.rc src/xmldatasource_module.cpp src/xmldatasource_module.hpp)
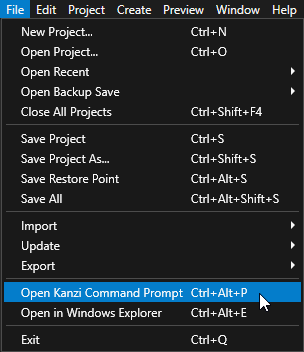
In Kanzi Studio, select File > Open Kanzi Command Prompt.
The Kanzi Command Prompt opens the Windows Command Prompt with the Kanzi environment variables set for the version of Kanzi for which you open a Kanzi Command Prompt.
Use the Kanzi Command Prompt to access Kanzi utilities and build tools, such as Gradle, SCons, and CMake, without using absolute paths or setting environment variables.
Tip
You can find the Kanzi Command Prompt in the Windows Start Menu in the Rightware directory.
When you have more than one version of Kanzi installed, make sure that you launch a Kanzi Command Prompt for the version of Kanzi with which you want to work in that command prompt.
In the Kanzi Command Prompt in the
<KanziWorkspace>/Tutorials/Data sources/Start/Applicationdirectory run the script that generates a Visual Studio solution for the tutorial application.For example, if you use Visual Studio 2019, run
generate_cmake_vs2019_solution.bat
This script generates a Visual Studio solution for the application in the directory
<KanziWorkspace>/Tutorials/Data sources/Start/Application/build_vs2019.In Visual Studio open the
<KanziWorkspace>/Tutorials/Data sources/Start/Application/build_vs<Version>/XML_data_source_start.slnVisual Studio solution.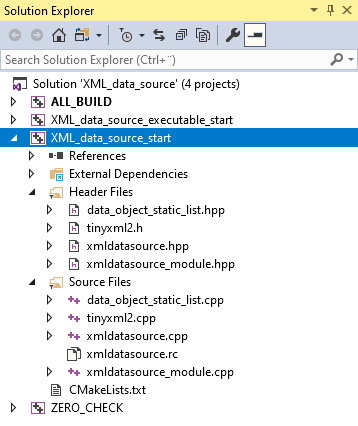
In Visual Studio in the XML_data_source_start project make these changes to the
xmldatasource.hppfile:In the public section of the XMLDataSource class create a property type with which you can set the XML file that you want this data source to use.
Replace
class XML_DATA_SOURCE_API XMLDataSource : public DataSource
{
public:

    KZ_METACLASS_BEGIN(XMLDataSource, DataSource, "CustomDataSourceType")
    KZ_METACLASS_END()

...

};
with
class XML_DATA_SOURCE_API XMLDataSource : public DataSource
{
public:
    // Create the XmlFilename property type. You use this property type to tell the data source plugin which XML file to read.
    static PropertyType<string> XmlFilenameProperty;

    KZ_METACLASS_BEGIN(XMLDataSource, DataSource, "XML_data_source")
        // Add the property you created to the class metadata.
        KZ_METACLASS_PROPERTY_TYPE(XmlFilenameProperty)
    KZ_METACLASS_END()

...

};
In the protected section after the
initialize()function declare:The helper function
parseFileto parse the XML file that the user selectsThe function that Kanzi calls after loading the kzb file of the application
class XML_DATA_SOURCE_API XMLDataSource : public DataSource
{

...

protected:

...
    // Declare the function that parses the XML file and creates data objects from its content.
    void parseFile(vector<char> fileData);

    // Kanzi calls onLoaded after loading the kzb file of the application.
    void onLoaded() override;
...
};
In Visual Studio add to the
xmldatasource.cppfile:Include the header file required to process XML.
// Provides the functionality to process XML.
#include "tinyxml2.h"
Define the metadata for the property type which you created in the
xmldatasource.hppheader file.You use this property to tell the data source plugin from which XML file to get the data.
// Define the metadata for the property type you use to tell the data source plugin which XML file to read.
PropertyType<string> XMLDataSource::XmlFilenameProperty(kzMakeFixedString("XMLdatasource.XMLDataSourceFile"), "", 0, false,
                                                        KZ_DECLARE_EDITOR_METADATA
                                                        (
                                                            // Set the name of the property the way it is shown in Kanzi Studio.
                                                            metadata.displayName = "XML Data Source File";
                                                            // Set the tooltip for the property.
                                                            metadata.tooltip = "Sets which XML file the data source plugin reads.";
                                                            // Select the editor which is used to edit the value of this property type.
                                                            // BrowseFileTextEditor editor contains a text box with a Browse button next to it.
                                                            metadata.editor = "BrowseFileTextEditor";
                                                        ));
Before the metadata definition create a function which creates data objects based on the type specified in the type attribute in the XML element of the data source file.
// Add a data object of the type specified by the type attribute in the XML element. Get the initial value
// from the text parameter.
DataObjectSharedPtr addDataObject(Domain* domain, const char* type, const char* name, const char* text)
{
    shared_ptr<DataObject> object;
    // Create an integer data object from the int type attributes.
    if (type && strcmp(type, "int") == 0)
    {
        int value = 0;
        if (text)
        {
            value = atoi(text);
        }
        object = DataObjectInt::create(domain, name, value);
    }
    // Create a float data object from the float and real type attributes.
    else if (type && (strcmp(type, "real") == 0 || strcmp(type, "float") == 0))
    {
        double value = 0;
        if (text)
        {
            value = atof(text);
        }
        object = DataObjectReal::create(domain, name, value);
    }
    // Create a Boolean data object from the bool and boolean type attributes.
    else if (type && (strcmp(type, "bool") == 0 || strcmp(type, "boolean") == 0))
    {
        bool value = false;
        if (text)
        {
            value = (strcmp(text, "true") == 0);
        }
        object = DataObjectBool::create(domain, name, value);
    }
    // Create a string data object from the string type attributes.
    else if (type && strcmp(type, "string") == 0)
    {
        string value;
        if (text)
        {
            value = text;
        }
        object = DataObjectString::create(domain, name, value);
    }
    else
    {
        // If the type attribute is not set, create a generic data object.
        // This is used to create the hierarchy in the data source.
        object = DataObject::create(domain, name);
    }
    return object;
}
After the
addDataObjectfunction create a function which converts the content of the XML structure in memory to data objects.// Convert to data objects the content of the XML structure in memory. You use these data objects to // construct the data object tree of the data source. // - The second parameter sets the node where this pass places new data objects. // - The third parameter sets the pointer to the location where the conversion and parsing is progressing (within the // XML in the memory, the child element in the XML). static void addDataObjectsRecursively(Domain* domain, DataObjectSharedPtr parent, const tinyxml2::XMLElement* xml) { // Check whether the current element in the XML file has the type attribute set. const tinyxml2::XMLAttribute* typeAttribute = xml->FindAttribute("type"); // Get value of the type attribute. const char* type = 0; if (typeAttribute) { type = typeAttribute->Value(); } // Create the data object based on the value of the type attribute. DataObjectSharedPtr object = addDataObject(domain, type, xml->Name(), xml->GetText()); // Add the data object as a child to the parent data object. parent->addChild(object); // Traverse the tree in the XML file to add data objects for each child element of the current XML element. for (const tinyxml2::XMLElement* child = xml->FirstChildElement(); child; child = child->NextSiblingElement()) { // Recurse. addDataObjectsRecursively(domain, object, child); } }
Before the
addDataObjectfunction create a function that loads from disk to memory the XML file that the user can set with the XML Data Source File property.// Declare the addDataObjectsRecursively function. static void addDataObjectsRecursively(Domain* domain, DataObjectSharedPtr object, const tinyxml2::XMLElement* xml); // Parse the XML file and create data objects from its content. void XMLDataSource::parseFile(vector<char> fileData) { // Clear the previous data object tree. m_root.reset(); // Parse the XML document from the memory and release the open file. tinyxml2::XMLDocument doc; tinyxml2::XMLError error = doc.Parse(fileData.data(), fileData.size()); // If the plugin successfully loads the file set in the XML Data Source File property, create data objects. if (error == tinyxml2::XML_SUCCESS) { // Get the root XML element. const tinyxml2::XMLElement* element = doc.RootElement(); // Create the root data object of the data source. m_root = DataObject::create(getDomain(), "Root"); do { // Populate the child data objects of the root data object. addDataObjectsRecursively(getDomain(), m_root, element); // Handle all sibling elements of the root XML element. element = element->NextSiblingElement(); } while (element); notifyModified(); } }
Before the
parseFilefunction create a function that reads into memory the contents of the file that you use as a data source.// Read the contents of the XML file into memory. vector<char> readFileContents(string_view filename) { ReadOnlyDiskFile file(filename); vector<char> data(static_cast<size_t>(file.size())); file.read(data.data(), data.size()); return data; }
After the
readFileContentsfunction, implement the function that Kanzi calls after loading the application kzb file.// Kanzi calls onLoaded after loading the kzb file of the application. void XMLDataSource::onLoaded() { // If you do not set the value of the XML Data Source File property, the plugin does not do anything. string filename = getProperty(XmlFilenameProperty); if (!filename.empty()) { // Call the function that reads the contents of the XML file into memory, and pass the return value // to the function that parses the XML file and creates data objects from its content. parseFile(readFileContents(filename)); } }
Update the data source
In this section you add the functionality to update a data source by checking every second whether the file, which you use as a source of data, has changed.
To update the data source:
Make these changes to the
xmldatasource.hpp:In the private section introduce the thread and functions that you use to track the changes in the data source. Replace
private:

    // Introduce the pointer to the root data object of the data source.
    DataObjectSharedPtr m_root;
with
private:

    // Declare the function that starts the thread which monitors and reads the XML file.
    void startWorkerThread(string_view filename);

    // Declare the function that stops the thread which monitors and reads the XML file.
    void stopWorkerThread();

    // Declare the function that is executed in the thread which monitors and reads the XML file.
    // You pass a copy of the string for the filename because it is used in a different thread.
    void workerThreadCallback(string filename);

    // Introduce the pointer to the root data object of the data source.
    DataObjectSharedPtr m_root;

    // Introduce the thread for monitoring and reading the XML file.
    thread m_workerThread;

    // Introduce the exit flag for the worker thread.
    atomic<bool> m_workerThreadExitCondition;
In the protected section modify the constructor to initialize the exit flag for the worker thread. Replace
// Constructor.
explicit XMLDataSource(Domain* domain, string_view name):
    DataSource(domain, name)
{
}
with
// Constructor.
explicit XMLDataSource(Domain* domain, string_view name):
    DataSource(domain, name),
    m_workerThreadExitCondition(false)
{
}
In the public section after the definition of the
createfunction declare the destructor.public: ... // Destructor ~XMLDataSource();
Make these changes to the
xmldatasource.cpp:Include the header file used by the functions that monitor the file that you use as a data source.
// Provides the system utility function to get the timestamp of the file.
#include <sys/stat.h>
Before the
parseFilefunction create the functions that monitor and read the file that you use as a data source.// Helper function to get the file modification time. static time_t getFileModificationTime(const char* filename) { time_t result = 0; struct stat fs; if (stat(filename, &fs) == 0) { result = fs.st_mtime; } return result; } // Start the thread that monitors and reads the XML file. void XMLDataSource::startWorkerThread(string_view filename) { kzAssert(!m_workerThread.joinable()); m_workerThread = thread(&XMLDataSource::workerThreadCallback, this, string(filename)); } // Stop the thread that monitors and reads the XML file. void XMLDataSource::stopWorkerThread() { m_workerThreadExitCondition = true; if (m_workerThread.joinable()) { m_workerThread.join(); } m_workerThreadExitCondition = false; } // This thread function checks once every second whether the XML file has been modified. // The function reads the contents of the XML file and submits a task to the UI thread to parse the file contents // into the data source structure. void XMLDataSource::workerThreadCallback(string filename) { TaskDispatcher* taskDispatcher = getDomain()->getTaskDispatcher(); // Initialize the previous modification time to an invalid value. time_t oldModificationTime = static_cast<time_t>(-1); for (;;) { if (!filename.empty()) { time_t newModificationTime = getFileModificationTime(filename.c_str()); if (oldModificationTime != newModificationTime) { // Read the contents of the file into memory. // You read the file contents on this thread to avoid blocking the UI thread with a long operation. vector<char> data = readFileContents(filename); // Submit a task that parses the XML file and constructs the data source. // You must do this in the UI thread because you can manipulate data source objects // and other UI objects only in the UI thread. taskDispatcher->submit(bind(&XMLDataSource::parseFile, this, kanzi::move(data))); oldModificationTime = newModificationTime; } } // Sleep for one second. this_thread::sleep_for(chrono::milliseconds(1000)); // If the UI thread sets the exit flag, exit. if (m_workerThreadExitCondition) { break; } } }
Modify the
onLoadedfunction to include shutting down and starting the thread that monitors and reads the XML file.// Kanzi calls onLoaded after loading the kzb file of the application. void XMLDataSource::onLoaded() { // The Kanzi Studio Preview can call the onLoaded function multiple times whenever // the user edits properties of the data source or refreshes the data source. // Shut down the thread that monitors and reads the XML file. stopWorkerThread(); ... if (!filename.empty()) { ... // Start the thread that monitors and reads the XML file. startWorkerThread(filename); } }
Before the
onLoadedfunction, define the destructor.// Destructor XMLDataSource::~XMLDataSource() { // Shut down the thread that monitors and reads the XML file. stopWorkerThread(); }
Build the data source plugin
After you are done creating the plugin, build the plugin dll. In the next step of this tutorial you use this plugin in the Kanzi Studio project to get the data for your application from an XML file.
To build the data source plugin:
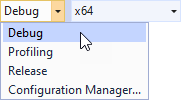
Select the solution configuration that you want to use.
During development select the Debug configuration. When you are ready to create a version for production, select the Release configuration.
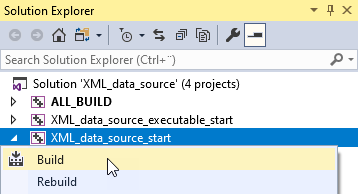
In the Solution Explorer right-click the XML_data_source_start project and select Build.
Visual Studio builds the plugin DLL in the
<ProjectName>/Application/lib/<PlatformName>/<ConfigurationName>and the<ProjectName>/Application/build_vs<Version>/runtime/<ConfigurationName>directories. Kanzi Studio uses the plugin DLL in the<ProjectName>/Application/libdirectory.