Theming your applications
Themes enable you to use a single Kanzi Studio project for multiple variants of your product.
For example, in a single project you can define Kanzi applications for different car models and different visual themes for each car model.
Creating themes for your application involves the creation and use of different resources, such as, text, textures, brushes, materials, and styles, and layouts for themes that you want to use in your applications.
A Theme Group defines a collection of Themes. Each Theme in a Theme Group defines the look and feel of your application. In your Kanzi Studio project you can define more than one Theme Group, where each contains several Themes. In your Kanzi application you can apply one Theme from each Theme Group at a time. For example, you can use one Theme Group to define a car model, such as hatchback, minivan, pickup, sedan, and SUV, and another Theme Group to define the look of the interface for each of the car models, such as, classic, digital, modern, and sport.
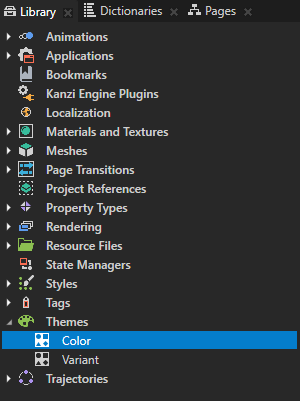
Kanzi uses themed resources indirectly using resource IDs that hold a separate value for each Theme. In the Library > Themes you can see all Theme Group items in your Kanzi Studio project.
To create a theme for your application:
Create a Theme Group and add to it the resources in your project which you want to define with a Theme. See Adding resources used in a project to a Theme Group.
Create and import resources each Theme uses. See Setting resources for a Theme.
View a Theme in the Preview. See Viewing a theme in the Preview.
Export resources used by a Theme to kzb files. See Exporting Themes.
Learn how to theme your Kanzi applications by completing a tutorial. See Tutorial: Theme your application.
Adding resources used in a project to a Theme Group
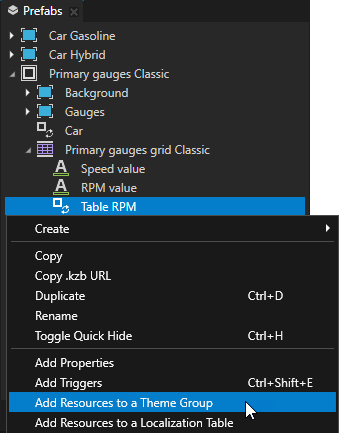
Start creating a theme for your Kanzi application by adding resources which you want to theme to a Theme Group. The easiest way to add resources to a Theme Group is to use the Add Resources to a Theme Group command on a node in the Node Tree.
When you use the Add Resources to a Theme Group command in the Node Tree, Kanzi Studio automatically creates a resource ID for each resource in the node and nodes in its tree and sets each node to use those resource IDs.
To add resources used in a project to a Theme Group:
In the Node Tree right-click the Screen node and in the context menu select Add Resources to a Theme Group.
When you use the Add Resources to a Theme Group command on the Screen node, Kanzi Studio enables you to add all resources in your project to a Theme Group and change their appearance in each Theme. To add to a Theme Group resources only from a selected node or prefab and its tree, right-click that node or prefab and select Add Resources to a Theme Group.
In the Add Resources to a Theme Group window set:
Theme Group to the Theme Group to which you want to add the resources. If you do not have a Theme Group yet, select <Create New>.
A Theme Group defines a collection of Themes.
Select the resource type you want to show in the Add Resources to a Theme Group window.
For example, to show only text and image resources select
 and
and  .
.
In the table that lists all resources of the types you selected, click the checkbox next to the resource you want to add to the Theme Group you selected. To change the resource ID, double-click the resource ID and enter a new name.
Kanzi Studio creates a single resource ID for Text Block nodes which use the same value for the Text property. These nodes share the same entry in a Theme Group.
Click Add.
Kanzi Studio creates resource IDs from all resources and adds them to the Theme Group you selected. You can find Theme Group items in the Library > Themes. In the Theme Group you can now create Themes and set which resource you want to use for which Theme. See Setting resources for a Theme.

Setting resources for a Theme
After you add resources used in your project to a Theme Group you can create a Theme and define the resources used by each Theme.
To set resources for a Theme:
Create and import resources you want to use for each Theme. For example:
In the Library create the resources, such as, brushes, styles, and materials which set the appearance for each theme in your application.
In the Prefabs create the layouts which arrange the UI elements for each theme in your application.
In the Assets import the 2D and 3D assets which you want to use in a Theme.
In the Library > Themes double-click the Theme Group where you want to define a Theme.
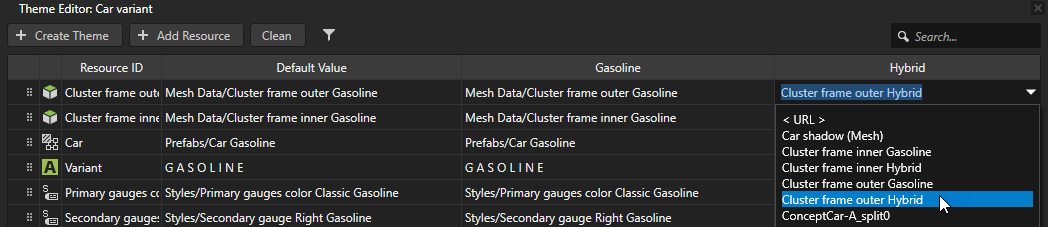
In the Theme Editor click Create Theme and name the Theme.

In the column of the theme you created in the previous step, double-click the cell for each resource, and set the resource you want to use for the resource ID in that row.
If you do not select a resource or value for a Theme, Kanzi uses the default resource or value for that Theme. The default value is listed in the Default Value column.
Black cells mark entries which use the default value.
To use an empty string for a text resource, enter a value, delete the value, and then press the Enter key.
Gray cells mark entries which use an empty string.
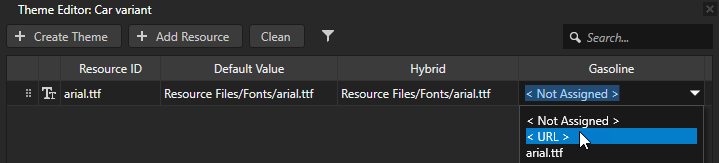
To use a resource from the file system, in the cell for which you want to set the resource select < URL >, and enter
file://followed by the absolute or relative path to the resource in the file system.
Using a kzb file URL for a resource in a Theme
After you add resources used in your project to a Theme Group, you can use a kzb file URL to point to a resource in another Kanzi Studio project.
To use a kzb file URL for a resource in a Theme:
In the Library > Themes double-click the Theme Group where you want to define a Theme.
In the Theme Editor click Create Theme and name the Theme.
In the column of the Theme you created in the previous step, double-click the cell for the resource for which you want to use a kzb file URL, and in the dropdown menu select < URL >.
In the cell enter the kzb file URL of the resource you want to use.
For example, to use a font from another Kanzi Studio project, enter the kzb file URL pointing to that font.

Viewing a theme in the Preview
When you are defining a Theme for your application, you can set the Preview to show that Theme without adding to the application a control for switching Themes.
To view a Theme in the Preview:
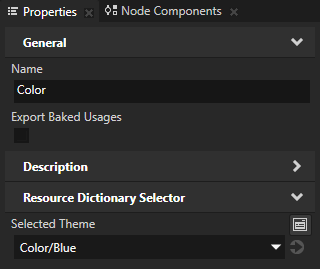
In the Dictionaries click Locales and Themes to enable the viewing of Localization Table and Theme Group items, and for each Theme Group select the Theme you want to see in the Preview.

In the Library select the Theme Group which contains the Theme you want to view and in the Properties set the Selected Theme property to that Theme.