Distributing rendering across several frames
Use the Progressive Rendering Viewport 2D node to distribute the rendering workload across several frames to reduce the amount of work and time required to render one whole frame. Kanzi continues to render all content not rendered by a Progressive Rendering Viewport 2D node every frame.
Kanzi updates all content rendered by a Progressive Rendering Viewport 2D node every n frames, where n is the number of child render passes of the render pass prefab that the Progressive Rendering Viewport 2D node uses.
For example, if a Progressive Rendering Viewport 2D node uses a Group Render Pass render pass prefab which has four child render passes, Kanzi updates the content rendered by the Progressive Rendering Viewport 2D node every four frames. When you use a Progressive Rendering Viewport 2D node to render interactive content this can make such content less responsive.
When you divide complex and rendering-intensive content into even parts, you can use a Progressive Rendering Viewport 2D node to improve the rendering performance of your application.
In a Progressive Rendering Viewport 2D Kanzi renders one render pass in one frame. To keep the framerate from fluctuating, distribute the rendering into even parts among the render passes used by a Progressive Rendering Viewport 2D node. To distribute the rendering into even parts make sure that each render pass renders:
Approximately the same amount of polygons
Shaders that are of similar complexity
Textures that are similar in size
Similar number of textures
For example, use the Progressive Rendering Viewport 2D node to render the content at different update frequencies. To render part of the content at 60 fps and the rest of the content at 30 fps, all content together must render in 16 ms or less (1000 ms / 60 fps = 16,6 ms). If the longest time it takes to render your 60 fps content is 10 ms, to display the rest of the content at 30 fps:
Split the content you want to render at 30 fps into two or three parts so that each part renders in 6 ms or less. In order to render your 60 fps content every frame at 60 fps, the total render time of both 60 fps and 30 fps content must not be higher than 16,6 ms.
Use the Progressive Rendering Viewport 2D node to render the 30 fps content. If you split the content into two parts, Kanzi renders the entire 30 fps content every two frames. If you split the content into three parts, Kanzi renders the entire 30 fps content every three frames.
Tip
When splitting content into parts, to find out how much time it takes to render each part:
In the Preview click
 to enter the Analyze mode, right-click
  , and select the Performance HUD, or enable the Performance HUD in the
 application.cfgfile oronConfigure()function when using the Kanzi Engine API. See Analyzing your application in the Preview and PerformanceInfoLevel.Hide the content you do not want to render. In Kanzi Studio in the Node Tree select the nodes you want to hide and press Ctrl H, or add and disable the Visible property.
To learn how to use the Progressive Rendering Viewport 2D node to distribute the rendering of content across several frames, complete the progressive rendering tutorial. See Tutorial: Progressive rendering.
Using the Progressive Rendering Viewport 2D node
To use the Progressive Rendering Viewport 2D node:
Use Kanzi filters or Combine Object Source items to collect the nodes you want distribute across several frames. See Filters and Using object sources. For example, to collect the nodes using a Tag Filter:
In the Node Tree select the nodes you want to render across several frames and in the Properties use the Tags property to mark the nodes for rendering in different render passes. See Using tags.
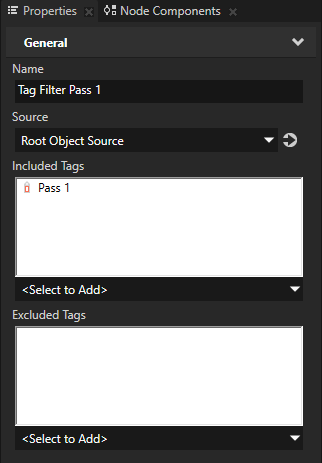
For example, to distribute the rendering into two parts, tag the nodes you want to render with the first render pass with a tag Pass 1, and tag the nodes you want to render with the second render pass with a tag Pass 2.
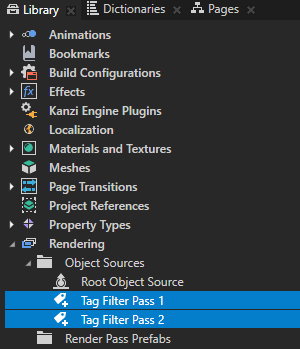
In the Library press Alt and right-click Rendering and create as many Tag Filter filters as you have tags with which you marked nodes in the previous step, and in the Properties set the Included Tags property to the tag you want to collect with that Tag Filter.
For example, name the first Tag Filter filter Tag Filter Pass 1, and in the Properties set the Included Tags property to Pass 1.
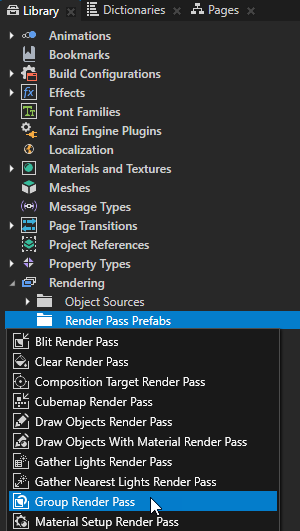
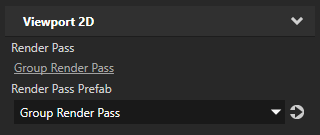
In the Library > Rendering press Alt and right-click Render Pass Prefabs, and create the Group Render Pass render pass prefab that the Progressive Rendering Viewport 2D node uses to render its content.
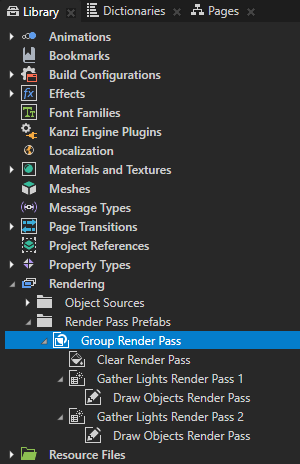
In the Library press Alt and right-click the Group Render Pass that you created in the previous step and create:
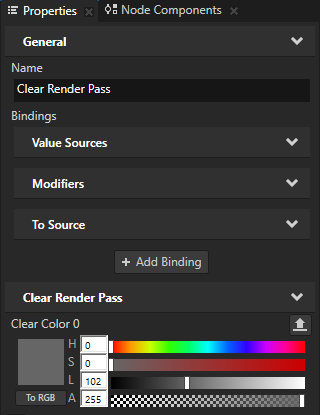
Clear Render Pass
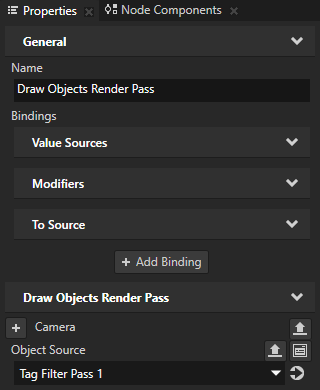
For each collection of nodes that you created in the first step, a Gather Lights Render Pass and inside it a Draw Objects Render Pass
In the Library select each Draw Objects Render Pass that you created in the previous step and in the Properties set the Object Source property to the filter or Combine Object Source item that collects the nodes that you want this render pass to render.
For example, select the first Draw Objects Render Pass and set the Object Source property to Tag Filter Pass 1.
In the Node Tree press Alt and right-click where you want to create a Progressive Rendering Viewport 2D node, select Progressive Rendering Viewport 2D, and in the Properties set the Render Pass Prefab property to the Group Render Pass.
You set Kanzi to render the Progressive Rendering Viewport 2D node using the Group Render Pass render pass prefab.
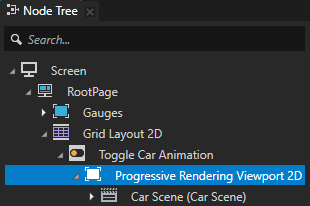
In the Node Tree add to the Progressive Rendering Viewport 2D node the content that you collected in the first step.
In the Clear Render Pass add and set the Clear Color 0 property to produce meaningful color output, including the alpha channel.
Using animations with progressive rendering
You cannot use an Animation Player or a state transition to animate nodes in a Progressive Rendering Viewport 2D node.
To use animations with progressive rendering:
In the Node Tree select a Progressive Rendering Viewport 2D node where you want to use an animation.
In the Properties set the Timeline property to the Animation, Animation Clip or Timeline Sequence you want to use.
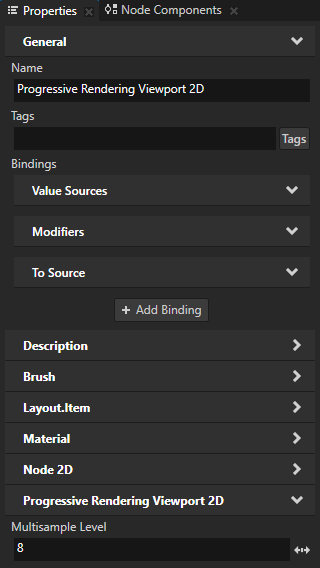
Applying anti-aliasing to content rendered by a Progressive Rendering Viewport 2D node
To apply anti-aliasing to the content rendered by a Progressive Rendering Viewport 2D node, in the Node Tree select the Progressive Rendering Viewport 2D node, in the Properties add the Multisample Level property, and set it to the number of anti-aliasing samples that you want to use.
See the documentation of the device on which you want to run your Kanzi application for supported values, because the number of anti-aliasing samples depends on the device. If you set the Multisample Level property to a value which your device does not support, Kanzi Engine clamps the value to the largest value supported by the device driver.

Progressive Rendering Viewport 2D property types and messages
For a list of the available property types and messages for the Progressive Rendering Viewport 2D node, see Progressive Rendering Viewport 2D.