Step 2 - Create locale packs for additional locales
A locale pack is a kzb file that contains only the resources for a specific locale. Using the Kanzi Engine API, you can load the application resources used by a specific locale when you set that locale. That way you reduce the size of kzb files in your application.
In this step of the tutorial you first prepare the Kanzi Studio project for loading additional locales and then create styles and locale packs for the Japanese, Chinese, and Korean locales.
Prepare the Kanzi Studio project for loading additional locales
In this section, you modify the Kanzi Studio project that you created in the first step of the tutorial:
You import the PO files that contain the resources for the additional locales.
You prepare the project so that the instances of the LocaleButton prefab in the LocaleSelector node use a custom property to control the locale of the application.
To prepare the project for loading additional locales:
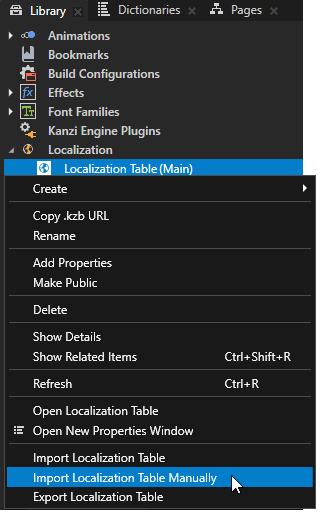
In the Library > Localization, right-click the Localization Table (Main) localization table and select Import Localization Table Manually. Go to the
<KanziWorkspace>/Tutorials/Localization/Assets/Textdirectory and import theja-JP.po,ko-KR.po, andzh-ZH.pofiles that contain the text strings for the Japanese, Korean, and Chinese locales.Kanzi Studio creates the locales specified in the PO files and adds the translations from these PO files to the localization table.
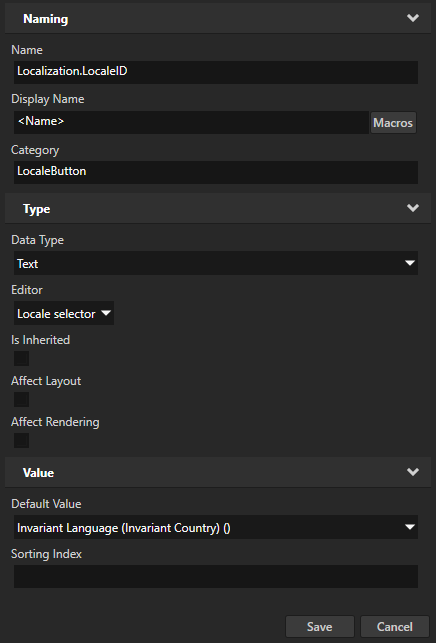
Create a custom property type that you use to control the locale of the application:
In the Library, press Alt and right-click Property Types and select Property Type.

In the New Property Type window, set:
Name to Localization.LocaleID
Category to LocaleButton
Data Type to Text
Editor to Locale selector
Click Save.
You use this custom property type to set the locale using the buttons in the LocaleSelector node.
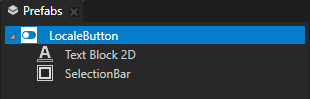
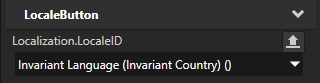
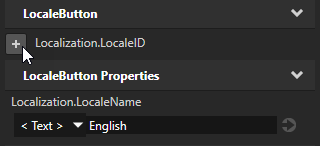
In the Prefabs, select the LocaleButton prefab. In the Properties, add the Localization.LocaleID property.
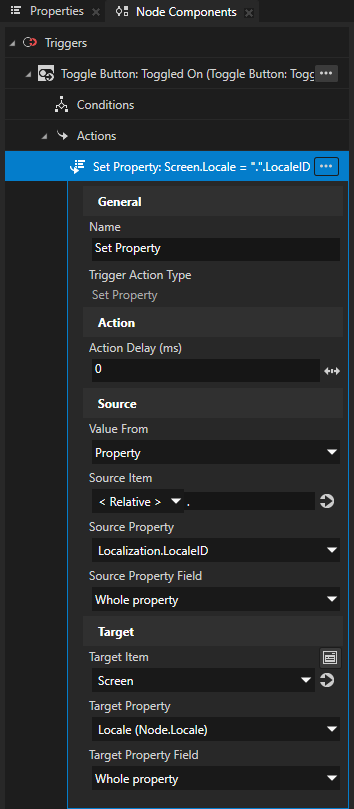
In the Prefabs, select the LocaleButton prefab. In the Node Components in the Toggle Button: Toggled On trigger, press Alt and right-click Actions, select the Set Property action, and set:
Target Item to Screen
Target Property to Locale
Value From to Property
Source Item to <Relative> and .
This way you get the value for the Screen node Locale property from the prefab instance used for setting the locale.
Source Property to Localization.LocaleID
With this Set Property action, you set the application to switch locale when the user toggles an instance of the LocaleButton prefab. The action gets the value for the locale from the Localization.LocaleID property of the prefab instance.

In the Node Tree in the LocaleSelector node for the first LocaleButton prefab instance:
In the Properties, add the Localization.LocaleID property and set it to the locale that you want to set with this button.
For example, to set to default locale, in this case English, select the Invariant Language (Invariant Country) () value.
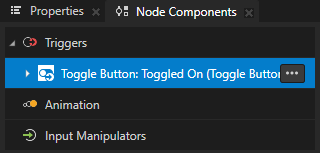
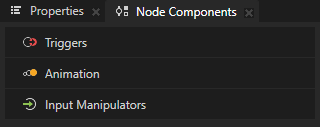
In the Node Components, select the Toggle Button: Toggled On trigger and press the Delete key.
You replace the trigger that defined the locale to which the trigger switches in each instance of the prefab with a trigger defined in the LocaleButton prefab. The new trigger gets the value for the locale from the Localization.LocaleID property of each prefab instance.
Repeat the previous step for each instance of the LocaleButton in the LocaleSelector node:
For the LocaleButton prefab instance that sets the Finnish locale, set the Localization.LocaleID property to Finnish (Finland) (fi-FI).
For the LocaleButton prefab instance that sets the Spanish locale, set the Localization.LocaleID property to Spanish (Spain) (es-ES).
In the Node Tree, press Alt and right-click the LocaleSelector node, and select Alias.
Kanzi Studio creates the alias to the LocaleSelector node in the resource dictionary of the Screen node.
You use this alias to access the LocaleSelector node using the Kanzi Engine API and to add to the node the buttons to load the locales from locale packs. You prepare the locale packs in the next section of this step.


Create the styles for the additional locales
In this section, you create the styles for the additional locales that use fonts which contain the Japanese, Chinese, and Korean glyphs.
To create the styles for additional locales:
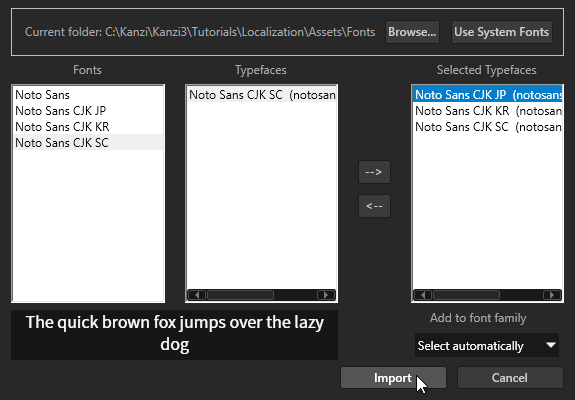
In the Kanzi Studio main menu, select File > Import > Import Fonts. In the Import Fonts dialog, click Browse, select the
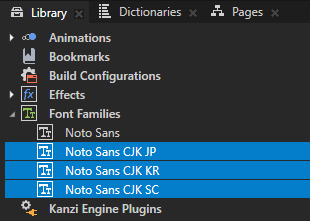
<KanziWorkspace>/Tutorials/Localization/Assets/Fontsfolder, and import the fonts that include the Japanese, Korean, and Chinese glyphs:For Japanese, use Noto Sans CJK JP.
For Korean, use Noto Sans CJK KR.
For Chinese, use Noto Sans CJK SC.
Make sure that the font you use includes all the glyphs for the text that you want to include in your Kanzi application.
Create the styles that set the font for each locale:
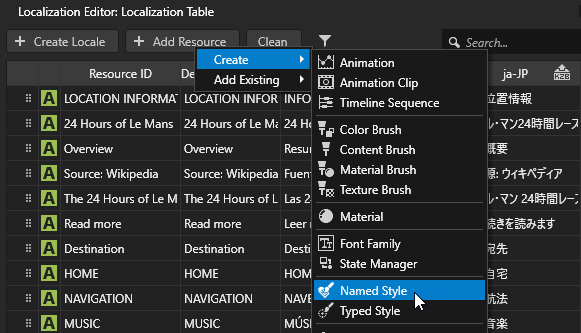
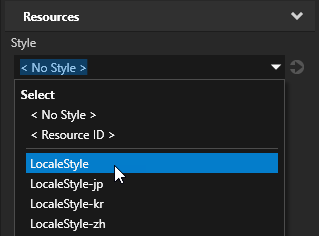
In the Localization Editor, click + Add Resource, select Create > Named Style, and name it LocaleStyle.
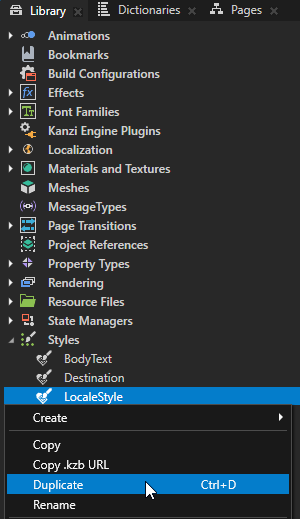
In the Library > Styles, right-click the LocaleStyle, select Duplicate, and name the style after the locale where you use it.
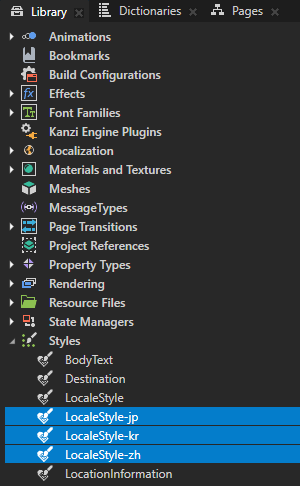
For example, name the styles:
For the Japanese locale LocaleStyle-jp
For the Korean locale LocaleStyle-kr
For the Chinese locale LocaleStyle-zh
In the Library, select a style and in the Properties, add and set the Font Family property to the font that contains the glyphs used by the style of that locale.
For example:
For the English, Finnish, and Spanish locale style LocaleStyle, set the Font Family property to Noto Sans.
For the Japanese locale style LocaleStyle-jp, set the Font Family property to Noto Sans CJK JP.
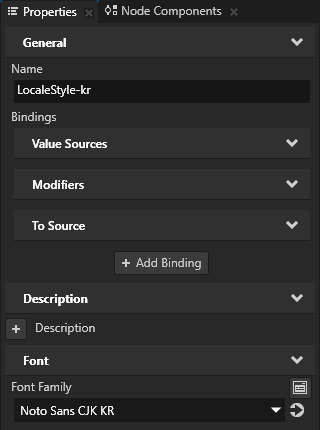
For the Korean locale style LocaleStyle-kr, set the Font Family property to Noto Sans CJK KR.
For the Chinese locale style LocaleStyle-zh, set the Font Family property to Noto Sans CJK SC.
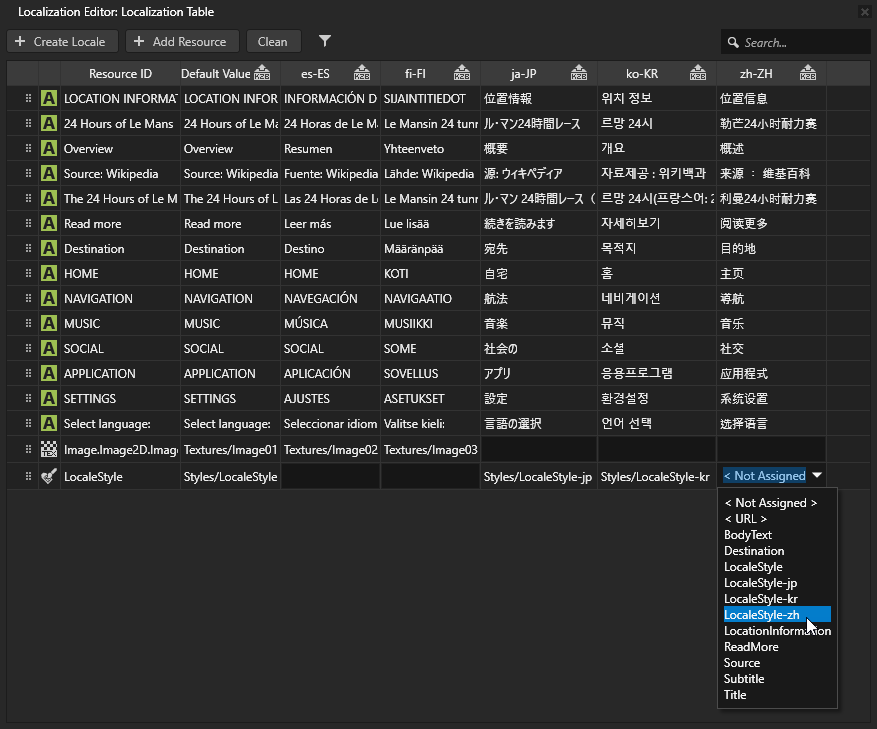
In the Localization Table in the column for each locale where you want to apply the styles that you created, double-click the LocaleStyle cell and select the style that you want to apply to that locale.
For example, for the Japanese locale select LocaleStyle-jp. The Finnish and Spanish locales use the LocaleStyle which uses the default font.
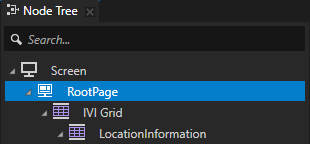
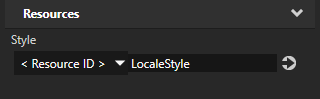
In the Node Tree, select the RootPage node. In the Properties, remove the Font Family property, add the Style property, and set it to <ResourceID> and the resource ID to LocaleStyle.
You replace setting the Font Family property in the RootPage with the resource that comes from the localization table for the currently selected locale.
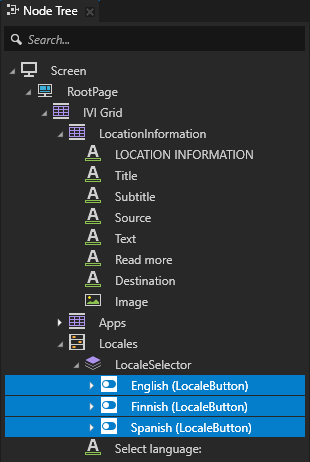
In the Node Tree in the LocaleSelector node, select all instances of the LocaleButton prefab. In the Properties, add the Style property and set it to the LocaleStyle style.
This way you set the font family for the locale name of the English, Finnish, and Spanish locales.
Create the locale packs
A locale pack is a kzb file that contains only the resources for a specific locale.
In this section, you add to the project localized resources for the Japanese, Korean, and Chinese locales and create locale packs. In the next section, you use the Kanzi Engine API to load the locale packs.
In the <KanziWorkspace>/Tutorials/Localization/Assets/Text directory, you can find the PO files that contain all the text strings used in the Kanzi Studio project in this tutorial localized to Japanese, Korean, and Chinese.
To create a locale pack:
Create the text resource that you use to display the name of the locale in the LocaleButton node:
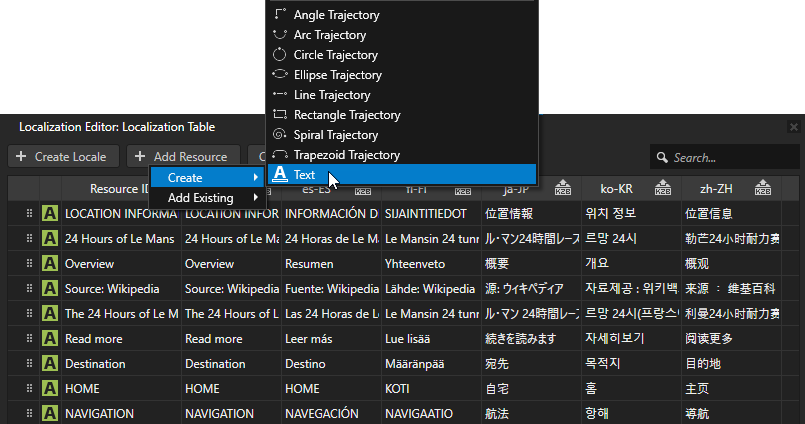
In the Library > Localization, double-click the Localization Table (Main) localization table to open it in the Localization Editor.
Click + Add Resource, select Create > Text, and name the new text resource LocaleDisplayName.
In the next step, you use the Kanzi Engine API to set this text resource to show the name of the locale in the LocaleButton that you use to load that locale.
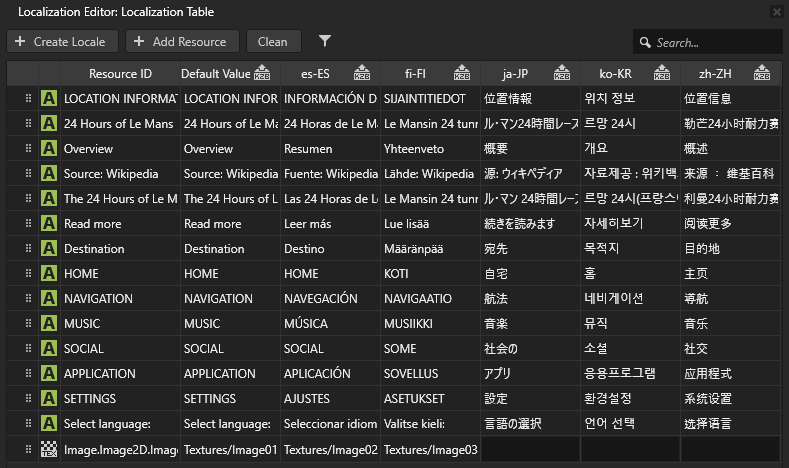
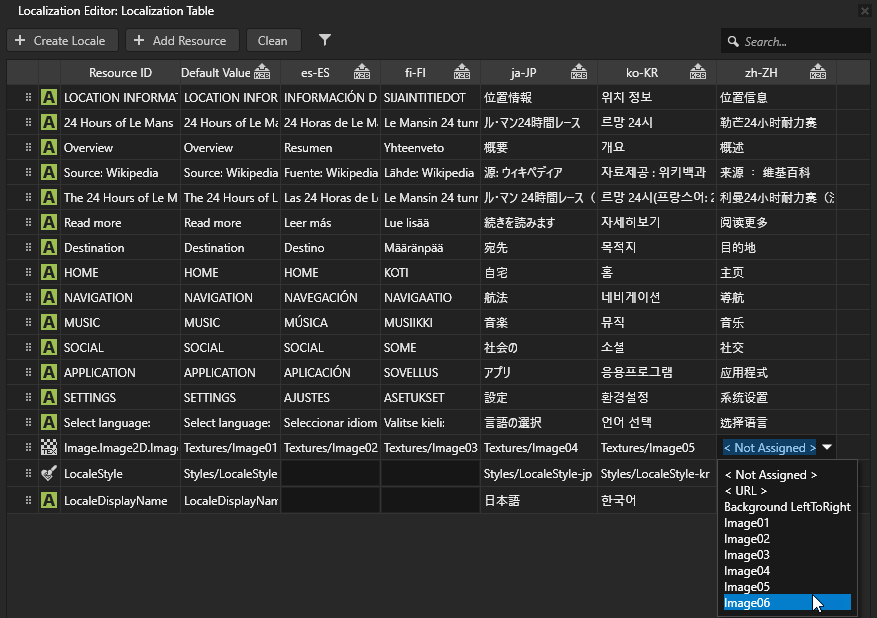
In the column for each locale whose resources you load from a locale pack, click the LocaleDisplayName cell and enter the text that you want to show in the LocaleButton for each locale.
Because you want the users of this locale to find their locale, use the native name for each locale. For example:
For Japanese, enter 日本語.
For Korean, enter 한국어.
For Chinese, enter 中文.

In the Localization Table, set the images that you want to use for the Japanese, Korean, and Chinese locales.
For example:
For the Japanese locale, use Image04.
For the Korean locale, use Image05.
For the Chinese locale, use Image06.
In the Localization Table, click
 next to the locale name of the Japanese, Chinese, and Korean locales.
This way you mark the locales for which you want to create a locale pack kzb file that contains only the resources used by that locale. Kanzi Studio does not export to the main kzb file the resources of locales marked in the localization table as locale packs.

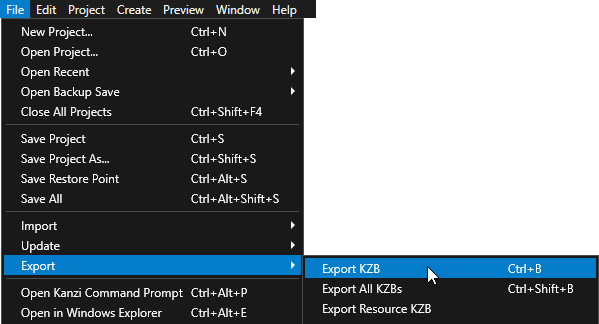
In Kanzi Studio, select File > Export > Export KZB. This command:
Creates one kzb file for each locale that you marked in the localization table as a locale pack. When Kanzi Studio exports locale packs, it names the kzb files after the locale whose resources they contain. Each locale pack file contains only the resources used by that locale.
Creates the main kzb file that contains the entire Kanzi Studio project, except the resources of locales that you mark as locale packs in the localization table.
Stores the locale pack kzb files in the
<ProjectName>/Application/bin/Locale_packsdirectory, or theLocale_packsdirectory in the location that you specify in the Project > Properties in the Binary Export Directory property.