Defining a data source
To use data from an external data source in your Kanzi application:
Define your data source in a Kanzi Engine plugin. See Defining a data source.
Use in your Kanzi Studio project the data source plugin which defines your data source. See Taking a data source plugin into use.
To learn how to use a data source in your Kanzi Studio project, see Using a data source.
Defining a data source
To define a data source:
In Kanzi Studio create a project and in the New Project window set the Template to Application with data source plugin.

Application with data source plugin template creates a project with a Kanzi Engine application that contains a data source plugin template.
Kanzi creates a Kanzi Studio project in the
<ProjectName>/Tool_projectdirectory and the structure for the application code of your project in the<ProjectName>/Applicationdirectory:bindirectory contains the kzb and configuration files of your project.configsdirectory contains the configuration files for different platforms. By default Kanzi creates configuration files for several different platforms. The recommended platform for developing Kanzi applications is Microsoft Visual Studio. See Deploying Kanzi applications.srccontains the source code for your application.CMakeLists.txtfile contains the instructions for CMake to generate the Visual Studio solution for the Kanzi application.generate_cmake_vs<Version>_solution.batis a script that you can use to generate a Visual Studio solution for the Kanzi application. The script generates the Visual Studio solution in the<ProjectName>/Application/build_vs<Version>directory.
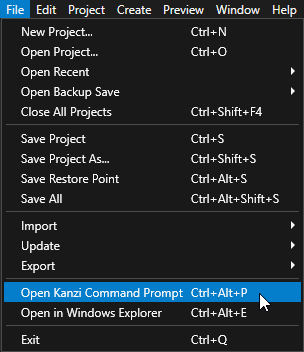
In Kanzi Studio, select File > Open Kanzi Command Prompt.
The Kanzi Command Prompt opens the Windows Command Prompt with the Kanzi environment variables set for the version of Kanzi for which you open a Kanzi Command Prompt.
Use the Kanzi Command Prompt to access Kanzi utilities and build tools, such as Gradle, SCons, and CMake, without using absolute paths or setting environment variables.
Tip
You can find the Kanzi Command Prompt in the Windows Start Menu in the Rightware directory.
When you have more than one version of Kanzi installed, make sure that you launch a Kanzi Command Prompt for the version of Kanzi with which you want to work in that command prompt.
In the Kanzi Command Prompt in the
<ProjectName>/Applicationdirectory run the script that generates a Visual Studio solution for the application.For example, if you use Visual Studio 2019, run
generate_cmake_vs2019_solution.bat
This script generates a Visual Studio solution for the application in the directory
<ProjectName>/Application/build_vs2019.In Visual Studio open the
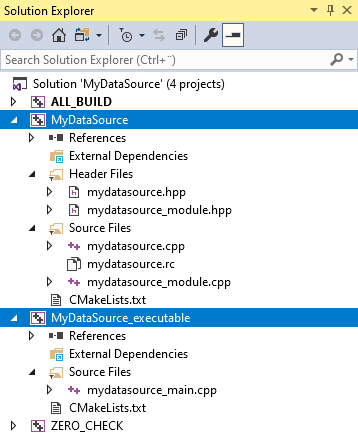
<ProjectName>/Application/build_vs<Version>/<ProjectName>.slnVisual Studio solution. The Visual Studio solution contains:The project for the Kanzi Engine plugin named
<ProjectName>. Define your data source in this project. If you build this empty template project, you create a data source which you can use to create a data source in your Kanzi Studio project, however such data source does not have any functionality. If you created the project only to define your data source, you need to use only this project in the Visual Studio solution.The project for the C++ application named <ProjectName>_executable. Define the logic of your Kanzi application in this project.
In Visual Studio create the logic for your Kanzi application and your data source in a Kanzi Engine plugin. Make sure you also define how you want to reload the data in your data source. For an example of how to define a data source, see Tutorial: Get application data from a data source.
When you add or remove files that your Kanzi application or Kanzi Engine plugin use, update in the
CMakeLists.txtthe list of files in thesetcommand and run thegenerate_cmake_vs<Version>_solution.batscript:When you change the files that you use in your Kanzi application, update
<ProjectName>/Application/src/executable/CMakeLists.txtWhen you change the files that you use in your Kanzi Engine plugin, update
<ProjectName>/Application/src/plugin/CMakeLists.txt
For example, to add the
tinyxml2.cppandtinyxml2.hfiles to your Kanzi Engine plugin, update<ProjectName>/Application/src/plugin/CMakeLists.txtto include these filesset(sources_plugin src/tinyxml2.cpp src/tinyxml2.h src/mykanziengineplugin.cpp src/mykanziengineplugin.hpp src/mykanziengineplugin.rc src/mykanziengineplugin_module.cpp src/mykanziengineplugin_module.hpp)
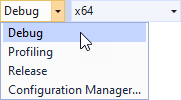
Select the solution configuration that you want to use.
During development select the Debug configuration. When you are ready to create a version for production, select the Release configuration.
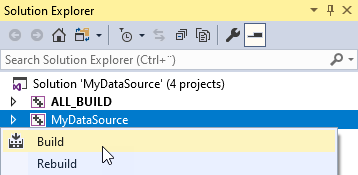
In Visual Studio right-click the project where you defined your data source and select Build.
Visual Studio builds your plugin DLL in the
<ProjectName>/Application/lib/<PlatformName>/<ConfigurationName>directory.If the Kanzi Studio project that uses this plugin is opened, before you start building the plugin DLL in Visual Studio, in Kanzi Studio select Preview > Exit Preview.
Taking a data source plugin into use
Once you have your data source plugin ready, you have to either enable it in your Kanzi Studio project, or import the plugin into another Kanzi Studio project where you want to use the same type of the data source.
To define a data source, see Defining a data source.
To take the data source plugin into use in your Kanzi Studio project:
If you are using the same Kanzi Studio project which you created to define the data source:
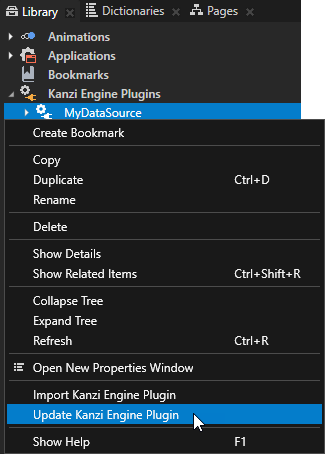
In Kanzi Studio in the Library > Kanzi Engine Plugins right-click the data source plugin you defined and built in Visual Studio and select Update Kanzi Engine Plugin.
You have to update the plugin metadata every time you make a change to the plugin source code and build the plugin in Visual Studio. After you update the plugin metadata and select the plugin in the Library, in the Properties the Metadata Last Read From property shows which plugin .dll file Kanzi Studio loaded and read metadata from.
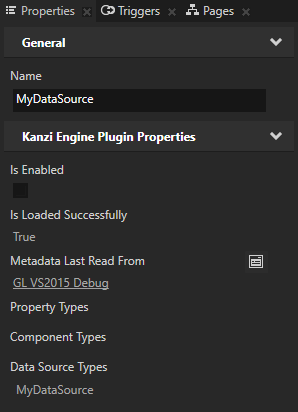
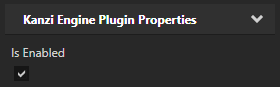
In the Library > Kanzi Engine Plugins select the plugin and in the Properties make sure that the Is Enabled property is enabled.
Tip
Use the Is Enabled property to enable or disable any Kanzi Engine plugin in your project.
In any other Kanzi Studio project where you want to use the plugin where you defined your data source:
In Kanzi Studio create a project and in the New Project window select the Application, Application with data source plugin, or Application with Kanzi Engine plugin project template.
In Kanzi Studio, select File > Open Kanzi Command Prompt.
The Kanzi Command Prompt opens the Windows Command Prompt with the Kanzi environment variables set for the version of Kanzi for which you open a Kanzi Command Prompt.
Use the Kanzi Command Prompt to access Kanzi utilities and build tools, such as Gradle, SCons, and CMake, without using absolute paths or setting environment variables.
Tip
You can find the Kanzi Command Prompt in the Windows Start Menu in the Rightware directory.
When you have more than one version of Kanzi installed, make sure that you launch a Kanzi Command Prompt for the version of Kanzi with which you want to work in that command prompt.
In the Kanzi Command Prompt in the
<ProjectName>/Applicationdirectory run the script that generates a Visual Studio solution for the application.For example, if you use Visual Studio 2019, run
generate_cmake_vs2019_solution.bat
This script generates a Visual Studio solution for the application in the directory
<ProjectName>/Application/build_vs2019.In Visual Studio open the
<ProjectName>/Application/build_vs<Version>/<ProjectName>.slnVisual Studio solution and import the Visual Studio project from the Kanzi project where you defined the data source plugin that you want to use.Select the solution configuration that you want to use.
During development select the Debug configuration. When you are ready to create a version for production, select the Release configuration.
In Visual Studio right-click the project where you defined your data source and select Build.
Visual Studio builds your plugin DLL in the
<ProjectName>/Application/lib/<PlatformName>/<ConfigurationName>directory.If the Kanzi Studio project that uses this plugin is opened, before you start building the plugin DLL in Visual Studio, in Kanzi Studio select Preview > Exit Preview.
In the Library right-click Kanzi Engine Plugins and select Import Kanzi Engine Plugin.
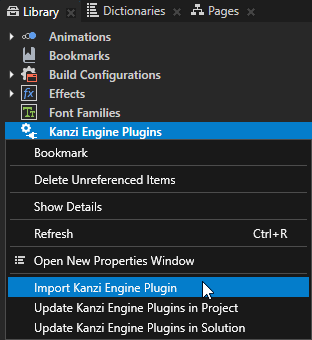
Select the plugin DLL that defines your data source and click Open.
In the Library > Kanzi Engine Plugins select the plugin and in the Properties make sure that the Is Enabled property is enabled.
Tip
Use the Is Enabled property to enable or disable any Kanzi Engine plugin in your project.