Importing 3D assets
When you want to bring the 3D assets created with a third-party tool to Kanzi Studio you have to import or merge the assets. You can import or merge 3D assets in these formats:
glTF 2.0 (gltf, glb) for meshes, animations, skins, and morphs
COLLADA (dae) for meshes, animations, skins, and morphs
Filmbox (fbx) for meshes, animations, skins, morphs, and splines
Geometry definitions (obj) for meshes
Different exporters in third-party tools handle content differently. For example, if you cannot get the expected result using the fbx format, try using the dae format.
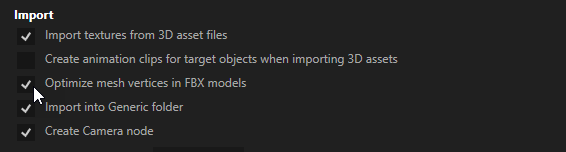
In the Edit > User Preferences in the Advanced tab set how you want Kanzi Studio to import your 3D assets.
For example, when you import fbx files Kanzi Studio by default consolidates meshes by merging the duplicate vertices.
When you import 3D assets, Kanzi Studio creates for each 3D asset:
In the Prefabs a Scene prefab for each scene in the imported file.
Kanzi Studio names each Scene prefab after the imported file. When you import a glTF file that contains multiple scenes, Kanzi Studio appends to the name of each Scene prefab the name of the scene.
In each Scene prefab Kanzi Studio creates the scene hierarchy from the imported file and places the assets from the imported file into that prefab.
In the Library Kanzi Studio places all resources from the imported file, such as Meshes, Splines, Animations, and Materials.
To create 3D assets in third-party tools and export them so that they require the minimum amount of effort after importing to Kanzi Studio, see Preparing 3D assets in third-party tools.
Note that you cannot undo the importing.
Importing 3D assets to a Kanzi Studio project
To import 3D assets to a Kanzi Studio project:
In the Assets window click Import Assets.

Select the files that you want to import and click Open.
You can find all files from which you imported 3D assets in the Library > Resource Files > 3D Assets.
Importing FBX files which contain animations that use custom pivot points
Importing fbx files which contain animations that use custom pivot points, can cause Kanzi Studio to terminate. This is caused by a defect in the FBX importer provided in the Autodesk's FBX SDK.
After the import fails, open the Kanzi Studio project:
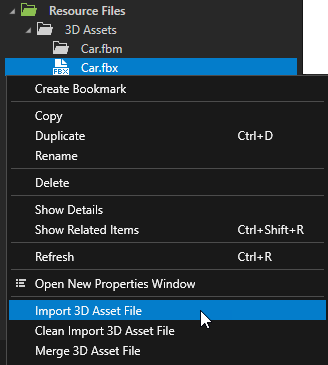
In the Library > Resource Files > 3D Assets select the fbx file that caused Kanzi Studio to terminate.
In the Properties disable the Convert Pivot Points property.
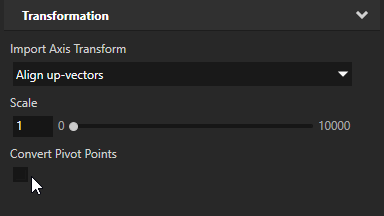
When disabled, Kanzi Studio ignores the custom pivot points in the fbx file, which can affect the rotation and scale animations for nodes that use custom pivot points.
When enabled, Kanzi Studio resets the pivot points to the default positions without making visual changes to animations. This is the recommended setting because Kanzi Studio does not support custom pivot points.
Custom pivot points contain an additional transform which Kanzi Studio bakes into a single transform. In some cases, custom pivot points do not contain any data, so disabling this option does not affect the content.
In the Library > Resource Files > 3D Assets right-click the fbx file that caused Kanzi Studio to terminate, and select Import 3D Asset File to import the file.
Adjusting the scale of imported 3D assets
To avoid problems with the scale, correctly set the units and scale before exporting 3D content in the third-party tool that you are using.
For example, in 3ds Max if you set the Display Unit Scale to any value other than the Generic Units, to avoid differences with scale of units in Kanzi Studio and 3ds Max, in 3ds Max in Units Setup > System Unit Setup set the System Unit Scale to match your Display Unit Scale.
To adjust the scale of imported 3D assets:
In Kanzi Studio in the Library > Resource Files > 3D Assets select the file for which you want to adjust scale.
In the Properties adjust the Import Scale property.
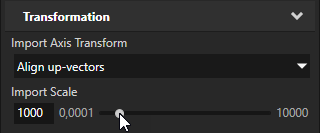
In the Library > Resource Files > 3D Assets right-click the file for which you adjusted the scale and select Import 3D Asset File.
Adjusting a spline created from a NURBS curve
When you use a NURBS curve for a spline trajectory you can adjust the number of subdivisions when importing the NURBS curve to Kanzi Studio. Kanzi uses the value you provide to tesselate the NURBS curve as a Kanzi spline. See Using the Trajectory List Box 3D node and Using the Trajectory Layout nodes.
To adjust a spline created from a NURBS curve:
In the Library > Resource Files > 3D Assets select the .fbx file that contains the NURBS curve you are using for a spline trajectory.
In the Properties set the Curve Tesselation Detail property to the number of subdivisions in the NURBS curve you want to use.
The default value is 16. Set the property to different values to find the result that suits you best.
In the Library > Resource Files > 3D Assets right-click the .fbx file that contains the NURBS curve and select Clean Import 3D Asset File.
In the Library > Trajectories select the spline trajectory that uses the NURBS curve you imported and in the Properties set the Spline property to the spline you imported.