Step 1 - Create project with C++ application and print to debug console
In this step you first create a new Kanzi Studio project with a C++ application. You then add the code to the C++ application to print Hello world! to the Kanzi debug console.
You can find the completed tutorial in the <KanziWorkspace>/Tutorials/Hello world/Completed directory.
Create a project with C++ application and print to debug console
To create a project with a C++ application and print to the Kanzi debug console:
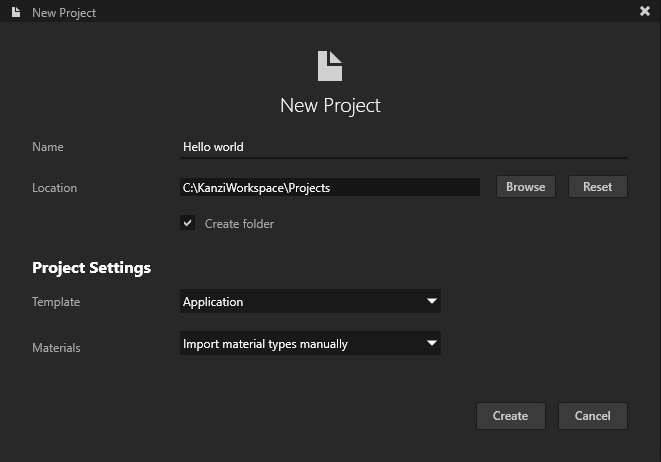
In the Kanzi Studio Quick Start window click New Project:
Choose the name and location for your project.
For example, name your project Hello world.
Set the Template to Application.
Click Create.
Kanzi creates a Kanzi Studio project in the
<ProjectName>/Tool_projectdirectory and the structure for the application code of your project in the<ProjectName>/Applicationdirectory:bindirectory contains the kzb and configuration files of your project.configsdirectory contains the configuration files for different platforms. By default Kanzi creates configuration files for several different platforms. The recommended platform for developing Kanzi applications is Microsoft Visual Studio. See Deploying Kanzi applications.srccontains the source code for your application.CMakeLists.txtfile contains the instructions for CMake to generate the Visual Studio solution for the Kanzi application.generate_cmake_vs<Version>_solution.batis a script that you can use to generate a Visual Studio solution for the Kanzi application. The script generates the Visual Studio solution in the<ProjectName>/Application/build_vs<Version>directory.
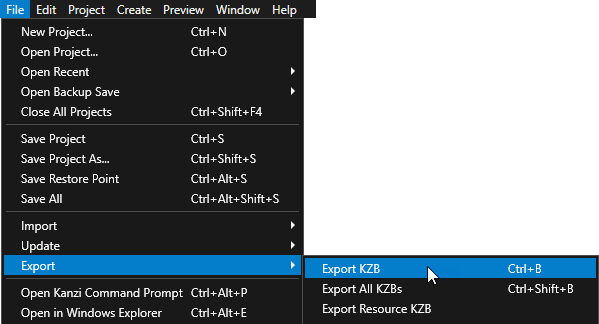
In Kanzi Studio select File > Export > Export KZB.
Kanzi Studio creates the kzb file and configuration files from your Kanzi Studio project. Kanzi Studio stores the exported files in the
<ProjectName>/Application/bindirectory or the location you set in Project > Properties in the Binary Export Directory property. The kzb file contains all nodes and resources from your Kanzi Studio project, except the resources you mark in a localization table as locale packs.When you run your Kanzi application from Visual Studio, your application loads the kzb file and configuration files.
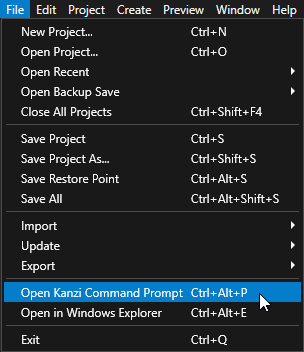
In Kanzi Studio, select File > Open Kanzi Command Prompt.
The Kanzi Command Prompt opens the Windows Command Prompt with the Kanzi environment variables set for the version of Kanzi for which you open a Kanzi Command Prompt.
Use the Kanzi Command Prompt to access Kanzi utilities and build tools, such as Gradle, SCons, and CMake, without using absolute paths or setting environment variables.
Tip
You can find the Kanzi Command Prompt in the Windows Start Menu in the Rightware directory.
When you have more than one version of Kanzi installed, make sure that you launch a Kanzi Command Prompt for the version of Kanzi with which you want to work in that command prompt.
In the Kanzi Command Prompt in the
<ProjectName>/Applicationdirectory run the script that generates a Visual Studio solution for the application.For example, if you use Visual Studio 2019, run
generate_cmake_vs2019_solution.bat
This script generates a Visual Studio solution for the application in the directory
<ProjectName>/Application/build_vs2019.In Visual Studio open the
Application/build_vs<Version>/<ProjectName>.slnVisual Studio solution.For example, if you named your Kanzi Studio project Hello world, the Visual Studio solution is called
Hello_world.sln.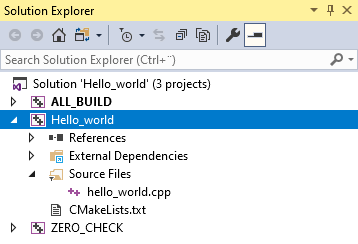
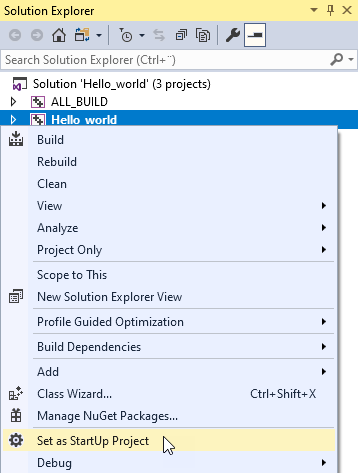
In Visual Studio in the Solution Explorer right-click the Hello_world project and select Set as StartUp Project.
In Visual Studio open the
hello_world.cppfile.Your application class uses the
ExampleApplicationclass which simplifies application development by handling the registration of the required modules.#include <kanzi/kanzi.hpp> using namespace kanzi; class HelloWorld : public ExampleApplication
Include the
log.hppheader file to use the logger to print to the Kanzi debug console:#include <kanzi/core/log/log.hpp>
Replace the content of the
onProjectLoaded()with the code in this step.When you place a function inside the
onProjectLoaded()Kanzi calls that function after it loads your application.void onProjectLoaded() override { // Prints Hello world! to the Kanzi debug console. kzLogInfo(KZ_LOG_CATEGORY_GENERIC, ("Hello world!")); }
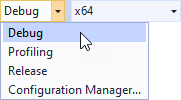
Select the solution configuration that you want to use and run your application.
During development, select the Debug configuration. When you are ready to create a version for production, select the Release configuration.
Function
kzLogInfoprints Hello world! to the Kanzi debug console.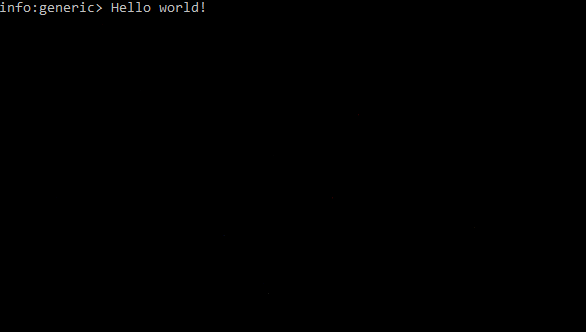
When in the debug mode, along with the Kanzi debug console, your Kanzi application is shown in the Kanzi player. Since by default a new Kanzi Studio project contains only a scene with a camera and a directional light, your application shows an empty scene.
This is what your hello_world.cpp looks like when you complete this step.
#include <kanzi/kanzi.hpp>
#include <kanzi/core/log/log.hpp>

using namespace kanzi;

class HelloWorld : public ExampleApplication
{
public:

    void onConfigure(ApplicationProperties& configuration) override
    {
        configuration.binaryName = "hello_world.kzb.cfg";
    }

    void onProjectLoaded() override
    {
        kzLogInfo(KZ_LOG_CATEGORY_GENERIC, ("Hello world!"));
        // Add initialization code here.
    }
};

Application* createApplication()
{
    return new HelloWorld;
}