Rendering content to composition targets
Use a Composition Target Render Pass to:
Render content to one composition target. See Rendering content to one composition target.

Render content to multiple composition targets. See Rendering content to multiple composition targets.

Composition Target Render Pass automatically creates textures from the content that it renders. A Composition Target Render Pass can render to up to four composition targets. You can use a Blit Render Pass to draw these textures to the screen or to other composition targets using a specific material. To render content to a Render Target Texture, you can use the Render to Texture Pass. See Rendering to texture.
Rendering content to one composition target
To render content to one composition target:
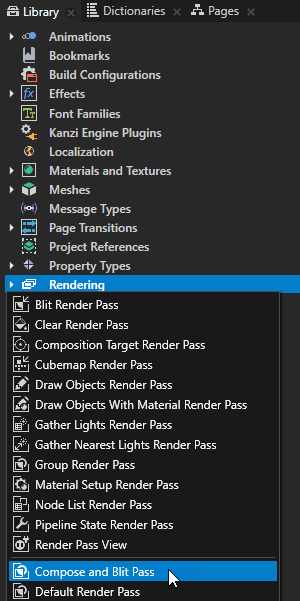
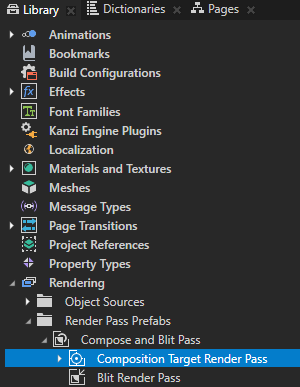
In the Library press Alt and right-click Rendering, and select Compose and Blit Pass.
Compose and Blit Pass contains the render pass structure that enables you to blit to the screen Composition Target Render Pass render passes or textures using a specific material.
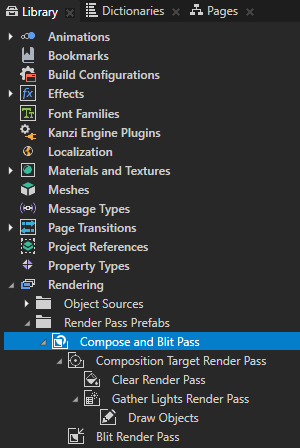
The Compose and Blit Pass render pass preset contains these render passes:
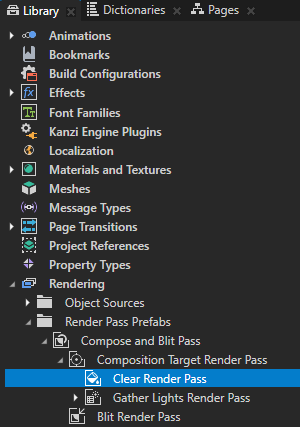
Composition Target Render Pass renders itself and its descendant render passes to one or more composition targets.
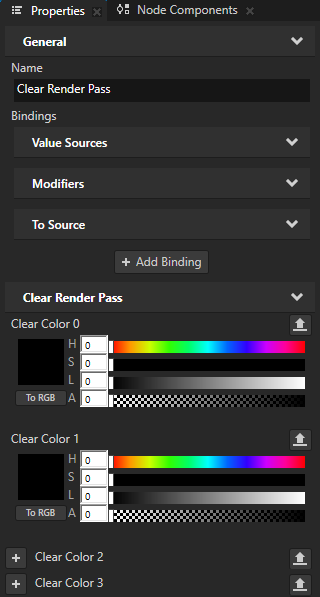
Clear Render Pass clears some or all of the buffers of the current render context.
By default the Clear Render Pass in the Compose and Blit Pass clears the first color buffer with transparent black color and the depth buffer with value 1.
For example, to clear the first color buffer with a different color, set the Clear Color 0 property to the color that you want to use as the background color of the content that Kanzi renders to the Composition Target Render Pass.
Gather Lights Render Pass collects the Light nodes in the Viewport 2D node that you set to use the Compose and Blit Pass, and passes them to its child Draw Objects Render Pass render pass.
Draw Objects Render Pass named Draw Objects allows you to set a Camera node to render a specific list of nodes, to filter those nodes, and to control frustum culling. Draw Objects Render Pass by default renders nodes using the lights provided by its nearest ancestor Gather Lights Render Pass. By default the Draw Objects Render Pass uses the default Camera node to render all nodes in a Viewport 2D node.
Blit Render Pass blits one or more textures on the screen using a specific material.
By default this Blit Render Pass draws on the screen the first color texture to which the Composition Target Render Pass renders its content.
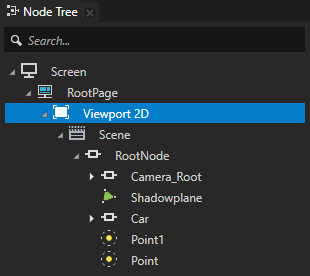
In the Node Tree select the Viewport 2D node whose content you want to render to a composition target and in the Properties set the Render Pass Prefab property to the Compose and Blit Pass. Kanzi renders the scene in that Viewport 2D to a composition target and uses the Blit Render Pass to draw the content on the screen.

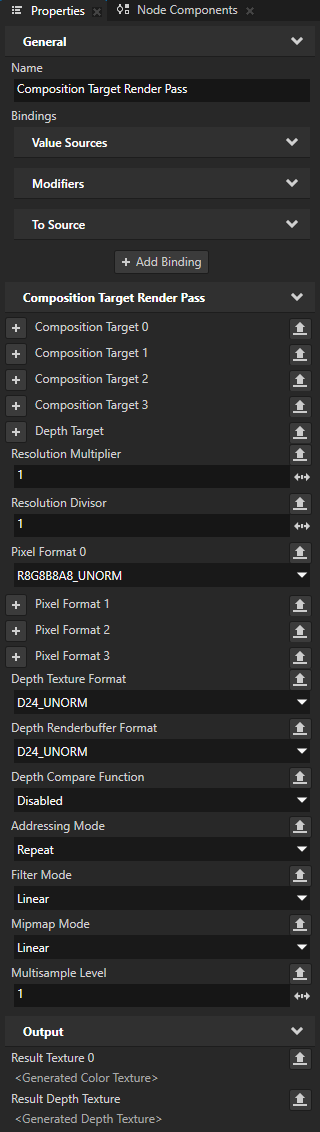
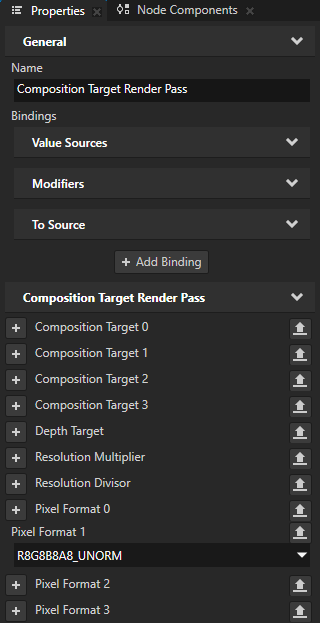
(Optional) If you do not set the composition target, you can set these properties in the Composition Target Render Pass:
Resolution Multiplier and Resolution Divisor to set the resolution of the default composition target.
Kanzi Studio multiplies the resolution of the composition target by the value of the Resolution Multiplier property and divides it by the value of the Resolution Divisor property.
For example, to multiply the resolution of the composition target by four set Resolution Multiplier to 4. To reduce the resolution of the composition target to a quarter of the original, set Resolution Divisor to 4.
Tip
You can use the Composition Target Render Pass > Width and Height properties to set the exact size of a composition target. The values of the Width and Height properties override the dimensions of the composition target calculated based on the values of the Resolution Multiplier and Resolution Divisor properties.
To bind the Width or Height property to a portion of the current viewport width or height, use the Render Pass > Input Viewport Area property, which reports the viewport area relative to the composition space of the parent render pass.
In bindings use these expressions to access the dimensions of the viewport:
Width:
{@./RenderPass.InputViewportArea}.ZHeight:
{@./RenderPass.InputViewportArea}.W
Pixel Format 0 to set the pixel format of the composition target.
Depth Texture Format to set the format of the depth composition target.
Set this property when you want to create depth textures.
The value of this property overrides the value of the Depth Renderbuffer Format property.
Depth Renderbuffer Format to set the format of the depth renderbuffers.
When you do not set this property, Kanzi sets the depth renderbuffer format automatically to the best available format. In most cases this is the 32-bit float format, which also consumes the most memory.
The value of the Depth Texture Format property overrides the value of this property.
Depth Compare Function to set the depth compare mode for the depth composition target.
Addressing Mode to set how Kanzi handles the texture coordinates of the composition target textures outside the [0, 0] - [1, 1] rectangle:
Repeat to make the texture repeat outside of these coordinates. This is the default value.
Mirror to make the texture repeat, but mirror every other repetition.
Clamp to confine the texture to these coordinates and to repeat the edge texels of the texture outside of the coordinates.
Mirror once to make the texture repeat once in the negative direction, and after that clamp the texture.
Filter Mode to set how Kanzi accesses the texture samples of the composition target:
Nearest to take the color from the nearest sample.
Linear to interpolate the color from the neighboring samples. This is the default value.
Mipmap Mode to create mipmaps for the composition target. See Creating mipmaps for a composition target.
Multisample Level to set the number of anti-aliasing samples you want to use. See Using multisampling.
Rendering content to multiple composition targets
You can set a Composition Target Render Pass to render to up to four composition targets. For example, use multiple render target rendering to implement screen space ambient occlusion or deferred shading.
To render content to multiple composition targets the hardware on which you want to run your Kanzi application must support either the GL_EXT_draw_buffers extension or OpenGL ES 3.0 or higher.
To render content to multiple composition targets:
In the Library press Alt and right-click Rendering, and select Compose and Blit Pass.
Compose and Blit Pass contains the render pass structure that enables you to blit to the screen Composition Target Render Pass render passes or textures using a specific material.
The Compose and Blit Pass render pass preset contains these render passes:
Composition Target Render Pass renders itself and its descendant render passes to one or more composition targets.
Clear Render Pass clears some or all of the buffers of the current render context.
By default the Clear Render Pass in the Compose and Blit Pass clears the first color buffer with transparent black color and the depth buffer with value 1.
For example, to clear the first color buffer with a different color, set the Clear Color 0 property to the color that you want to use as the background color of the content that Kanzi renders to the Composition Target Render Pass.
Gather Lights Render Pass collects the Light nodes in the Viewport 2D node that you set to use the Compose and Blit Pass, and passes them to its child Draw Objects Render Pass render pass.
Draw Objects Render Pass named Draw Objects allows you to set a Camera node to render a specific list of nodes, to filter those nodes, and to control frustum culling. Draw Objects Render Pass by default renders nodes using the lights provided by its nearest ancestor Gather Lights Render Pass. By default the Draw Objects Render Pass uses the default Camera node to render all nodes in a Viewport 2D node.
Blit Render Pass blits one or more textures on the screen using a specific material.
By default this Blit Render Pass draws on the screen the first color texture to which the Composition Target Render Pass renders its content.
In the Node Tree select the Viewport 2D node whose content you want to render to composition targets and in the Properties set the Render Pass Prefab property to the Compose and Blit Pass.
Kanzi renders the scene in that Viewport 2D to one composition target and uses the Blit Render Pass to draw the content on the screen.
To set the number of composition targets that you want to create, in the Library in the Compose and Blit Pass select the Composition Target Render Pass, in the Properties add one or more of the Pixel Format 0, Pixel Format 1, Pixel Format 2, and Pixel Format 3 properties, and set them to the pixel format that you want to use for the composition targets.
If you do not set any of the pixel format properties, Kanzi creates one composition target for the Composition Target Render Pass.
The pixel format property with the highest index sets the number of composition targets that Kanzi creates for the Composition Target Render Pass. The pixel format properties whose value you do not set get their value from a pixel format property with a higher index whose value you do set.
For example:
If you set the values of the Pixel Format 0 and Pixel Format 2 properties, Kanzi creates three composition targets and sets:
The first composition target to use the pixel format that you set with the Pixel Format 0 property.
The second composition target to use the pixel format that you set with the Pixel Format 2 property.
The third composition target to use the pixel format that you set with the Pixel Format 2 property.
To create two composition targets that use the same pixel format, set the value of the Pixel Format 1 property.
In the Library select the Compose and Blit Pass > Composition Target Render Pass > Clear Render Pass and in the Properties add and set the Clear Color properties to the colors with which you want to clear the color buffers of the composition targets.
For example, if you want to use two composition targets, set the Clear Color 0 and Clear Color 1 properties.
In the Library > Materials and Textures > Material Types in the Material Type that you want to use to draw content to multiple composition targets, edit the Fragment Shader:
(Optional) If your target platform does not support OpenGL ES 3, enable the GL_EXT_draw_buffers extension, which enables specifying a list of color buffers to which to draw:
#extension GL_EXT_draw_buffers : enableInstead of
gl_FragColorwrite the output values to the elements of the output array variablegl_FragData[n], wherenis the index of the color buffer to which you want to write, corresponding to the Composition Target Render Pass result texture with the matching index. Instead of... void main() { ... gl_FragColor = ... }
use
...

void main()
{
    ...

    // Write the value to CompositionTargetRenderPass.ResultTexture0.
    gl_FragData[0] = ...

    // Write the value to CompositionTargetRenderPass.ResultTexture1.
    gl_FragData[1] = ...

    ...
}
Set one or more Blit Render Pass render passes to draw the content of the composition targets by binding their Texture properties to the Result Texture properties of the Composition Target Render Pass.
For example, to set one Blit Render Pass to draw multiple composition targets:
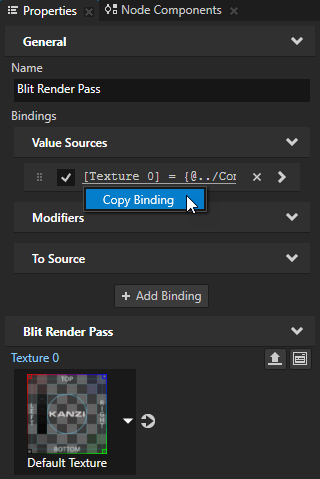
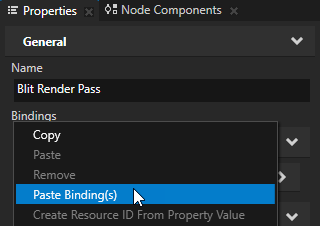
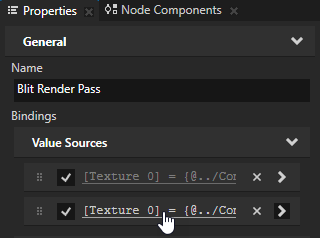
In the Library select the Compose and Blit Pass > Blit Render Pass and in the Properties make a copy of the binding, which binds the Texture 0 property, for each composition target.

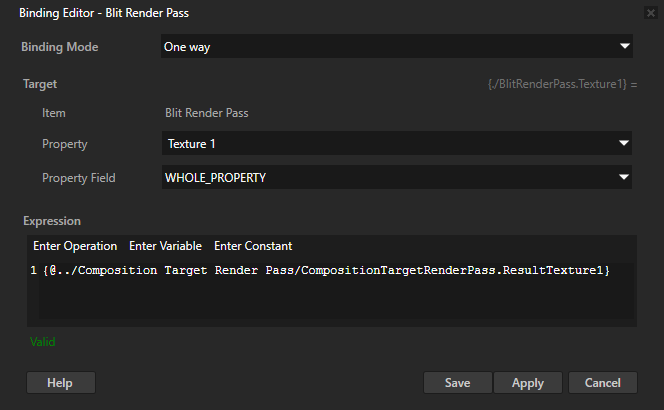
Click each binding that you created and in the Binding Editor set:
Property to the texture that you want to bind
Expression to the corresponding Result Texture property in the Composition Target Render Pass
For example, set:
Property to Blit Render Pass > Texture 1
Expression to
{@../Composition Target Render Pass/CompositionTargetRenderPass.ResultTexture1}
(Optional) To render to a depth texture:
In the Library select the Composition Target Render Pass and in the Properties add and set the Depth Texture Format to the format that you want to use for the depth texture.
If you do not set the Depth Texture Format property, but the rendering settings require depth testing to render the child render passes of the Composition Target Render Pass, Kanzi automatically creates a depth render buffer.
In the Blit Render Pass that you want to blit the depth texture, bind a Texture property to the Result Depth Texture property of the Composition Target Render Pass.
(Optional) When you do not manually set any of the composition targets of a Composition Target Render Pass, Kanzi applies the property values to all composition targets it creates. You can change this by manually setting these properties:
Resolution Multiplier and Resolution Divisor to set the resolution of the composition targets.
Kanzi multiplies the resolution of each composition target by the value of the Resolution Multiplier property and divides it by the value of the Resolution Divisor property.
For example, to multiply the resolution of each composition target by four set Resolution Multiplier to 4. To reduce the resolution of each composition target to a quarter of the original, set Resolution Divisor to 4.
Tip
You can use the Composition Target Render Pass > Width and Height properties to set the exact size of a composition target. The values of the Width and Height properties override the dimensions of the composition target calculated based on the values of the Resolution Multiplier and Resolution Divisor properties.
To bind the Width or Height property to a portion of the current viewport width or height, use the Render Pass > Input Viewport Area property, which reports the viewport area relative to the composition space of the parent render pass.
In bindings use these expressions to access the dimensions of the viewport:
Width:
{@./RenderPass.InputViewportArea}.ZHeight:
{@./RenderPass.InputViewportArea}.W
Addressing Mode to set how Kanzi handles the texture coordinates of the composition target textures outside the [0, 0] - [1, 1] rectangle:
Repeat to make the texture repeat outside of these coordinates. This is the default value.
Mirror to make the texture repeat, but mirror every other repetition.
Clamp to confine the texture to these coordinates and to repeat the edge texels of the texture outside of the coordinates.
Mirror once to make the texture repeat once in the negative direction, and after that clamp the texture.
Filter Mode to set how Kanzi accesses the texture samples of the composition targets:
Nearest to take the color from the nearest sample.
Linear to interpolate the color from the neighboring samples. This is the default value.
Mipmap Mode to create mipmaps for the composition targets. See Creating mipmaps for a composition target.
Multisample Level to set the number of anti-aliasing samples you want to use. See Using multisampling.