Using the Scroll View nodes
Use the Scroll View nodes to define an area where to generate scrolling messages in response to user input and physics-based animation.
For example, you can use the scroll message with its parameters generated by a Scroll View node to move a map plane or rotate a mesh.

The Scroll View defines an interactive area and sends the messages reflecting the changes in the scroll position. The position and size of a Scroll View node define where the Scroll View registers input. After you create a Scroll View node, you have to define what happens in response to scroll position changes. For example, you can use a Scroll View node to move 3D objects. See Tutorial: Rotate a 3D model.
The Scroll View reports changes of its scroll position through the Scrolled trigger. You can add actions to react to these messages to, for example, set the appearance of a node during scrolling.
Scroll View 3D is a 3D control, so take into account that the orientation towards the viewer is important. A Scroll View node tracks user input along the focus plane that is in the center of the Scroll View node. Make sure that you do not rotate this focus plane so that it is either perpendicular to or faces away from the viewer.
You can nest Scroll View nodes to scroll parts of your application on different axes. See Nesting Scroll View nodes.
The Scroll View nodes that you create in Kanzi Studio have the Focusable property enabled and can receive focus by default. When a Scroll View node has focus, to scroll that node, you can use the default keyboard keys ←, →, ↑, and ↓.
Creating a Scroll View node
To create a Scroll View node:
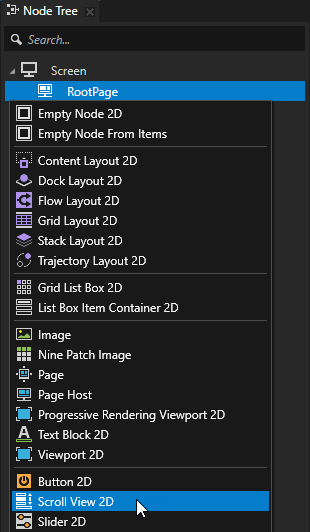
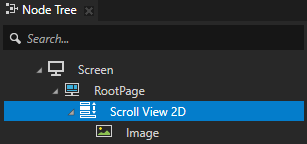
In the Node Tree, press Alt and right-click the node where you want to create a Scroll View node and select either Scroll View 3D, or Scroll View 2D.
You can create a 3D node only in a 3D node, such as the Scene node, and a 2D node only in a 2D node.
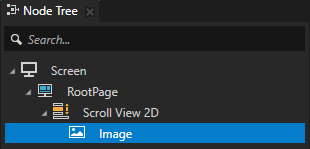
In the Scroll View node, create a node that works as an input plane that you want to control with scroll gestures.
For example, if you created a Scroll View 3D node, create a Plane node, if you created a Scroll View 2D, create an Image node.
Bind the transformation of the node, which you created in the previous step, to the scroll position of the Scroll View node.
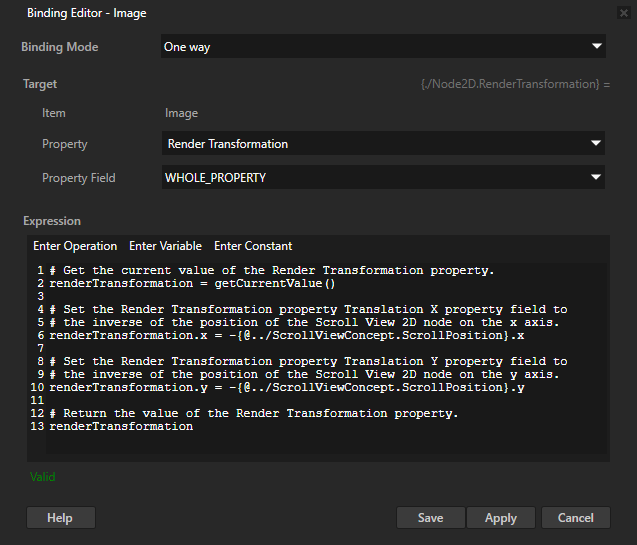
For example, in the Node Tree, select the Image node, in the Properties, click + Add Binding, and in the Binding Editor set:
Property to Render Transformation
Expression to
# Get the current value of the Render Transformation property.
renderTransformation = getCurrentValue()

# Set the Render Transformation property Translation X property field to
# the inverse of the position of the Scroll View 2D node on the x axis.
renderTransformation.x = -{@../ScrollViewConcept.ScrollPosition}.x

# Set the Render Transformation property Translation Y property field to
# the inverse of the position of the Scroll View 2D node on the y axis.
renderTransformation.y = -{@../ScrollViewConcept.ScrollPosition}.y

# Return the value of the Render Transformation property.
renderTransformation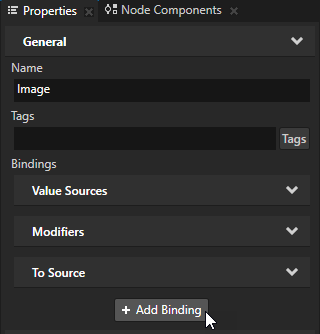
Click Save.
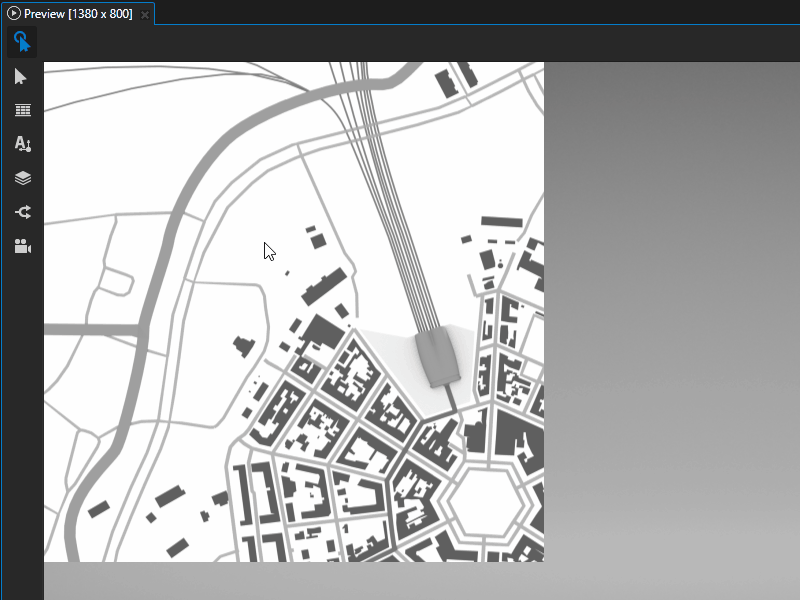
In the Preview, when you click and drag your pointer on the Scroll View node, the Image node moves along the pointer.
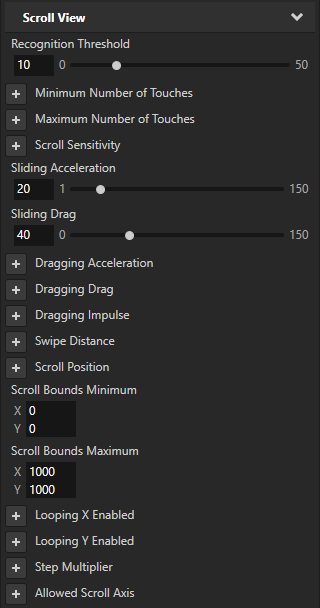
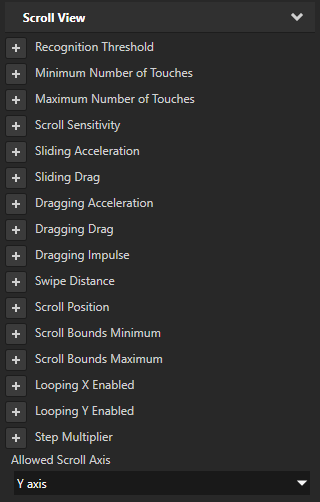
(Optional) In the Node Tree, select the Scroll View node. In the Properties, add and set the Scroll View properties to control how the Scroll View node responds to user input. For example:
Recognition Threshold property sets the threshold in pixels on the x and y axis that a pointer must move before Kanzi recognizes it as a scroll gesture. The default value is 5 pixels on both axes.
Minimum Number of Touches property sets the minimum number of touches required on the node for Kanzi to recognize the scroll gesture. The default value is 1.
Maximum Number of Touches property sets the maximum number of touches allowed on the node for Kanzi to recognize the scroll gesture. The default value is 10.
Scroll Sensitivity property sets how much the position of the node controlled by the Scroll View node changes relative to the movement of the pointer that starts the swiping. By default the position changes the same amount as the pointer moves.
Sliding Acceleration property sets the acceleration of the node after you release the pointer with which you swipe. Use low values when you want the node controlled by the Scroll View node to slowly reach the final position. Use high values when you want the node to quickly reach the final position.
Sliding Drag property sets how much drag affects the movement of the node after you release the pointer with which you swipe. The lower the value the higher the drag and the faster the sliding of the node controlled by the Scroll View node stops.
Scroll Bounds Minimum and Scroll Bounds Maximum properties set the minimum and maximum values for the scroll bounds. Scroll bounds define where the scrolling begins and ends.

Looping X Enabled and Looping Y Enabled properties set the object to start scrolling from the beginning when the scroll reaches the scroll bounds on the x or y axis. Use the Scroll Bounds Minimum and Scroll Bounds Maximum properties to set the scroll bounds.
Reacting to Scroll View scrolling
The Scroll View reports changes of its state and scroll position through message triggers. You can use actions to react to these messages.
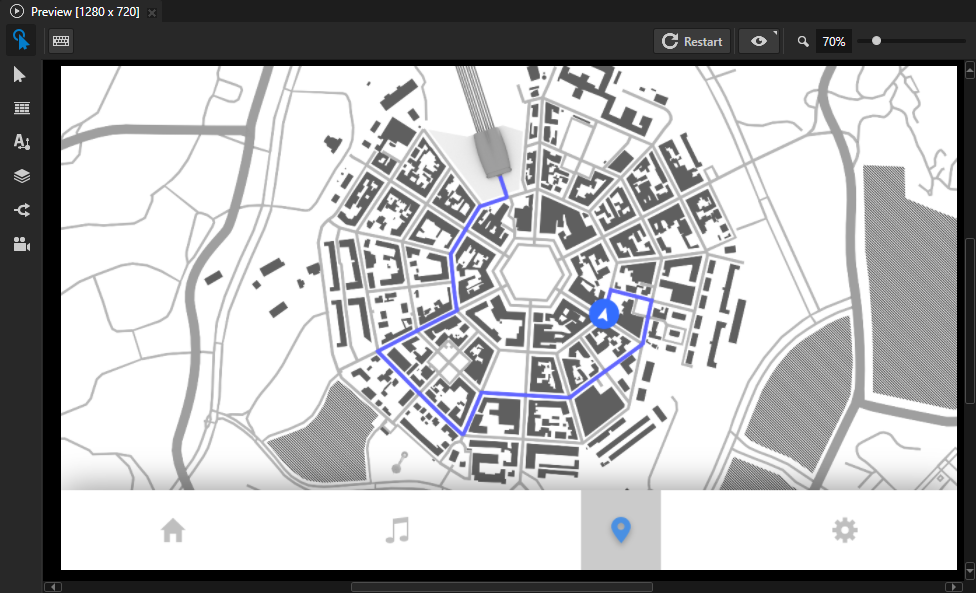
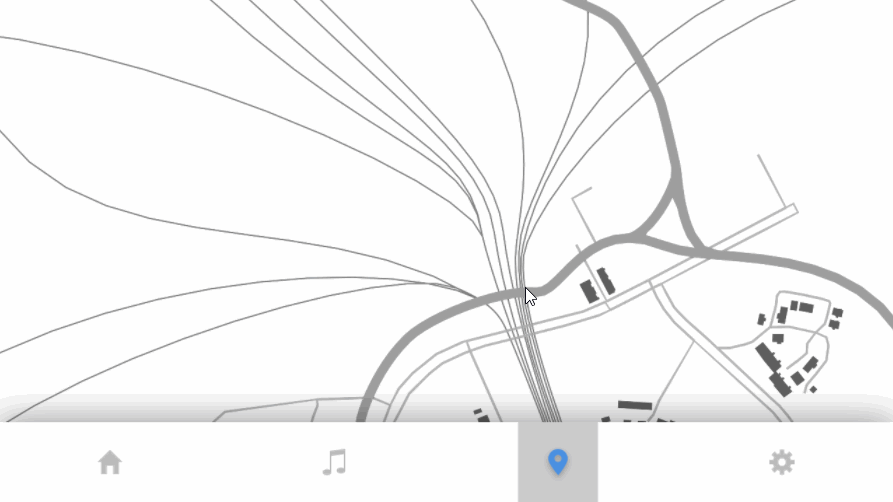
For example, you can hide an application menu while the user scrolls a map in a Scroll View node.
To react to Scroll View scrolling:
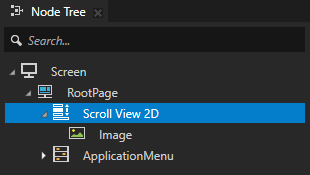
Create a Scroll View node and a node that works as an input plane. Create content, such as an application menu, and render it on top of the Scroll View node. See Creating a Scroll View node.
For example, create a Scroll View that contains a map and an application menu that you hide while the user scrolls the map.
Create a trigger and an action that you want to use to react to the scrolling of the Scroll View.
For example:
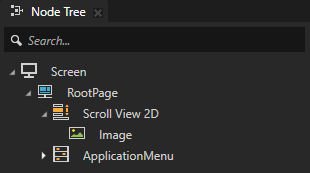
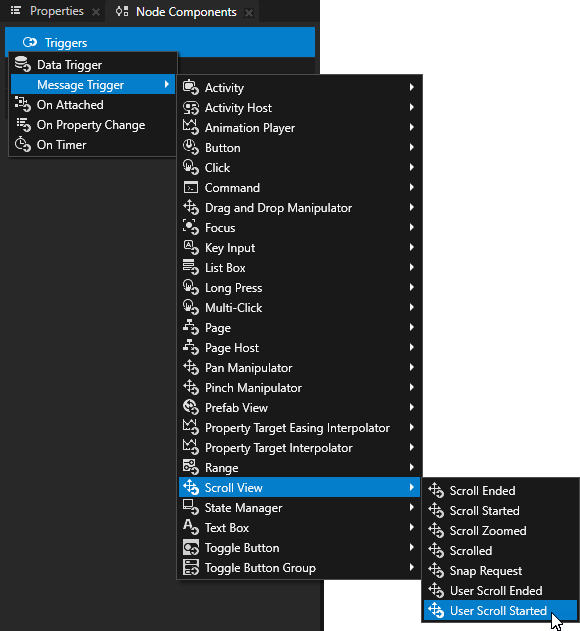
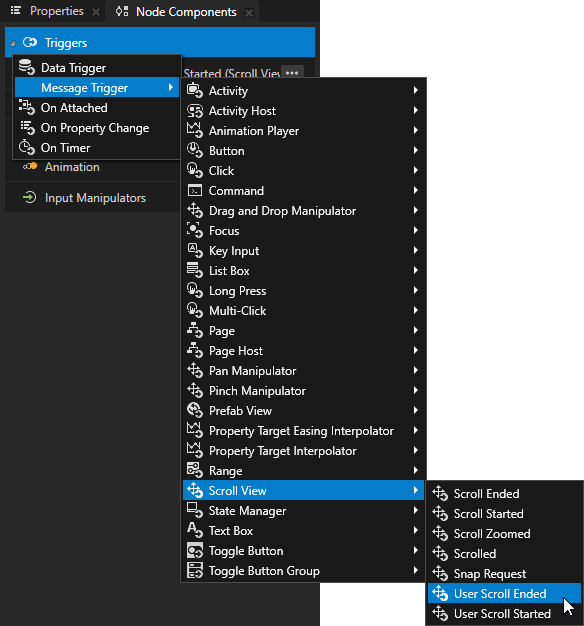
In the Node Tree, select the Scroll View node. In the Node Components, press Alt and right-click Triggers, and select a trigger in Message Trigger > Scroll View.
For example, to react when the user starts scrolling the Scroll View, create a User Scroll Started trigger.
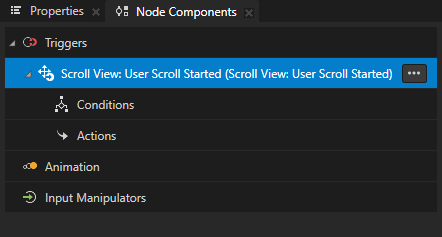
In the trigger that you created, create and configure an action that you want the trigger to execute.
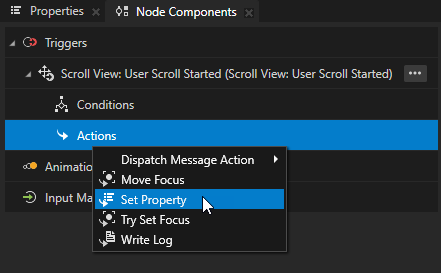
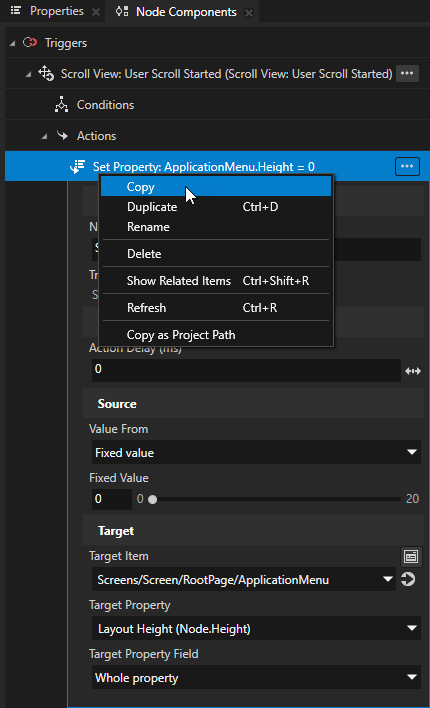
For example, to hide an application menu when the user starts scrolling the Scroll View, in the User Scroll Started trigger, press Alt and right-click Actions, select Set Property action, and in the action set:
Target Item to Screens/Screen/RootPage/ApplicationMenu
Target Property to Layout Height
Fixed Value to 0
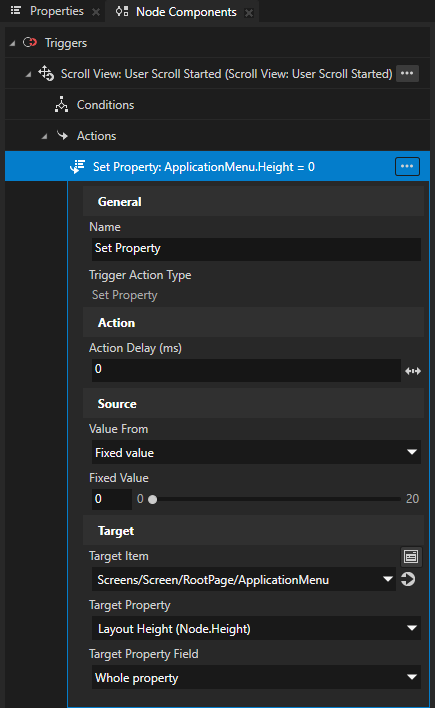
Now, when the user starts scrolling, the User Scroll Started trigger executes the Set Property action. The action sets the height of the ApplicationMenu node to 0, which hides the menu.

To add functionality to the Scroll View, repeat the previous step.
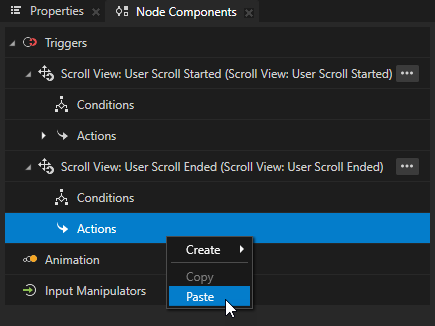
For example, to show the ApplicationMenu node when the user stops scrolling:
In the Node Components, press Alt and right-click Triggers, and select Message Trigger > Scroll View > User Scroll Ended.
Kanzi sets off the User Scroll Ended trigger when the user stops scrolling a Scroll View node.
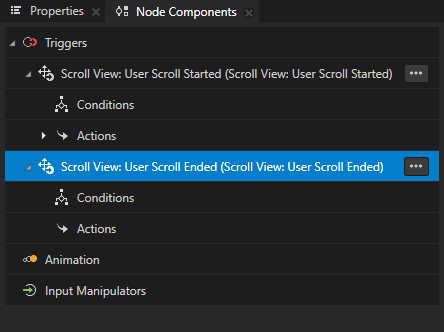
In the User Scroll Started trigger, right-click the Set Property action and select Copy. In the User Scroll Ended trigger, right-click the Actions and select Paste.
In the User Scroll Ended trigger, in the Set Property action, set the Fixed Value property to the height of the ApplicationMenu node.
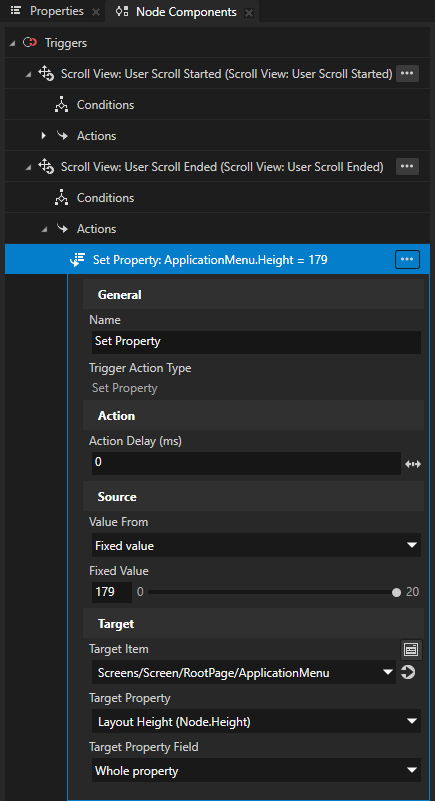
Now, when the user starts scrolling, the User Scroll Started trigger executes the Set Property action. The action sets the menu height to 0, which hides the menu. When the user stops scrolling, the User Scroll Stopped trigger executes the Set Property action that sets the height of ApplicationMenu node to its previous value.
Nesting Scroll View nodes
You can nest Scroll View nodes to create a scroll view which you can set to scroll on different axes. You can also nest Grid List Box and Trajectory List Box 3D nodes. See Nesting Grid List Box nodes and Nesting Trajectory List Box 3D nodes.
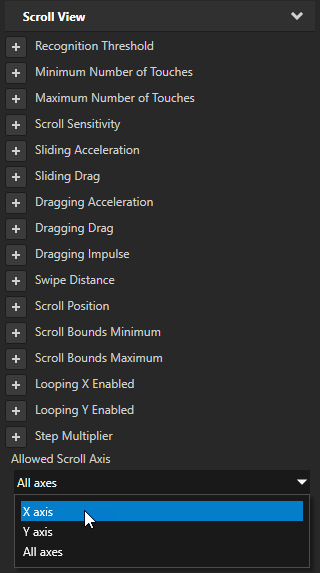
For each Scroll View node, use the Allowed Scroll Axis property to set the axis on which each Scroll View scrolls.
To nest Scroll View nodes:
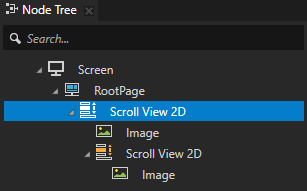
In the Node Tree, create a Scroll View node. See Creating a Scroll View node.
For example, create a Scroll View 2D node. Inside it, create an Image node.
In the Node Tree, select the Scroll View node that you created. In the Properties, add the Allowed Scroll Axis property and set it to the axis on which you want that node to scroll.
For example, to set the Scroll View node to scroll on the x axis, set the Allowed Scroll Axis property to X axis.
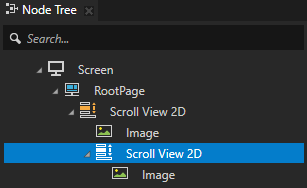
Create the Scroll View node that you want to nest in the Scroll View node that you created.
For example, to scroll an image within an image, create another Scroll View 2D node with an Image node.
Select the nested Scroll View node. In the Properties, add and set the Allowed Scroll Axis property to the axis on which you want that node to scroll.
For example, to scroll the nested Scroll View on the y axis, set the Allowed Scroll Axis property to Y axis.
Controlling whether a Scroll View node is in use
To control whether a Scroll View node is in use, use the Input > Enabled property. A disabled Scroll View node does not react to user input. When you disable a Scroll View node, Kanzi stops ongoing gestures and preserves the scroll position and zoom value of that Scroll View node.
When you disable the Enabled property of a node, you effectively disable that node and its descendant nodes in the same overlay focus scope.
To observe whether a node is effectively enabled, use the Input > Effectively Enabled property in a state manager or a binding. For example, to visually indicate to the user whether a node is in use, create a state manager and use the Effectively Enabled property as its controller property.
Debugging a Scroll View
To test whether the scroll view is working properly, add a Write Log action to the scroll view trigger that you are using. Every time you use the scroll view, Kanzi Studio writes a message to the Log window. See Reacting to Scroll View scrolling.
Setting the appearance of a Scroll View 2D
To set the appearance of 2D nodes:
You can fill 2D nodes with a solid color, a texture, or a material. See Adjusting the appearance of 2D nodes.


You can apply a post-processing effect to a 2D node. See Effects for 2D nodes.


You can rotate a 2D node around all three axes to create a 3D perspective effect. See Creating a 3D perspective effect for 2D nodes.

You can apply custom rendering to 2D nodes to create post-processing effects. See Applying custom rendering to 2D nodes.
You can render a 2D node as pixel-perfect. See Rendering pixel-perfect 2D nodes.
Using the Scroll View 3D node in the API
To use a Scroll View 3D node to pan a node, use the ScrolledMessage messages:
// Declare the variables you use to store the nodes in this example.
ScrollView3DSharedPtr scrollView;
Node3DSharedPtr box;

// Define the handler function for the ScrollView3D.ScrolledMessage message which a Scroll View generates when it scrolls.
void onScrollViewScrolled(ScrollView3D::ScrollMessageArguments& messageArguments)
{
    // Make a 3D vector out of the scroll position x and y axis coordinates of the Scroll View node. Set value for z to 0.
    Vector3 translation = Vector3(-messageArguments.getScrollPositionX(), messageArguments.getScrollPositionY(), 0.0f);

    // Set the above 3D vector as a render translation of the Box node that you pan with a Scroll View node.
    box->setRenderTransformation(SRTValue3D::createTranslation(translation));
}

// Create the Scroll View which uses the ScrollView3D.ScrolledMessage message handler.
void exampleSetupScrollView3D()
{
    // Create a Scroll View 3D node and set its size.
    scrollView = ScrollView3D::create(domain, "Scroll View");
    scrollView->setSize(100.0f, 100.0f, 10.0f);

    // Create a Box node and attach it to the Scroll View 3D node.
    box = Model3D::createBox(domain, "Box", Vector3(2.0f, 2.0f, 2.0f), ThemeOrange);
    scrollView->addChild(box);

    // Add a message handler for the ScrollView3D.ScrolledMessage message from the Scroll View 3D node.
    scrollView->addMessageHandler(ScrollView3D::ScrolledMessage, bind(&ScrollView3DScrollSnippet::onScrollViewScrolled, this, placeholders::_1));
}
To use a Scroll View 3D node to scale a node, use the ZoomedMessage messages:
// Declare the variables you use to store the nodes in this example.
ScrollView3DSharedPtr scrollView;
Node3DSharedPtr box;
// Declare the variable you use to store the Render Transformation property.
SRTValue3D baseTransform;

// Define the handler function for the ScrollView3D.ZoomedMessage message which a Scroll View generates when it zooms.
void onScrollViewZoomed(ScrollView3D::ZoomedMessageArguments& arguments)
{
    // Get the value for the amount of zoom from the ScrollView3D.ZoomedMessage message arguments.
    float zoom = arguments.getZoom();

    // Make a copy of the saved base Render Transformation of the Box node.
    SRTValue3D transformCopy(baseTransform);

    // Scale the copied transform on every axis for the zoom amount.
    transformCopy.scale(Vector3(zoom, zoom, zoom));

    // Apply the scaled transform to the Render Transformation property of the Box node.
    box->setRenderTransformation(transformCopy);
}

// Create the Scroll View which uses the ScrollView3D.Zoomed message handler.
void exampleSetupScrollView3D()
{
    // Create Scroll View 3D node and set a size for it.
    scrollView = ScrollView3D::create(domain, "Scroll View");
    scrollView->setSize(100.0f, 100.0f, 10.0f);

    // Create a Box node and attach it to the Scroll View 3D node.
    box = Model3D::createBox(domain, "Box", Vector3(2.0f, 2.0f, 2.0f), ThemeOrange);
    scrollView->addChild(box);

    // Get the value of the Render Transformation property of the Box node.
    baseTransform = box->getRenderTransformation();

    // Add a message handler for the ScrollView3D.ZoomedMessage message from the Scroll View 3D node.
    scrollView->addMessageHandler(ScrollView3D::ZoomedMessage, bind(&ScrollView3DZoomSnippet::onScrollViewZoomed, this, placeholders::_1));
}
For details, see the ScrollView3D class in the Kanzi Engine API reference.
Using the Scroll View 2D node in the API
To use a Scroll View 2D node to pan a node, use the ScrolledMessage messages:
// Declare the variables you use to store the nodes in this example.
ScrollView2DSharedPtr scrollView;
Node2DSharedPtr textNode;

// Define the handler function for the ScrollView2D.ScrolledMessage message which a Scroll View generates when it scrolls.
void onScrollViewScrolled(ScrollView2D::ScrollMessageArguments& messageArguments)
{
    // Make a 2D vector out of the scroll position x and y axis coordinates of the Scroll View node.
    Vector2 translation = Vector2(-messageArguments.getScrollPositionX(), -messageArguments.getScrollPositionY());

    // Set the above 2D vector as a render translation of the Text Block 2D node that you pan with a Scroll View node.
    textNode->setRenderTransformation(SRTValue2D::createTranslation(translation));
}

// Create the Scroll View which uses the ScrollView2D.ScrolledMessage message handler.
void exampleSetupScrollView2DScroll()
{
    // Create a Scroll View 2D node and set its size.
    scrollView = ScrollView2D::create(domain, "Scroll View");
    scrollView->setLayoutSize(100.0f, 100.0f);

    // Create a Text Block 2D node and attach it to the Scroll View 2D node.
    textNode = TextBlock2D::create(domain, "Hello world!");
    scrollView->addChild(textNode);

    // Add a message handler for the ScrollView2D.ScrolledMessage message from the Scroll View 2D node.
    scrollView->addMessageHandler(ScrollView2D::ScrolledMessage, bind(&ScrollView2DSnippet::onScrollViewScrolled, this, placeholders::_1));
}
To use a Scroll View 2D node to scale a node, use the ZoomedMessage messages:
// Define the handler function for the ScrollView2D.ZoomedMessage message which a Scroll View generates when it zooms.
void onScrollViewZoomed(ScrollView2D::ZoomedMessageArguments& messageArguments)
{
    // Get the value for the amount of zoom from the ScrollView2D.ZoomedMessage message arguments.
    float zoom = messageArguments.getZoom();

    // Scale the Text Block 2D node based on the zoom read from the ZoomedMessage message.
    textNode->setRenderTransformation(SRTValue2D::createScale(Vector2(zoom, zoom)));
}

// Create the Scroll View which uses the ScrollView2D.ZoomedMessage handler.
void exampleSetupScrollView2DZoom()
{
    // Create Scroll View 2D node and set a size for it.
    scrollView = ScrollView2D::create(domain, "Scroll View");
    scrollView->setLayoutSize(100.0f, 100.0f);

    // Create a Text Block 2D node and attach it to the Scroll View 2D node.
    textNode = TextBlock2D::create(domain, "Hello world!");
    scrollView->addChild(textNode);

    // Add a message handler for the ScrollView2D.ZoomedMessage message from the Scroll View 2D node.
    scrollView->addMessageHandler(ScrollView2D::ZoomedMessage, bind(&ScrollView2DSnippet::onScrollViewZoomed, this, placeholders::_1));
}
To set the scroll position:
// Create the scroll position message arguments.
ScrollViewConcept::SetScrollMessageArguments args;
args.setScrollPosition(Vector2(50.0f, 25.0f));

// Send the message to set the scroll position.
scrollView2D->dispatchMessage(ScrollViewConcept::SetScrollMessage, args);
To set the scroll target and start scrolling to the position set by the target:
// Create the scroll target message arguments.
ScrollViewConcept::SetScrollTargetMessageArguments args;
args.setScrollTarget(Vector2(50.0f, 25.0f));

// Send the message to set the scroll target.
scrollView2D->dispatchMessage(ScrollViewConcept::SetScrollTargetMessage, args);
To set the scroll position using the ScrollPositionProperty:
// Set the ScrollViewConcept.ScrollPositionProperty.
scrollView2D->setProperty(ScrollViewConcept::ScrollPositionProperty, Vector2(100.0f, 100.0f));
For details, see the ScrollView2D class in the Kanzi Engine API reference.
Scroll View property types and messages
For lists of the available property types and messages for the Scroll View nodes, see Scroll View 2D and Scroll View 3D.