Preparing 3D assets in third-party tools
Supported formats
When you want to bring the 3D assets created with a third-party tool to Kanzi Studio you have to import or merge the assets. You can import or merge 3D assets in these formats:
glTF 2.0 (gltf, glb) for meshes, animations, skins, and morphs
COLLADA (dae) for meshes, animations, skins, and morphs
Filmbox (fbx) for meshes, animations, skins, morphs, and splines
Geometry definitions (obj) for meshes
Different exporters in third-party tools handle content differently. For example, if you cannot get the expected result using the fbx format, try using the dae format.
Preparing 3D assets
As you prepare 3D assets for your Kanzi Studio project, keep in mind:
Try to switch materials as little as possible. You can achieve this by merging meshes that use the same material and use only one material for the mesh. Doing so you improve both mesh and material managing, and rendering performance. See Reducing shader switches.
Remove the vertex attributes from meshes that are not used by shaders. The smaller the vertex size, the more efficient is the access to the vertex data, and the lower is memory consumption. You can remove unnecessary vertex attributes in most 3D modeling software during export. The export settings usually include a list of vertex attributes that are exported, such as normals, vertex colors and so on. For example, if a mesh is rendered without a textured material, the texture coordinates vertex attribute is unnecessary, and you can remove it.
When you import 3D assets from an fbx file, Kanzi Studio automatically copies all the textures that you assigned into the diffuse-slot, and converts each texture into a Single Texture.
It is best if you keep single objects in the center, and choose a sensible place for the pivot. For example, for a chair, set the pivot to the point where the chair touches the ground.
Poorly placed pivots are a problem because after you bring an object to Kanzi and add it to a hierarchy or animate it, it is very likely the object will not behave an expected way. Additionally, the accuracy of the vertex buffer of the object is too low when the pivot is far away from the imported object. In Kanzi Studio objects with this problem appear like they are in low-resolution.
Unlike third-party 3D modeling software, Kanzi uses OpenGL shaders for the materials. Which is why when you import 3D assets, Kanzi Studio imports only a few basic material parameters, such as diffuse, ambient, and texture. Also, Kanzi Studio does not import the shading model.
If you do not assign a material, Kanzi Studio assigns the material that you set as the default material in your project. If you do assign a default material and the material value for the imported 3D content is invalid, Kanzi Studio uses a bright-green debug material. To correct the problem, assign a material in Kanzi Studio after importing 3D assets. See Using materials.
When importing, Kanzi Studio supports only the Blinn-Phong lighting model. Before exporting 3D assets in your 3D modeling tool, choose Blinn-Phong material (the shininess value is > 1).
Kanzi Studio imports only lights it supports, including simple point lights, directional lights, and spot lights. Instead of skylights, physical lights, area light, and Vray lights Kanzi Studio creates an Empty Node 3D for each.
When making movable transparent parts like, for example, cars with movable doors and transparent windows, create them as separate objects. To do this in Kanzi, you have to either use sorting filters, or create a separate render pass for the windows to render correctly. See Using the Sorting Filter.
If you want to make invisible seams when two movable parts are close together (for example, when a car door is closed), in your third-party tool edit normals and combine the seam normals to point to the same direction. This makes the reflection look smooth on seams.
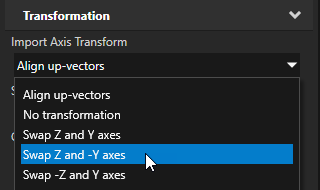
The orientation of the coordinate system used by your 3D modeling tool can differ from that used by Kanzi Studio, which can change the orientation of your assets as you import them to Kanzi Studio. You can change the orientation of your assets either in your modeling tool, or in Kanzi Studio. To change the orientation of your 3D assets in Kanzi Studio:
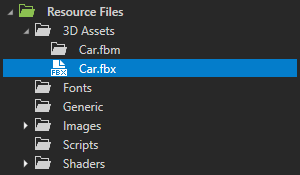
In the Library > Resource Files > 3D Assets select the model.
In the Properties set the Import Axis Transform property to the value that represents the difference between the orientation of the coordinate systems.
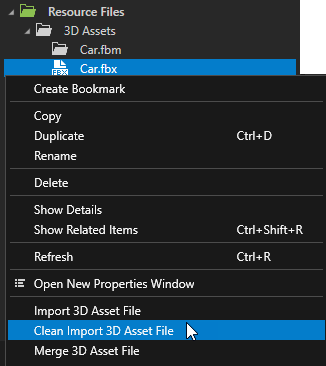
In the Library > Resource Files > 3D Assets right-click your model and select Clean Import 3D Asset File. Clean Import 3D Asset File first deletes the earlier imported 3D asset and all modifications you made to that 3D asset in Kanzi Studio, and then imports the selected 3D asset.
It is easier to create very simple animations in Kanzi Studio using the Kanzi animation tools and transitions in state managers, than it is to import them from a third-party tool. If you are creating complex animations that, for example, contain hierarchies, create them in third-party tools and import them to Kanzi Studio.
When you have complex content in animation controllers or controller stacks, bake the animation already in your third-party tool or before exporting. Centering pivots and setting empty animation controller (zero out the animations with Freeze Transform tool) to start the animation from 0 keeps the data clean.
Shader that handles the skinning sets the bone count and the amount of bones that can affect a single vertex.
If in your Kanzi Studio project your skinned mesh does not work as you intended:
Use the messages printed in the Log window as guidelines for changing the mesh in your third-party tool and reimport the mesh.
If the mesh you want to skin is complex, try simplifying it.
Check in your content tool that the bones do not have inverted matrices before you map the vertices to bones. Inverted matrices are often caused by tools that perform flipping or mirroring of objects on some axis. If the bones in your mesh have inverted matrices, remove them and remap the vertices to the bones.
When you encounter flipped meshes, polygons, normals, or texture coordinates after importing 3D assets to Kanzi Studio, it is best to fix these problems in your third-party tool. However, if you cannot find or fix the problem in your third-party tool, you can fix some of these problems in Kanzi Studio. To flip meshes, polygons, normals, or texture coordinates in Kanzi Studio, in the Library > Resource Files > 3D Assets right-click the imported 3D model and select Flip and then the type of content you want to flip.
When using complex hierarchy, create a script in your third-party tool to save the parent properties of all nodes and unlink them before you use, for example, in 3ds Max the Reset X-Form tool for everything, and then link back and save and reapply the rotations.
Weld all vertices with very small amount to make sure there are no unwelded vertices causing shading errors and extra vertices.
Remove dead vertices. You can find double meshes by selecting one vertex using rectangle selection and checking that the selection says number of the vertex instead of the count of the vertices. If it says there are two or more vertices selected and they seem to be in the same place you most likely have overlapping meshes. In 3ds Max, in some cases Weld Selected will not fix that, because if you are using editable poly mesh type class object the object itself has more rules for the topology and merging vertices is not applicable to certain cases.
To avoid problems with the scale, correctly set the units and scale before exporting 3D content in the third-party tool that you are using.
You can adjust the scale of 3D assets after importing it to Kanzi Studio. See Adjusting the scale of imported 3D assets.
If after importing your 3D assets to Kanzi Studio the assets do not look correct:
Export the assets to another format supported by Kanzi Studio. For example, if you exported to an fbx file and your assets do not look correct, export to a dae file instead. See Importing.
Import the assets back to the third-party tool from which you exported those assets. If you exported to an fbx file, to check whether the content looks correct, you can also use the Autodesk fbx review tool.
If the assets look incorrect in the third-party tool, change the exporter settings. For example, export as binary or ASCII fbx. However, if changing exporter settings does not fix the issue and the assets look correct in the third-party tool, contact Rightware support. See Technical support.
Preparing 3D assets in 3ds Max
As you prepare 3D assets for your Kanzi Studio project in 3ds Max, keep in mind:
If you set the Display Unit Scale to any value other than the Generic Units, to avoid differences with scale of units in Kanzi Studio and 3ds Max, in 3ds Max in Units Setup > System Unit Setup set the System Unit Scale to match your Display Unit Scale.
If you set align up vectors, you can export your 3D models either y axis up or z axis up, and Kanzi Studio corrects the rotation.
During the import Kanzi bakes the pivot so that it becomes the origin of the model.
Avoid using offset and non-uniform scaling at least when you have a hierarchy. Because 3ds Max allows you to link objects into a hierarchy even when objects have non-uniform scale. This allows you to have the same effect on the hierarchy regardless of the stage when you added the objects, scaled or not scaled. That information is lost in the process and you cannot reconstruct it through resetting. If you need to use non-uniform scale, do so only on the mesh level.
When working with UVs:
UV splits and smoothing groups create double vertices. Having hard edges is not always the best, but if you have a UV split, you can use smoothing group hard edge in the same place without any additional penalty.
Unwrap your 3D mesh in flat 2D space to project a texture for that 3D mesh so that the flow will run from the start of the mesh to the end.
Set the polygonal faces flat on the UV editing windows and match their sizes for optimal results.
Match the vertex positions in the UV layout by aligning the vertices of the matching polygons horizontally and vertically.
To maximize the UV layout space, scale the polygons to fill the UV layout.
Note that if you do not need the whole space for the object in the UV layout, you can use the free space for something else. This way you can use the same texture for multiple objects.
Topology and edge orientation. If default orientation used in 3ds Max is not correct, to achieve better shading for low polygon models, use Edit polygons > Turn.
Avoid using inverse scales or Mirror tool on objects to avoid inverse matrices. Mirror tool creates content that is correct for offline rendering, but invalid matrices for realtime rendering. Try fixing inverse matrices:
Remove the object from a hierarchy and use Reset X-Form tool on it.
Reapply the recent orientation.
Add the object back to the hierarchy.
Use Reset X-Forms tool before exporting to ensure there are no unwanted scaling or flipped faces. Note that when you have objects in a hierarchy (schematic view in 3ds Max) using Reset X-Forms tool in the parent object rotates the child objects too, which you cannot undo in 3ds Max. To avoid this, either use Reset X-Forms tool before creating a hierarchy, or break it for the moment you reset them. You can solve this using a MAXScript, but as max default this is the case.
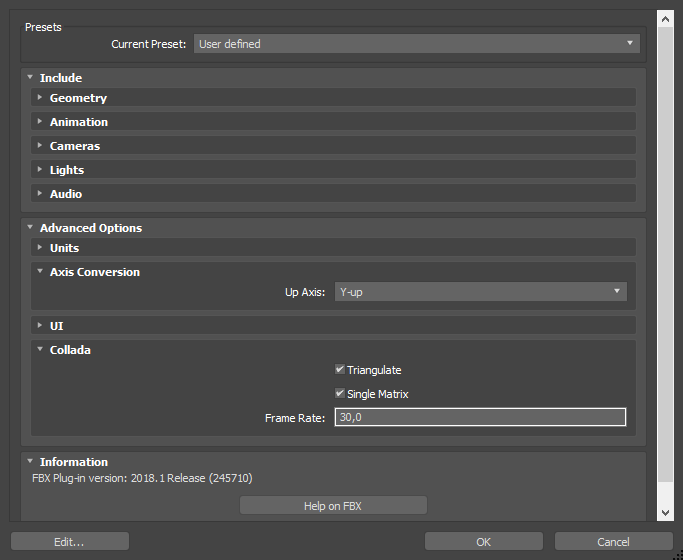
To bring animations from 3ds Max use fbx file format. If you must use Collada, in Advanced Options set:
Axis Conversion Up Axis to Y-up
Collada Single Matrix to enabled
Preparing 3D assets in Maya
As you prepare 3D assets for your Kanzi Studio project in Maya, keep in mind:
Even small differences between viewport aspect ratios, camera aspect ratios, and resolutions can cause strange effects to layouts.
Camera FOV does not currently come through from .fbx to Kanzi. During import Kanzi assigns to FOV value 40. To correct this, copy the FOV value from the Maya camera to the Kanzi Camera node.