Extending the functionality of Kanzi Engine
With a Kanzi Engine plugin you can extend the functionality of Kanzi Engine and set how Kanzi Studio shows the custom content you create:
Create your own nodes and property types. See Creating custom nodes and property types.
Create your own message types that users of Kanzi Studio can use as either triggers or actions. See Creating custom message types.
Create your own node components that users can use to add functionality to any node in their Kanzi project. See Creating custom node components.
Set how Kanzi Studio shows the property types you create in your Kanzi Engine plugin. See Setting custom property types.
Set the default value of any property type that is defined in the node on which you base your node. See Setting the default value of a property type.
Set the icons for the node types you create. See Setting the icon for your node type.
Creating custom nodes and property types
In a Kanzi Engine plugin you can create custom nodes with custom property types. You can set how Kanzi Studio shows and lets users interact with these nodes.
To create a custom node with custom property types:
To pass to Kanzi Studio information about the custom node, declare the metadata where you describe the node:
In the hpp file of your Kanzi Engine plugin project, after the metaclass definition, declare the function which returns the metadata:
...
KZ_METACLASS_END()

static kanzi::PropertyTypeEditorInfoSharedPtr makeEditorInfo();
...
In the cpp file of your Kanzi Engine plugin project, create the metadata for your custom node. For example, to create a tooltip and to set automatically added and frequently used properties, add this code snippet:
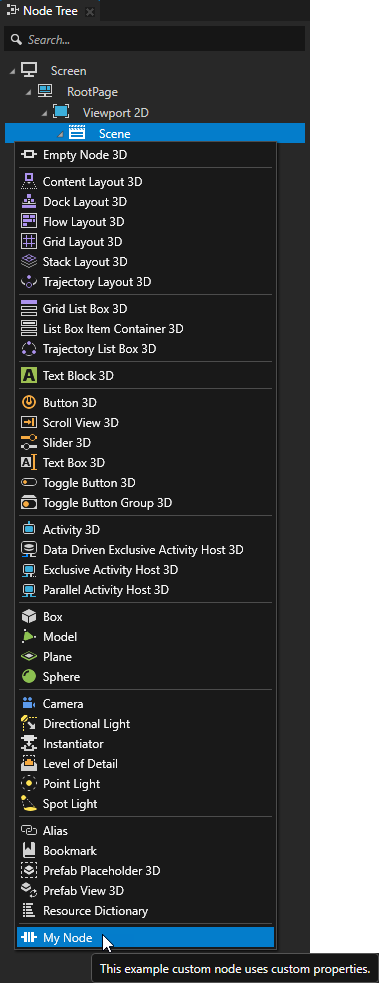
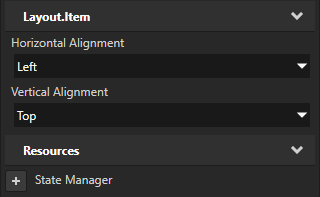
PropertyTypeEditorInfoSharedPtr MyPlugin::makeEditorInfo()
{
    return PropertyTypeEditorInfoSharedPtr(
        KZ_DECLARE_EDITOR_METADATA(
            // Set the name that you want to use for your node in Kanzi Studio.
            metadata.displayName = "My Node";
            // Set the tooltip that you want to use in the Kanzi Studio Create menu.
            metadata.tooltip = "This example custom node uses custom properties.";
            // Add the Horizontal Alignment and Vertical Alignment properties to the node.
            metadata["AutomaticallyAddedProperties"] = "Node.HorizontalAlignment, Node.VerticalAlignment";
            // Add the State Manager property as a frequently used property which users can add by clicking next to the property name.
            metadata["FrequentlyAddedProperties"] = "Node.StateManager";
            // Let the user add the Focusable property using the Add Property context menu or the context tab of the Add Properties window.
            metadata["ContextProperties"] = "Node.Focusable";
        ));
}
Create the custom property types and their metadata. For example:
In the hpp file of your Kanzi Engine plugin project, replace
KZ_METACLASS_BEGIN(MyPlugin, Node3D, "CustomComponentType")
KZ_METACLASS_END()
with
// String property
static kanzi::PropertyType<kanzi::string> StringProperty;
// String reference to a node
static kanzi::PropertyType<kanzi::string> NodeRefByStringProperty;
// String reference to a prefab
static kanzi::PropertyType<kanzi::string> PrefabRefByStringProperty;
// Shared pointer reference to a prefab
static kanzi::PropertyType<kanzi::ResourceSharedPtr> PrefabRefBySharedPtrProperty;
// Shared pointer reference to a material
static kanzi::PropertyType<kanzi::ResourceSharedPtr> MaterialRefBySharedPtrProperty;

KZ_METACLASS_BEGIN(MyPlugin, Node3D, "MyNode")
    // Add the property types to the class metadata.
    KZ_METACLASS_PROPERTY_TYPE(StringProperty)
    KZ_METACLASS_PROPERTY_TYPE(NodeRefByStringProperty)
    KZ_METACLASS_PROPERTY_TYPE(PrefabRefByStringProperty)
    KZ_METACLASS_PROPERTY_TYPE(PrefabRefBySharedPtrProperty)
    KZ_METACLASS_PROPERTY_TYPE(MaterialRefBySharedPtrProperty)
KZ_METACLASS_END()
In the cpp file of your Kanzi Engine plugin project, add the metadata for the custom property types. See Reference for showing Kanzi Engine plugin custom types in Kanzi Studio.
For example, to declare the metadata for the custom property types you created in the previous step:
String property with a one-line text editor:
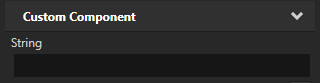
// Creates a string property.
// This example does not set the editor. If you do not set the editor, Kanzi Studio uses
// the default editor for this property type.
PropertyType<string> MyPlugin::StringProperty(
    kzMakeFixedString("MyPlugin.String"), "", 0, false,
    KZ_DECLARE_EDITOR_METADATA(
        metadata.displayName = "String";
    ));
String reference to a 3D node the user can select from a dropdown menu:
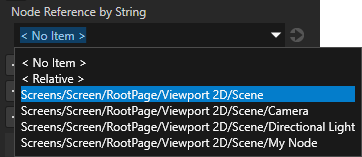
// Creates a string reference to a node.
PropertyType<string> MyPlugin::NodeRefByStringProperty(
    kzMakeFixedString("MyPlugin.NodeRefByString"), "", 0, false,
    KZ_DECLARE_EDITOR_METADATA(
        metadata.displayName = "Node Reference by String";
        // When you set valueProvider to ProjectObject:Node3D,
        // Kanzi Studio automatically uses the Node 3D selector editor.
        metadata.valueProvider = "ProjectObject:Node3D";
    ));
String reference to a prefab the user can select from a dropdown menu:
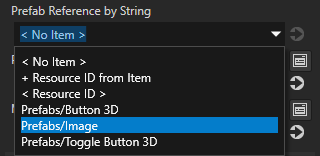
// Creates a string reference to a prefab resource.
PropertyType<string> MyPlugin::PrefabRefByStringProperty(
    kzMakeFixedString("MyPlugin.PrefabRefByString"), "", 0, false,
    KZ_DECLARE_EDITOR_METADATA(
        metadata.displayName = "Prefab Reference by String";
        // When you set valueProvider to ProjectObject:PrefabTemplate,
        // Kanzi Studio automatically uses the Prefab template selector editor.
        metadata.valueProvider = "ProjectObject:PrefabTemplate";
    ));
Shared pointer reference to a prefab resource the user can select from a dropdown menu:
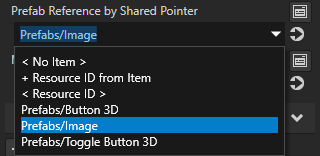
// Creates a shared pointer reference to a prefab resource.
PropertyType<ResourceSharedPtr> MyPlugin::PrefabRefBySharedPtrProperty(
    kzMakeFixedString("MyPlugin.PrefabRefBySharedPtr"), ResourceSharedPtr(), 0, false,
    KZ_DECLARE_EDITOR_METADATA(
        metadata.displayName = "Prefab Reference by Shared Pointer";
        // When you set valueProvider to ProjectObject:PrefabTemplate,
        // Kanzi Studio automatically uses the Prefab template selector editor.
        metadata.valueProvider = "ProjectObject:PrefabTemplate";
    ));
Shared pointer reference to a material resource the user can select from a dropdown menu:
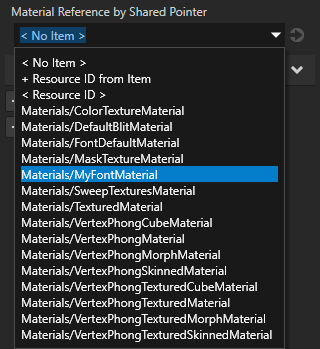
// Creates a shared pointer reference to a material resource.
PropertyType<ResourceSharedPtr> MyPlugin::MaterialRefBySharedPtrProperty(
    kzMakeFixedString("MyPlugin.MaterialRefBySharedPtr"), ResourceSharedPtr(), 0, false,
    KZ_DECLARE_EDITOR_METADATA(
        metadata.displayName = "Material Reference by Shared Pointer";
        // When you set valueProvider to ProjectObject:Material,
        // Kanzi Studio automatically uses the Material dropdown editor.
        metadata.valueProvider = "ProjectObject:Material";
    ));
Build and install your plugin. See Adding a Kanzi Engine plugin to a Kanzi Studio project.
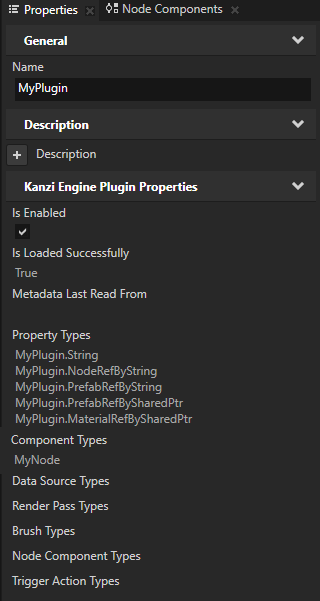
In Kanzi Studio in the Library > Kanzi Engine Plugins select your plugin. In the Properties you can see the custom property types.
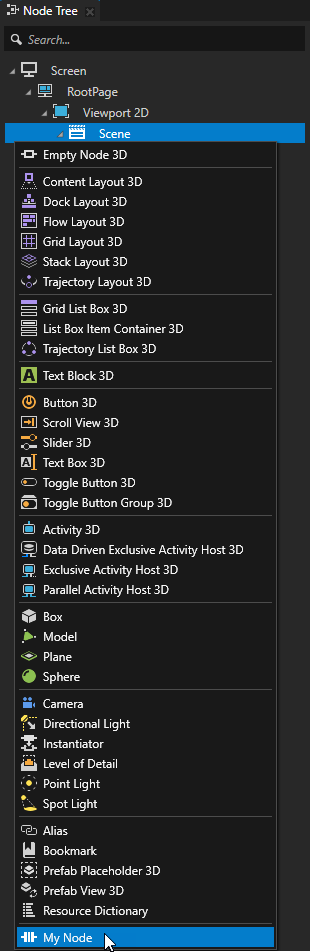
In the Node Tree select a node to which you want to add your node, press Alt and right-click, and select your custom node.
(Optional) Set the icons for the node types you create. See Setting the icon for your node type.
(Optional) By default Kanzi Studio adds custom properties as frequently used properties to the nodes of the type for which you created the property type. To set the node types for which Kanzi Studio suggests the property, and whether Kanzi Studio adds the property automatically or lets the user add it, set the
metadata.hostattribute. See host.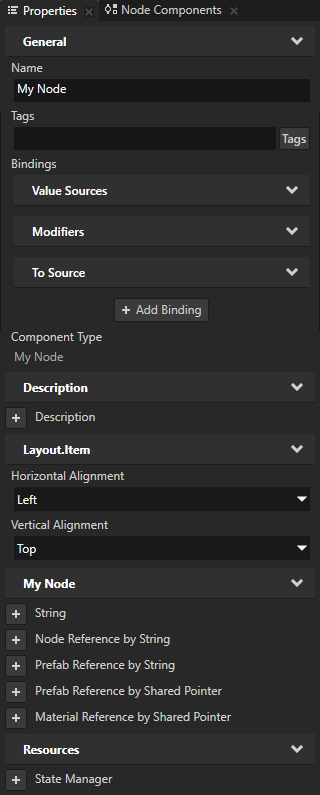
Creating custom message types
You can create and configure custom message types that you use to add functionality to your application. For example, use a message type to make your node type react to an event.
For every custom message type that you define, Kanzi Studio creates a message action and a message trigger type, which let you dispatch and react to the message type, respectively.
When you are using Kanzi Connect you can use custom message types to get information about a Kanzi Connect server or service that your application uses.
Creating custom message triggers
In a Kanzi Engine plugin, you can create a custom message type that Kanzi Studio shows as a message trigger. A message type enables you to subscribe to notifications when a certain event occurs.
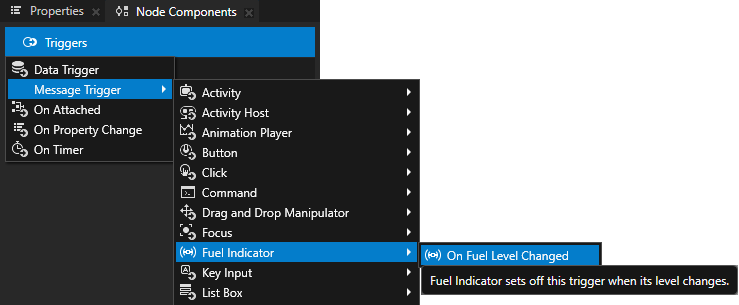
For example, to allow the Kanzi Studio user to add a message trigger called On Fuel Level Changed that is set off when the fuel level of a custom node called Fuel Indicator changes:
Inside your node class, create the class that represents the custom message type and define that message type:
// Represents message arguments of FuelIndicator.OnFuelLevelChanged message type.
class OnFuelLevelChangedMessageArguments : public MessageArguments
{
public:
    KZ_MESSAGE_ARGUMENTS_METACLASS_BEGIN(OnFuelLevelChangedMessageArguments, MessageArguments, "On Fuel Level Changed Message Arguments")
    KZ_METACLASS_END()
};

// Define the message type of the FuelIndicator.OnFuelLevelChanged message.
static MessageType<OnFuelLevelChangedMessageArguments> OnFuelLevelChangedMessage;
Create a function that dispatches the message when the fuel level changes:
// Sends a FuelIndicator.OnFuelLevelChanged message.
void onFuelLevelChanged(int fuelLevel)
{
    OnFuelLevelChangedMessageArguments messageArguments;
    dispatchMessage(OnFuelLevelChangedMessage, messageArguments);
}
Declare the metadata for the message:
MessageType<FuelIndicator::OnFuelLevelChangedMessageArguments> FuelIndicator::OnFuelLevelChangedMessage(
    kzMakeFixedString("Message.FuelIndicator.OnFuelLevelChanged"),
    KZ_DECLARE_EDITOR_METADATA(
        // Set the name of the message the way you want to show it in Kanzi Studio.
        metadata.displayName = "On Fuel Level Changed";
        // Set the tooltip for the message.
        metadata.tooltip = "Fuel Indicator sets off this trigger when its level changes.";
        // Do not show the message in the trigger actions dropdown menu.
        // You show the message as a trigger.
        metadata.sendable = "False";));
Creating custom actions
In a Kanzi Engine plugin, you can create a custom message type that Kanzi Studio shows as an action.
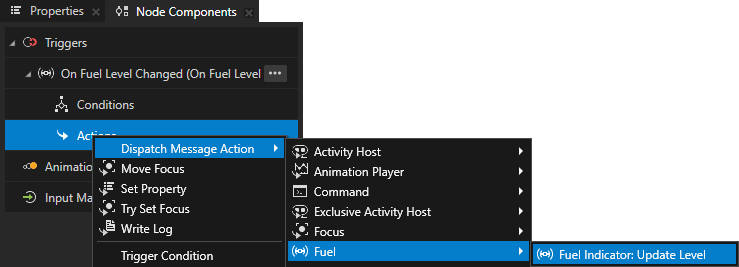
For example, to allow the Kanzi Studio user to add to a trigger an action called Fuel Indicator: Update Level that shows the level of a custom node called Fuel Indicator in a Text Block 3D node:
In the hpp file of your Kanzi Engine plugin project create the class that represents the custom message type and define that message type:
// Represents the message arguments of the FuelIndicator.UpdateLevel message.
class FuelIndicatorUpdateLevelMessageArguments : public MessageArguments
{
public:

    KZ_MESSAGE_ARGUMENTS_METACLASS_BEGIN(FuelIndicatorUpdateLevelMessageArguments, MessageArguments, "Fuel Indicator Update Level Message Arguments")
        KZ_METACLASS_PROPERTY_TYPE(FuelIndicatorLevelProperty)
    KZ_METACLASS_END()

    // The property type which represents the value of the Fuel Indicator node.
    static PropertyType<int> FuelIndicatorLevelProperty;

    // Returns the value of the Fuel Indicator message argument.
    int getFuelIndicatorLevel()
    {
        return getArgument(FuelIndicatorLevelProperty);
    }

};

// The message type of the FuelIndicator.UpdateLevel message.
static MessageType<FuelIndicatorUpdateLevelMessageArguments> FuelIndicatorUpdateLevelMessage;
In the hpp file of your Kanzi Engine plugin project define the message handler for the
FuelIndicator.UpdateLevelmessage:// The message handler for the FuelIndicator.UpdateLevel message. // Shows the level of the Fuel Indicator in a Text Block 3D node. void fuelIndicatorUpdateLevelHandler(FuelIndicatorUpdateLevelMessageArguments& arguments) { // Get the level of the Fuel Indicator node. m_currentLevel += arguments.getFuelIndicatorLevel(); // Show the level of the Fuel Indicator node in a Text Block 3D node. TextBlock3DSharedPtr textBlock = m_textBlockReference.get(); if (textBlock) { textBlock->setText(to_string(m_currentLevel)); } }
In the hpp file in the
initialize()function register the message handler for theFuelIndicator.UpdateLevelmessage:void initialize() { ... // Register the message handler for the FuelIndicator.UpdateLevel message. addMessageHandler(FuelIndicatorUpdateLevelMessage, this, &FuelIndicator::fuelIndicatorUpdateLevelHandler); }
In the cpp file of your Kanzi Engine plugin project declare the metadata for the
FuelIndicator.UpdateLevelmessage.Kanzi Studio groups message types in the create context menu based on the value of the
displayNameproperty of the parent class metadata where you declare the message type. You can override this information by setting thecategoryproperty.MessageType<FuelIndicator::FuelIndicatorUpdateLevelMessageArguments> FuelIndicator::FuelIndicatorUpdateLevelMessage( kzMakeFixedString("Message.FuelIndicator.UpdateLevel"), KZ_DECLARE_EDITOR_METADATA( // Set the name of the message the way you want to show it in Kanzi Studio. metadata.displayName = "Fuel Indicator: Update Level"; // Do not show the message as a trigger. // You show the message in the trigger actions dropdown menu. metadata.listenable = "False"; // Set the category to override the name of default context menu item for grouping message actions. metadata.category = "Fuel";));
Creating custom node components
A custom node component is an isolated piece of logic, which you implement in a Kanzi Engine plugin and you can attach to any node, in order to add custom functionality to that node. For example, you can print the value of a property to the Kanzi Log every time the value of that property changes or define animation playback with variable speed.
For example, to create a custom node component called Log Property Value that prints the value of a float property type to the Kanzi Log every time the value of that property changes:
In the hpp file of your Kanzi Engine plugin project include the header file that defines the base class for the custom node component:
#include <kanzi/core.ui/node_component/node_component.hpp>
In the hpp file of your Kanzi Engine plugin project create the class that represents the custom node component and define that node component:
class LogPropertyValueComponent;
typedef kanzi::shared_ptr<LogPropertyValueComponent> LogPropertyValueComponentSharedPtr;

// Represents the Log Property Value custom node component.
class LOGPROPERTYVALUECOMPONENT_API LogPropertyValueComponent : public kanzi::NodeComponent
{
public:

    // The property type that sets which property the Log Property Value custom node component logs.
    static kanzi::PropertyType<kanzi::string> LoggedPropertyTypeProperty;

    KZ_METACLASS_BEGIN(LogPropertyValueComponent, NodeComponent, "LogPropertyValueComponent")
        KZ_METACLASS_PROPERTY_TYPE(LoggedPropertyTypeProperty);
    KZ_METACLASS_END()

    static kanzi::PropertyTypeEditorInfoSharedPtr makeEditorInfo();

    // Creates a LogPropertyValueComponent node component instance.
    static LogPropertyValueComponentSharedPtr create(kanzi::Domain* domain, kanzi::string_view name);

protected:

    // The constructor for the LogPropertyValueComponent node component.
    explicit LogPropertyValueComponent(kanzi::Domain* domain, kanzi::string_view name);

    void initialize();

    // You call the attachOverride() function when the Log Property Value custom node component is attached to the node tree.
    // In the attachOverride() function you get the property type that you want to log and add the notification handler
    // which tracks when the value of that property changes.
    void attachOverride() override;

    // You call the detachOverride() function when the Log Property Value custom node component is detached from the node tree.
    // In the detachOverride() function you remove the notification handler which tracks when the value of
    // the property type, which you want to log, changes.
    void detachOverride() override;

...

};
In the hpp file in the class that represents the Log Property Value custom node component, implement the notification handler and the functions that you use to log the value of a property:
// Represents the Log Property Value custom node component.
class LOGPROPERTYVALUECOMPONENT_API LogPropertyValueComponent : public kanzi::NodeComponent
{

...

private:

    // The notification handler for the property type that the Log Property Value custom node component logs.
    static void onLoggedPropertyChanged(kanzi::PropertyObject& object, const float& propertyValue,
                                        kanzi::PropertyNotificationReason reason, void* owner);

    // Logs a specific property value.
    void logPropertyValue(const float& propertyValue) const;

    // The property type that the Log Property Value custom node component logs.
    kanzi::AbstractPropertyType m_loggedPropertyType;

...

};
In the cpp file of your Kanzi Engine plugin project add the constructor and the static
create()function, which creates an instance of the node component, and define theattachOverride()anddetachOverride()callback functions that you implemented in the header file:// Create a Log Property Value custom node component. LogPropertyValueComponentSharedPtr LogPropertyValueComponent::create(Domain* domain, string_view name) { LogPropertyValueComponentSharedPtr component(new LogPropertyValueComponent(domain, name)); component->initialize(); return component; } LogPropertyValueComponent::LogPropertyValueComponent(Domain* domain, string_view name) : kanzi::NodeComponent(domain, name) { } void LogPropertyValueComponent::initialize() { // Initialize the base class. NodeComponent::initialize(); } void LogPropertyValueComponent::attachOverride() { NodeComponent::attachOverride(); // Get the name of the property type that you want to log. const auto loggedPropertyTypeName = getProperty(LoggedPropertyTypeProperty); if (loggedPropertyTypeName.empty()) { kzLogInfo(KZ_LOG_CATEGORY_GENERIC, ("Use the Logged Property Type property to set which property type you want to log.")); return; } // Get the property type that you want to log and check that it is valid. const auto loggedPropertyType = AbstractPropertyType(getProperty(LoggedPropertyTypeProperty)); if (!loggedPropertyType) { kzLogWarning(KZ_LOG_CATEGORY_GENERIC, ("The custom node component cannot find the property type.")); return; } else if (loggedPropertyType.getDataType() != PropertyDataTypeFloat) { kzLogWarning(KZ_LOG_CATEGORY_GENERIC, ("The custom node component supports property types with float data type.")); return; } // Add the notification handler for the property type that you want to log. const DynamicPropertyType<float> concreteLoggedPropertyType(loggedPropertyType); getNode()->addPropertyNotificationHandler(concreteLoggedPropertyType, &LogPropertyValueComponent::onLoggedPropertyChanged, this); // Store as a member variable the property type that you want to log. m_loggedPropertyType = loggedPropertyType; // Print the initial value of the property type that you want to log. const auto initialPropertyValue = getNode()->getOptionalProperty(concreteLoggedPropertyType); if (initialPropertyValue) { logPropertyValue(*initialPropertyValue); } } void LogPropertyValueComponent::detachOverride() { // Remove the property notification handler for the property that you want to log. if (m_loggedPropertyType) { const DynamicPropertyType<float> concreteLoggedPropertyType(m_loggedPropertyType); getNode()->removePropertyNotificationHandler(concreteLoggedPropertyType, &LogPropertyValueComponent::onLoggedPropertyChanged, this); } NodeComponent::detachOverride(); }
In the cpp file define the callback functions that you implemented in the hpp file and that you use to log the value of a property type:
void LogPropertyValueComponent::onLoggedPropertyChanged(PropertyObject& /*object*/, const float& propertyValue,
                                                        PropertyNotificationReason reason, void* owner)
{
    // Get the component which receives a notification when the value of
    // the property, which you want to log, changes.
    const auto* component = static_cast<LogPropertyValueComponent*>(owner);

    // Kanzi sends a notification each time the value of the property type changes or when that property type is added to a node.
    component->logPropertyValue(propertyValue);
}

// Use the kzLogInfo logging macro to print:
// - The name of the node that has a Log Property Value custom node component
// - The name of the property type that you want to log
// - The value of that property type
void LogPropertyValueComponent::logPropertyValue(const float& propertyValue) const
{
    kzLogInfo(KZ_LOG_CATEGORY_GENERIC, ("{}:{} = {}", getNode()->getName(),
                                        string(m_loggedPropertyType.getName()),
                                        to_string(propertyValue)));
}
In the cpp file initialize the Logged Property Type property type and create the metadata that Kanzi Studio uses for the Log Property Value custom node component:
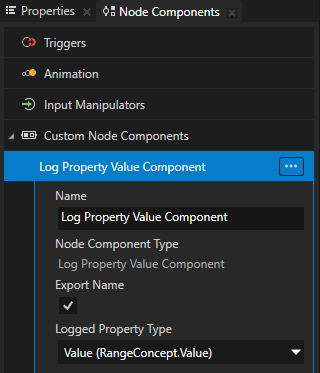
// Declare the metadata for the Logged Property Type property type that you use to set which property
// the Log Property Value custom node component logs.
PropertyType<string> LogPropertyValueComponent::LoggedPropertyTypeProperty(kzMakeFixedString("LogPropertyValueComponent.LoggedPropertyType"), "", 0, false,
    KZ_DECLARE_EDITOR_METADATA
    (
        metadata.displayName = "Logged Property Type";
        metadata.tooltip = "The property type whose value you want the node component to log.";
        metadata.valueProvider = "PropertyType";
    ));

// Create the metadata for the Log Property Value custom node component.
PropertyTypeEditorInfoSharedPtr LogPropertyValueComponent::makeEditorInfo()
{
    return PropertyTypeEditorInfoSharedPtr(
        KZ_DECLARE_EDITOR_METADATA(
            metadata.displayName = "Log Property Value Component";
            metadata.tooltip = "Writes the value of a specified property to Kanzi Log every time that property changes.";
            metadata.category = "Custom Node Components";
        ));
}
In the
<project_name>_module.cppfile include the header that provides the functions of theDomainclass:#include <kanzi/core.ui/domain/domain.hpp>
Build and install your Kanzi Engine plugin. See Adding a Kanzi Engine plugin to a Kanzi Studio project.
In Kanzi Studio:
In the Node Tree select the node whose property you want to log.
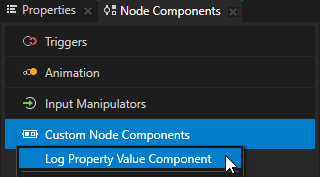
In the Node Components press Alt and right-click Custom Node Components and select the Log Property Value Component custom node component that you created.
In the Log Property Value Component set the Logged Property Type property to the property type whose value you want to print to the Kanzi Log.
In Kanzi Studio, when you change the value of that property, you can see the log messages in the Kanzi Studio Log window.

Setting custom property types
To pass to Kanzi Studio information about the custom property types you create in a Kanzi Engine plugin, you declare metadata that describe these property types.
The metadata enable Kanzi Engine plugin users to interact with the plugin content in Kanzi Studio.
See Reference for showing Kanzi Engine plugin custom types in Kanzi Studio.
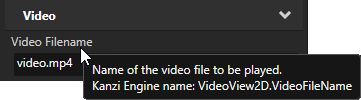
For example, to create the metadata for the custom property type VideoFileNameProperty to allow Kanzi Studio user to select a video file:
PropertyType<string> VideoView2D::VideoFileNameProperty(
    kzMakeFixedString("VideoView2D.VideoFileName"), "video.mp4", 0, false,
    KZ_DECLARE_EDITOR_METADATA(
        // Set the name of the property type the way you want to show it in Kanzi Studio.
        metadata.displayName = "Video Filename";
        // Set the tooltip for the property type.
        metadata.tooltip = "Name of the video file to be played.";
        // Set the category under which this property type is listed in the Properties.
        metadata.category = "Video";
        // Set the editor you want the user to use to edit the value of this property type.
        // BrowseFileTextEditor editor contains a text box with a Browse button next to it.
        metadata.editor = "BrowseFileTextEditor";
        // Set the default value of the property in Kanzi Studio.
        // The Kanzi Engine default value is set in the first line of this example.
        metadata.defaultValue = "video.mp4";
    ));
When the user creates a VideoView2D node, Kanzi Studio adds to the properties of the node in the category Video the Video Filename property, which has a text editor with a Browse button, a tooltip, and the default value set to video.mp4. See Ordering property categories in the Properties window.
Property type names cannot contain:
A period (.) in the beginning or at the end of a property name
Spaces
Tabs
Slashes (/)
Backslashes ()
Hashes (#)
Opening or closing braces ({})
At signs (@)
Setting the default value of a property type
In a custom node you can set the default value of any property type that is defined in the node on which you base your node.
For example, if your node inherits from the Node2D class, to set the default value of the Node.Opacity property type to 0.44, in the makeEditorInfo of your node:
PropertyTypeEditorInfoSharedPtr MyNode::makeEditorInfo()
{
    return PropertyTypeEditorInfoSharedPtr(
        KZ_DECLARE_EDITOR_METADATA(
            // Set the default value of the Node.Opacity property to 0.44.
            metadata["override:Node.Opacity:defaultValue"] = "0.44";
            // (Optional) Set how Kanzi Studio suggests the use of this property type.
            // If the "host" value of the property in the base node is:
            // - "auto", you can use "auto" or "fixed"
            // - "context", you can use "auto", "context", "fixed", or "freq"
            // - "fixed", you can use "fixed"
            // - "freq", you can use "auto", "fixed", or "freq"
            // For example, to automatically add the Node.Opacity property
            // when a user adds your node.
            metadata["override:Node.Opacity:host"] = "auto";
        ));
}
See host.
Setting the icon for your node type
If you do not set the icon for your node type, Kanzi Studio uses the default icon (![]() ). To make it easier for Kanzi Studio users to visually keep track of the nodes in the Node Tree, you can set your own icons for your nodes.
). To make it easier for Kanzi Studio users to visually keep track of the nodes in the Node Tree, you can set your own icons for your nodes.
To set the icon for your node type:
Place the icon that you want to use for a node to the
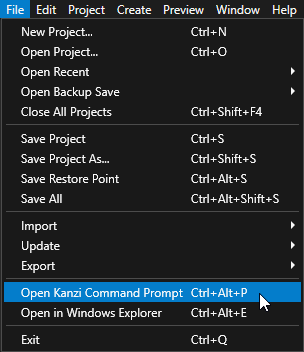
<ProjectName>/Application/src/plugindirectory.In Kanzi Studio, select File > Open Kanzi Command Prompt.
The Kanzi Command Prompt opens the Windows Command Prompt with the Kanzi environment variables set for the version of Kanzi for which you open a Kanzi Command Prompt.
Use the Kanzi Command Prompt to access Kanzi utilities and build tools, such as Gradle, SCons, and CMake, without using absolute paths or setting environment variables.
Tip
You can find the Kanzi Command Prompt in the Windows Start Menu in the Rightware directory.
When you have more than one version of Kanzi installed, make sure that you launch a Kanzi Command Prompt for the version of Kanzi with which you want to work in that command prompt.
In the Kanzi Command Prompt in the
<ProjectName>/Applicationdirectory run the script that generates a Visual Studio solution for the application.For example, if you use Visual Studio 2019, run
generate_cmake_vs2019_solution.bat
This script generates a Visual Studio solution for the application in the directory
<ProjectName>/Application/build_vs2019.In Visual Studio open the
<ProjectName>/Application/build_vs<Version>/<ProjectName>.slnVisual Studio solution for your project.In the Solution Explorer right-click the
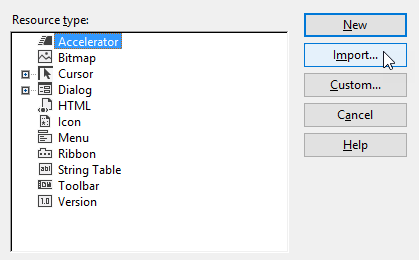
<ProjectName>project, select Add > Resource, click Import... and import the ico file that you placed to the<ProjectName>/Application/src/plugindirectory.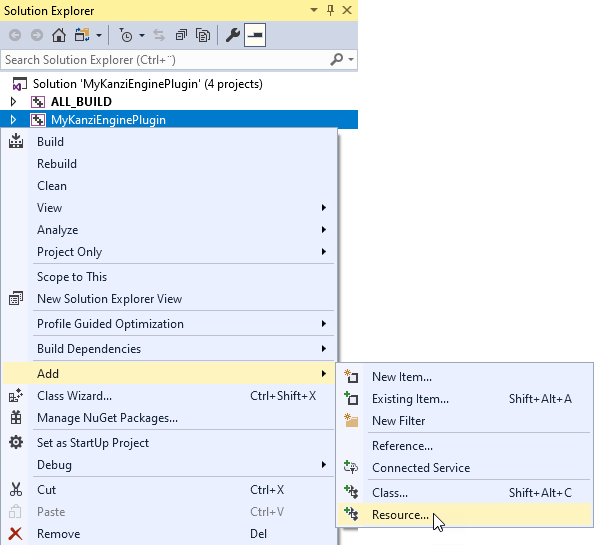
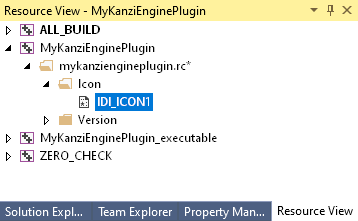
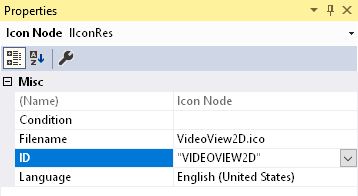
In the Solution Explorer in the
<ProjectName>project double-click the<ProjectName>.rc resource file to open it in the Resource View.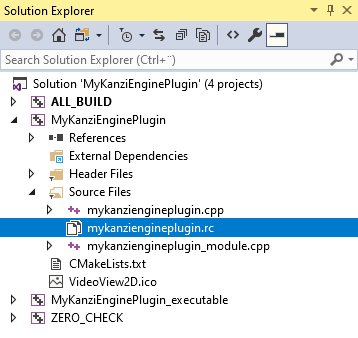
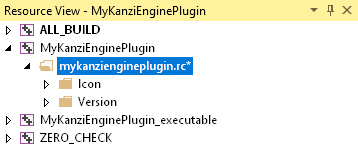
In the Resource View in the Icon directory, select the icon that you imported and in the Properties set the ID of the icon resource to the name of your node type in capital letters enclosed in quotation marks.
For example, if your node type is VideoView2D, set the ID to "VIDEOVIEW2D".
In Visual Studio build the plugin and copy the plugin DLL files to the same location where the previous versions of the plugins are located.
Visual Studio builds the plugin DLL files in the
<ProjectName>/Application/lib/<PlatformName>/<ConfigurationName>and the<ProjectName>/Application/build_vs<Version>/runtime/<ConfigurationName>directories.Kanzi Studio uses the plugin DLL in the
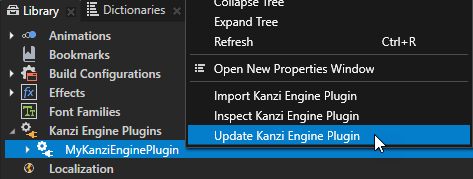
<ProjectName>/Application/libdirectory.In Kanzi Studio in the Library > Kanzi Engine Plugins right-click the plugin that you built and select Update Kanzi Engine Plugin.
When Kanzi Studio loads the plugin, it shows changes in the properties and classes defined in the plugin.
For an example where a custom node type uses its own icon, see Node2D plugin example.